Field Customization
Overview
The Field Customization module in Flinkk One Admin Center enables administrators to customize and configure fields for various CRM modules including Leads, Opportunities, Quotations, Companies, Contacts, Tasks, Events, Products, Price Books, and Packages. Additionally, Support module field customization allows configuration of ticket management fields.
CRM Module Customization
Understanding Module Tabs
Each CRM module has multiple tabs to organize different types of configuration. Understanding these tabs will help you effectively customize fields for your module:
Standard Fields Tab
The Standard Fields tab displays all built-in fields that come with the module. These fields are pre-configured and essential for the module's functionality. Standard fields include:
- System fields (e.g., Created By, Updated By)
- Module-specific required fields (e.g., Lead Name for Leads, Contact Name for Contacts)
- Common business fields (e.g., Email, Phone Number, Address)
You can view the configuration of standard fields but cannot delete them. However, you can control their visibility, requirement status, and other properties.
Custom Fields Tab
The Custom Fields tab is where you can add, edit, and manage custom fields specific to your business needs. This tab allows you to:
- Create new custom fields with various field types
- Edit existing custom fields to modify their properties
- Delete custom fields that are no longer needed
- Configure field visibility based on user roles
- Set field requirements for data validation
Module-Specific Tabs
Most modules have additional tabs for configuring module-specific options:
Leads Module:
- Lead Status: Configure different lead statuses (New, Qualified, Unqualified, etc.)
- Lead Source: Define lead sources (Website, Referral, Cold Call, Trade Show, etc.)
- Lead Stages: Set up lead pipeline stages
Opportunities Module:
- Opportunity Stages: Configure deal stages (Prospecting, Qualification, Proposal, Negotiation, Closed Won/Lost)
- Opportunity Status: Define status options for opportunities
Products Module:
- Units: Manage product units of measure
- Categories: Configure product categories
Companies Module:
- Account Types: Define company account types (e.g., Prospect, Customer, Vendor)
Contacts Module:
- Standard Fields and Custom Fields only
Tasks Module:
- Standard Fields and Custom Fields only
Adding Custom Fields to Modules
Custom fields allow you to extend the functionality of any CRM module to match your business requirements. Follow the steps below to add custom fields:
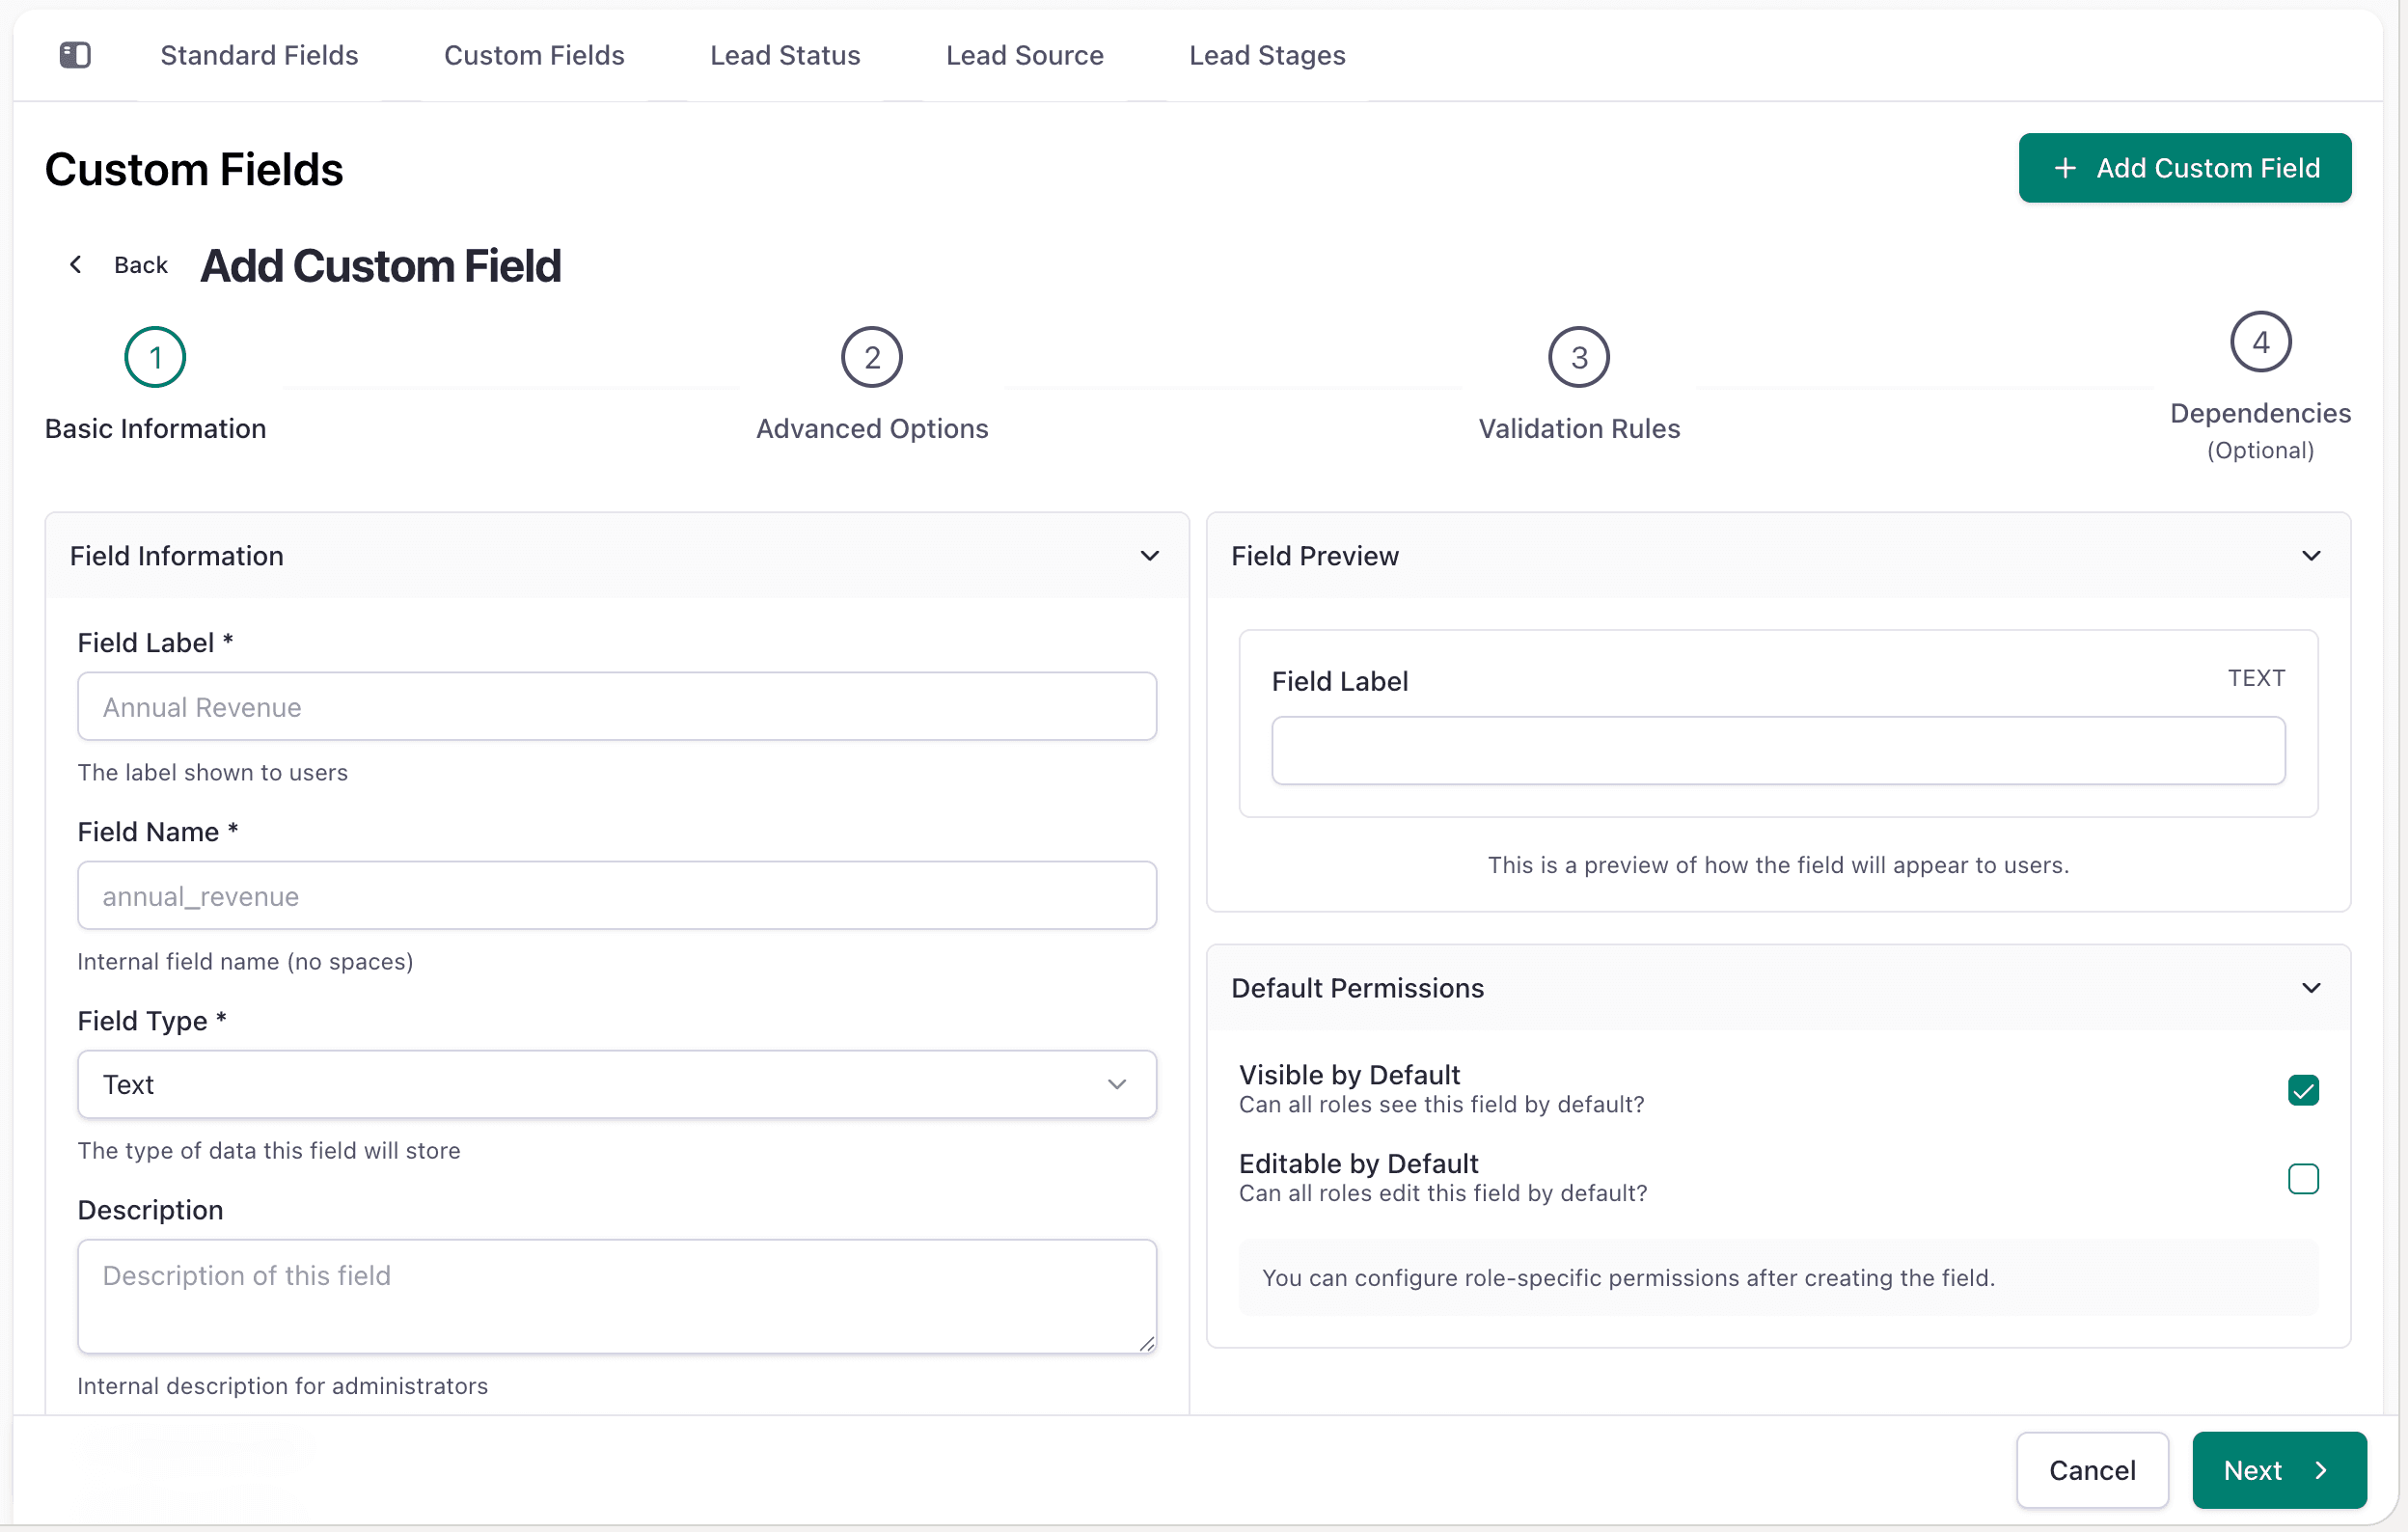
Step-by-Step Guide to Add Custom Fields
-
Navigate to Admin Center CRM Setup
- Go to Admin Center → CRM Setup → select your desired module (e.g., Leads, Opportunities, Companies, etc.)
-
Access the Custom Fields Tab
- Once in the module configuration page, click on the Custom Fields tab
- You will see a list of existing custom fields (if any) with options to edit or delete them
-
Click the Add Custom Field Button
- Look for the + Add Custom Field button (usually at the top or bottom of the Custom Fields list)
- Click it to open the custom field creation form
-
Configure Field Properties
Basic Information:
- Field Label: Enter a user-friendly name for the field (e.g., "Lead Score", "Industry Specialization")
- Field Key: The system automatically generates a unique identifier, but you can customize it (e.g., "leadScore", "industrySpec")
- Description: Optional - Add help text to guide users on how to fill this field
Field Configuration:
- Field Type: Select the appropriate data type:
- Text (single line)
- Long Text (textarea)
- Number
- Currency
- Percentage
- Date
- DateTime
- Dropdown/Select
- Multi-Select
- Checkbox
- Phone
- URL
- Lookup (reference to another record)
- Multi-Lookup
- File Upload
- Default Value: Set a pre-filled value when creating new records
- Required: Toggle to make the field mandatory for record creation
- Visible: Control which user roles can see this field
- Searchable: Enable field indexing for faster searches and filters
- Edit Permission: Define who can modify the field after record creation
-
For Dropdown/Select Fields
- If you selected Dropdown or Select, add the available options
- Each option will be available for selection when users fill out the form
- Example: For a "Priority" field, you might add options: High, Medium, Low
-
For Lookup Fields
- Select the module to link to (e.g., if creating a lookup in Opportunities, you might link to Companies)
- Configure which records can be selected and displayed
-
Save the Custom Field
- Click the Save button to create the custom field
- The field will immediately appear in the module's detail views and forms
- It will also become available in reports, filters, and workflows
Field Visibility and Permissions
After creating a custom field, you can control:
- Role-Based Visibility: Show/hide the field based on user roles
- Edit Permissions: Restrict editing to specific roles or the field creator
- Display in Lists: Choose whether the field appears in list views
- Required Status: Make the field mandatory for all users or specific roles
Best Practices for Custom Fields
- Use Descriptive Names: Field labels should clearly indicate the field's purpose
- Avoid Redundancy: Check standard fields before creating duplicates
- Limit Dropdown Options: Keep dropdown lists concise (under 50 options)
- Document Purpose: Add descriptions to help team members understand the field
- Test with Users: Have end-users test custom fields before full deployment
- Monitor Performance: Review unused custom fields periodically and archive them
- Maintain Consistency: Use standard naming conventions across all modules
Impact: After adding custom fields, they will be immediately reflected in the module's detail views, list views, and all module-related workflows within the CRM. Users will be able to see, edit, and filter by these new fields based on their assigned roles and permissions.
Module-Specific Customization
Leads
Customize fields for your lead management process:
- Field Name: Display name for the lead field
- Field Type: Select from Text, Textarea, Dropdown, Checkbox, Date, Number, Email, Phone, URL, Lookup
- Required: Mark field as mandatory for lead creation
- Default Value: Pre-populate field with default value
- Visibility: Control field visibility based on user roles
- Search: Enable field for lead search functionality
How to Customize Lead Fields
- Navigate to Admin Center → CRM Setup → Leads
- Click on the Fields tab
- Click Add Field or select existing field to edit
- Configure field properties:
- Enter field name (e.g., "Lead Source", "Industry", "Budget")
- Select field type from dropdown
- Toggle "Required" if field must be filled
- Set default values if applicable
- Configure visibility rules
- Click Save
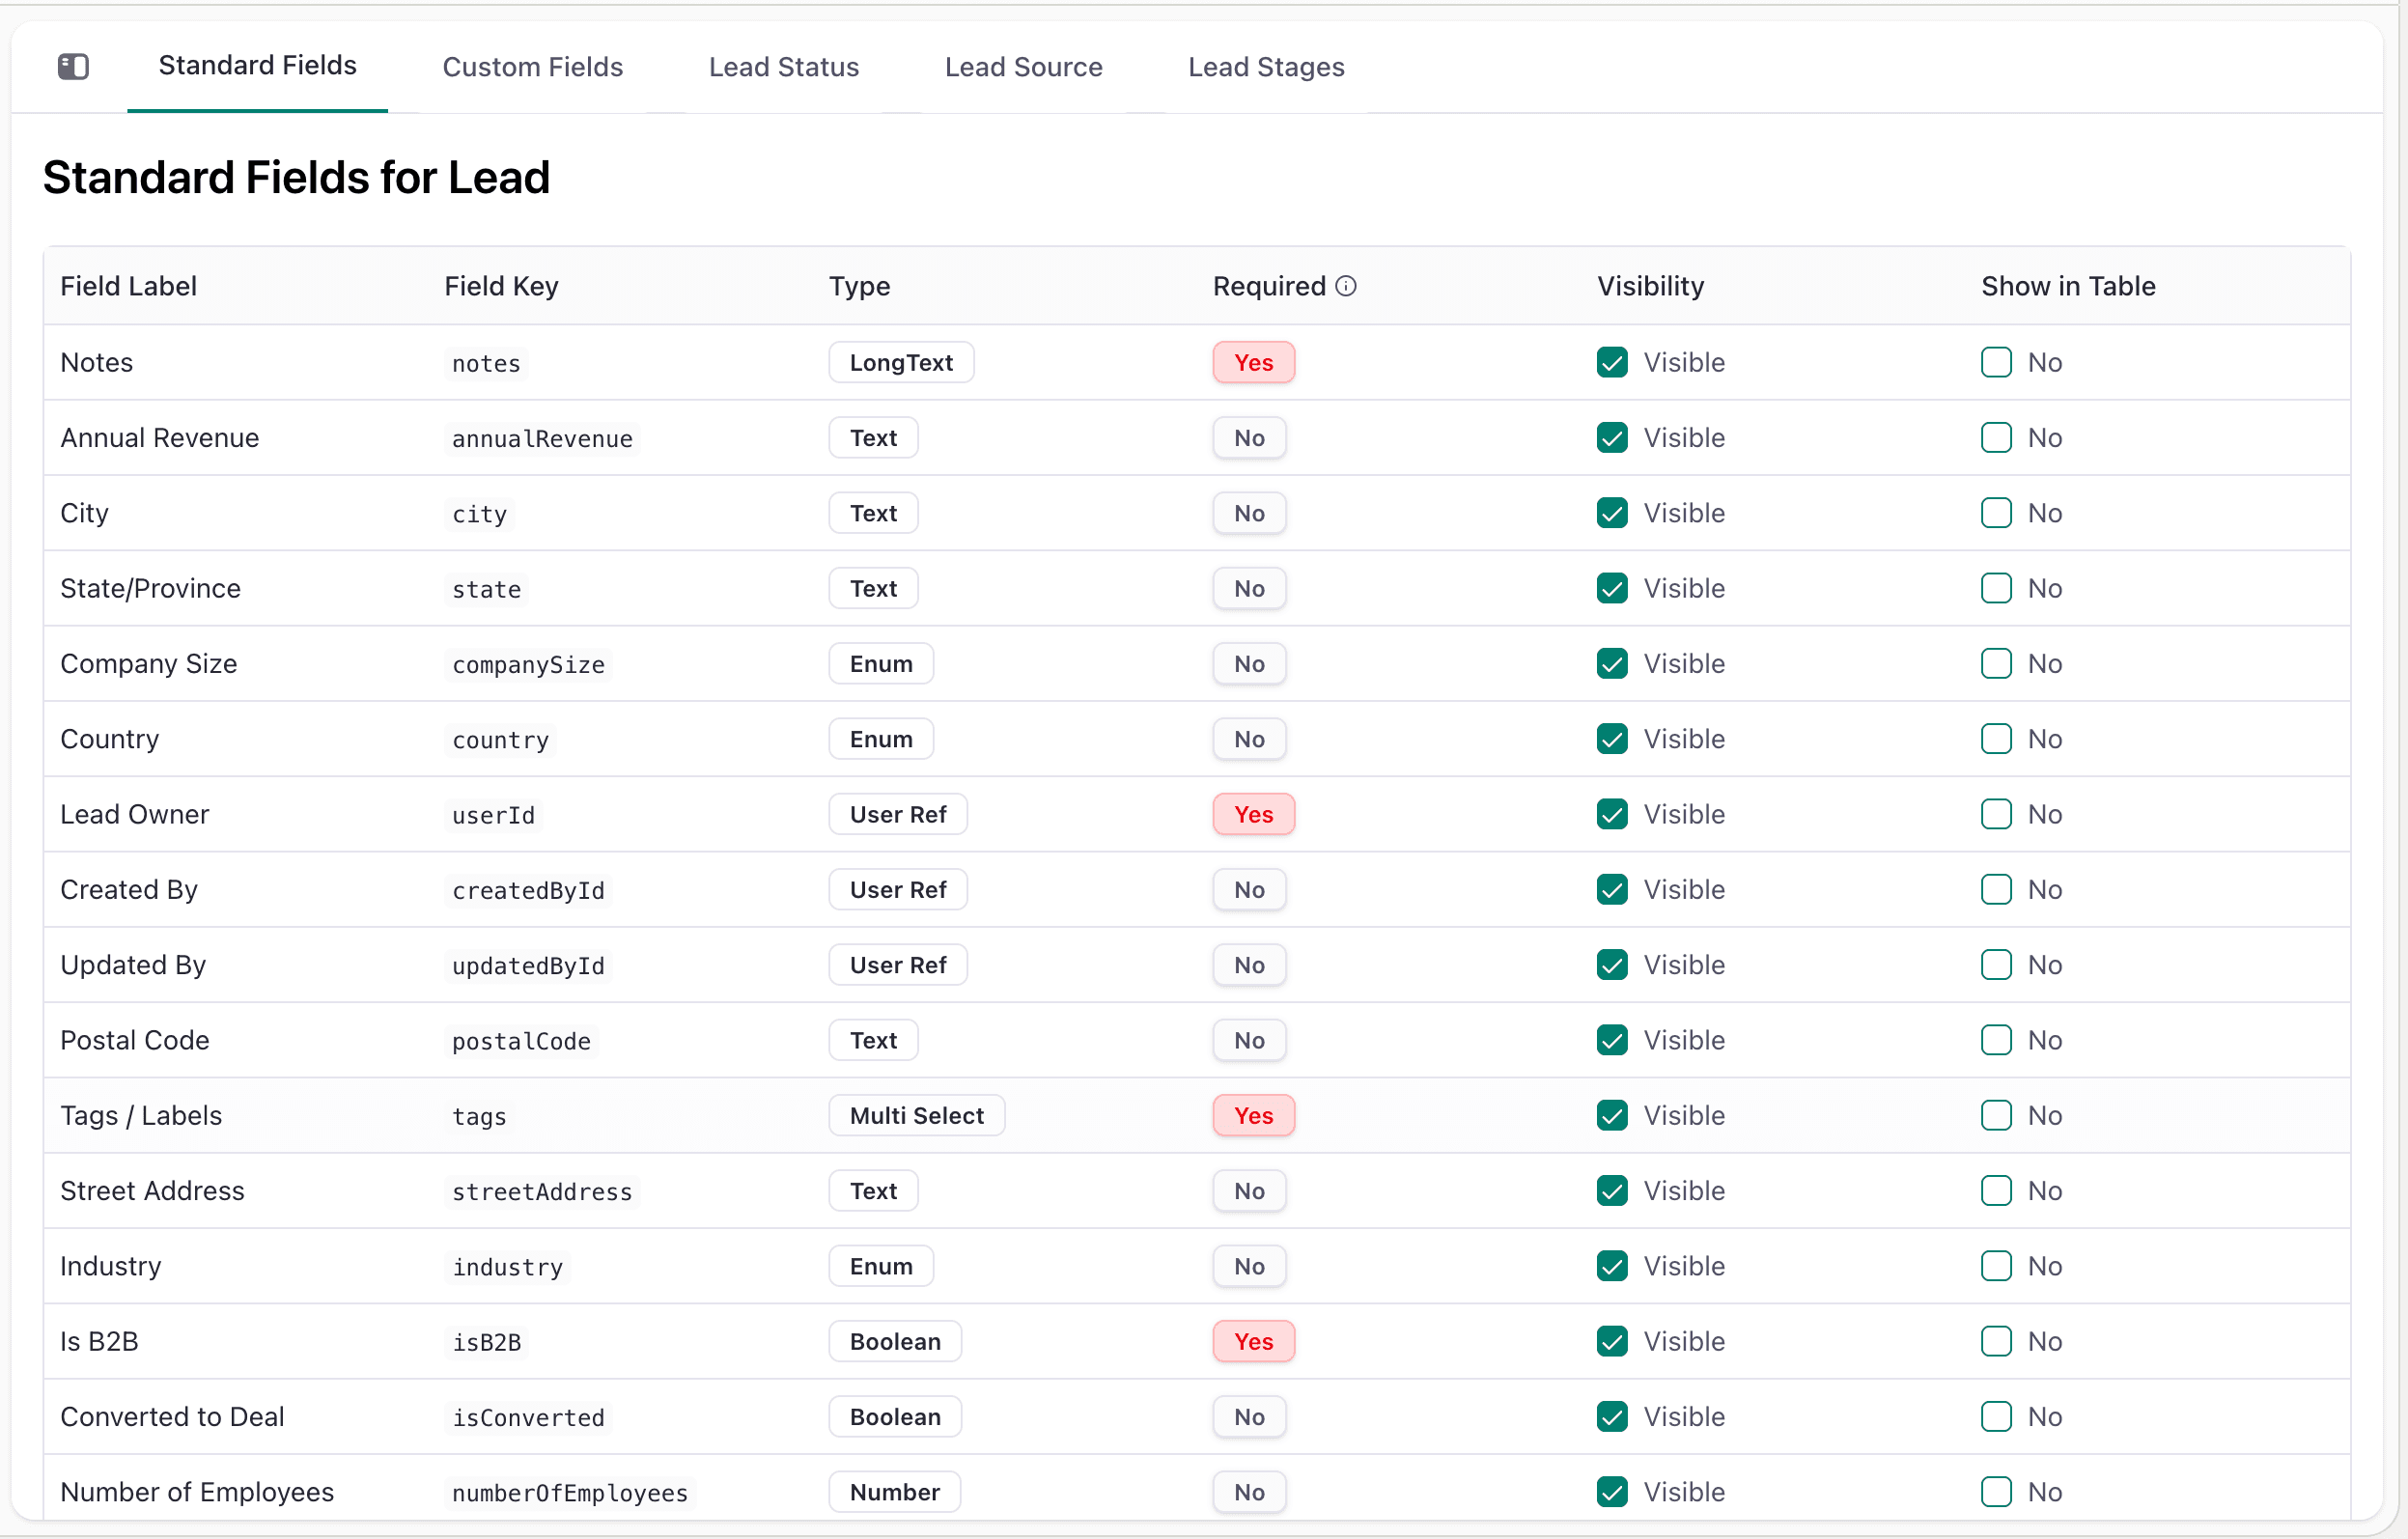
Impact: These field customizations will be immediately reflected in the Flinkk One CRM Leads module. Any changes made to lead fields will appear in the lead detail views, list views, and all lead-related workflows within the CRM.
Example Lead Fields:
- Lead Source (Dropdown: Website, Referral, Cold Call, Trade Show)
- Industry (Dropdown: Technology, Finance, Healthcare, Manufacturing)
- Budget (Number with currency format)
- Decision Timeline (Date field)
- Number of Employees (Number field)
Opportunities
Configure fields for opportunity/deal tracking:
- Opportunity Name: Text field for deal identifier
- Amount: Number field for deal value
- Stage: Dropdown field for deal stage (Prospecting, Qualification, Proposal, Negotiation, Closed Won/Lost)
- Expected Close Date: Date field for projected closure
- Probability: Percentage field for win probability
- Description: Text area for opportunity details
How to Customize Opportunity Fields
- Navigate to Admin Center → CRM Setup → Opportunities
- Click on Fields tab
- Add or edit fields using same process as Leads
- Common customizations include:
- Adding custom deal stages
- Creating product/service-specific fields
- Configuring revenue recognition fields
- Click Save
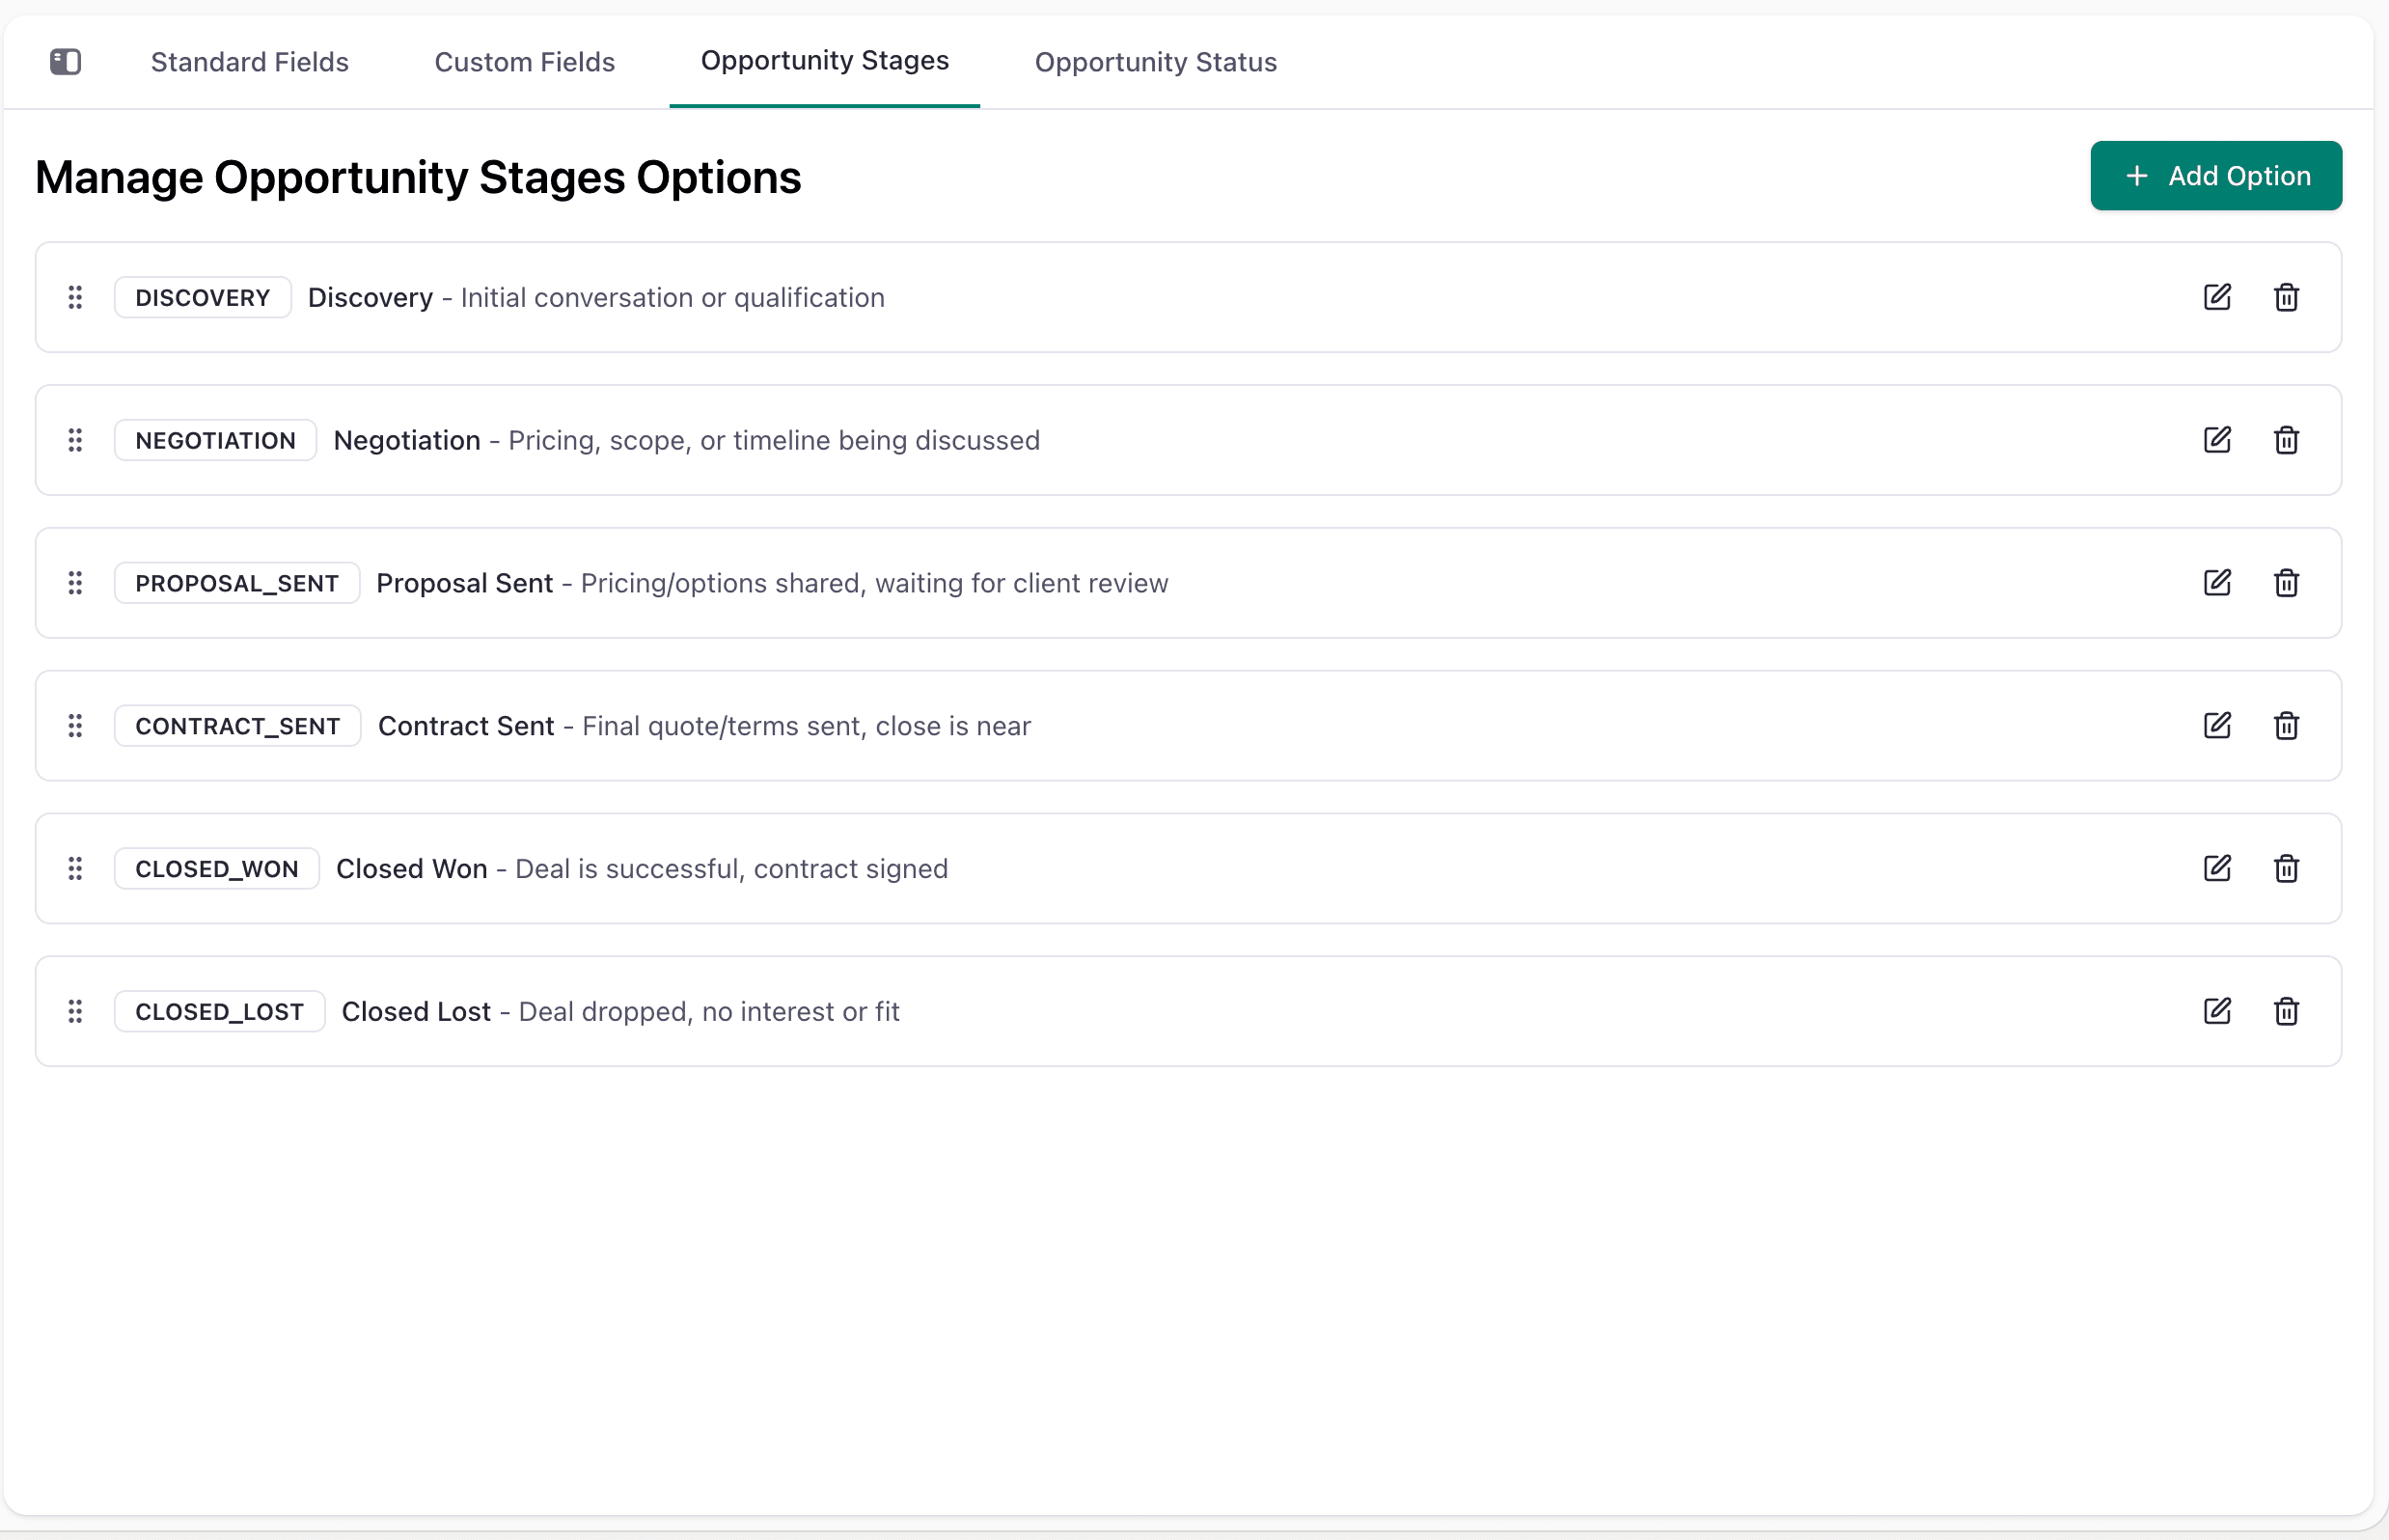
Impact: These field customizations will be immediately reflected in the Flinkk One CRM Opportunities module. Any changes made to opportunity fields will appear in the opportunity detail views, list views, kanban board, and all opportunity-related workflows within the CRM.
Example Opportunity Fields:
- Deal Type (Dropdown: New Business, Expansion, Renewal)
- Competitor (Lookup to Company)
- Expected Revenue (Number with currency)
- Approval Status (Dropdown: Pending, Approved, Rejected)
Quotations
Customize quotation/proposal fields:
- Quote Number: Auto-generated unique identifier
- Total Amount: Auto-calculated from line items
- Tax: Configurable tax field
- Discount: Discount amount or percentage
- Validity Period: Date range for quote validity
- Custom Terms: Text area for additional terms and conditions
How to Customize Quotation Fields
- Navigate to Admin Center → CRM Setup → Quotations
- Configure fields for quote creation and management
- Set up automatic calculations for totals, taxes, and discounts
- Define quote status workflow (Draft, Sent, Accepted, Rejected, Expired)
- Click Save
Impact: These field customizations will be immediately reflected in the Flinkk One CRM Quotations module. Any changes made to quotation fields will appear in the quotation detail views, quote generation templates, and all quotation-related workflows within the CRM.
Companies (Accounts)
Customize company/account information fields:
- Company Name: Text field for company identifier
- Industry: Dropdown for business sector
- Company Size: Dropdown for employee count ranges
- Website: URL field for company website
- Phone: Phone field for company contact
- Address: Multi-line address fields (Street, City, State, Postal Code, Country)
- Annual Revenue: Number field for revenue tracking
- Tax ID: Text field for tax identification
How to Customize Company Fields
- Navigate to Admin Center → CRM Setup → Companies
- Add fields for your company information requirements
- Common customizations:
- Custom industry categories
- Company classification fields
- Account tier/segment fields
- Billing vs. shipping address fields
- Click Save
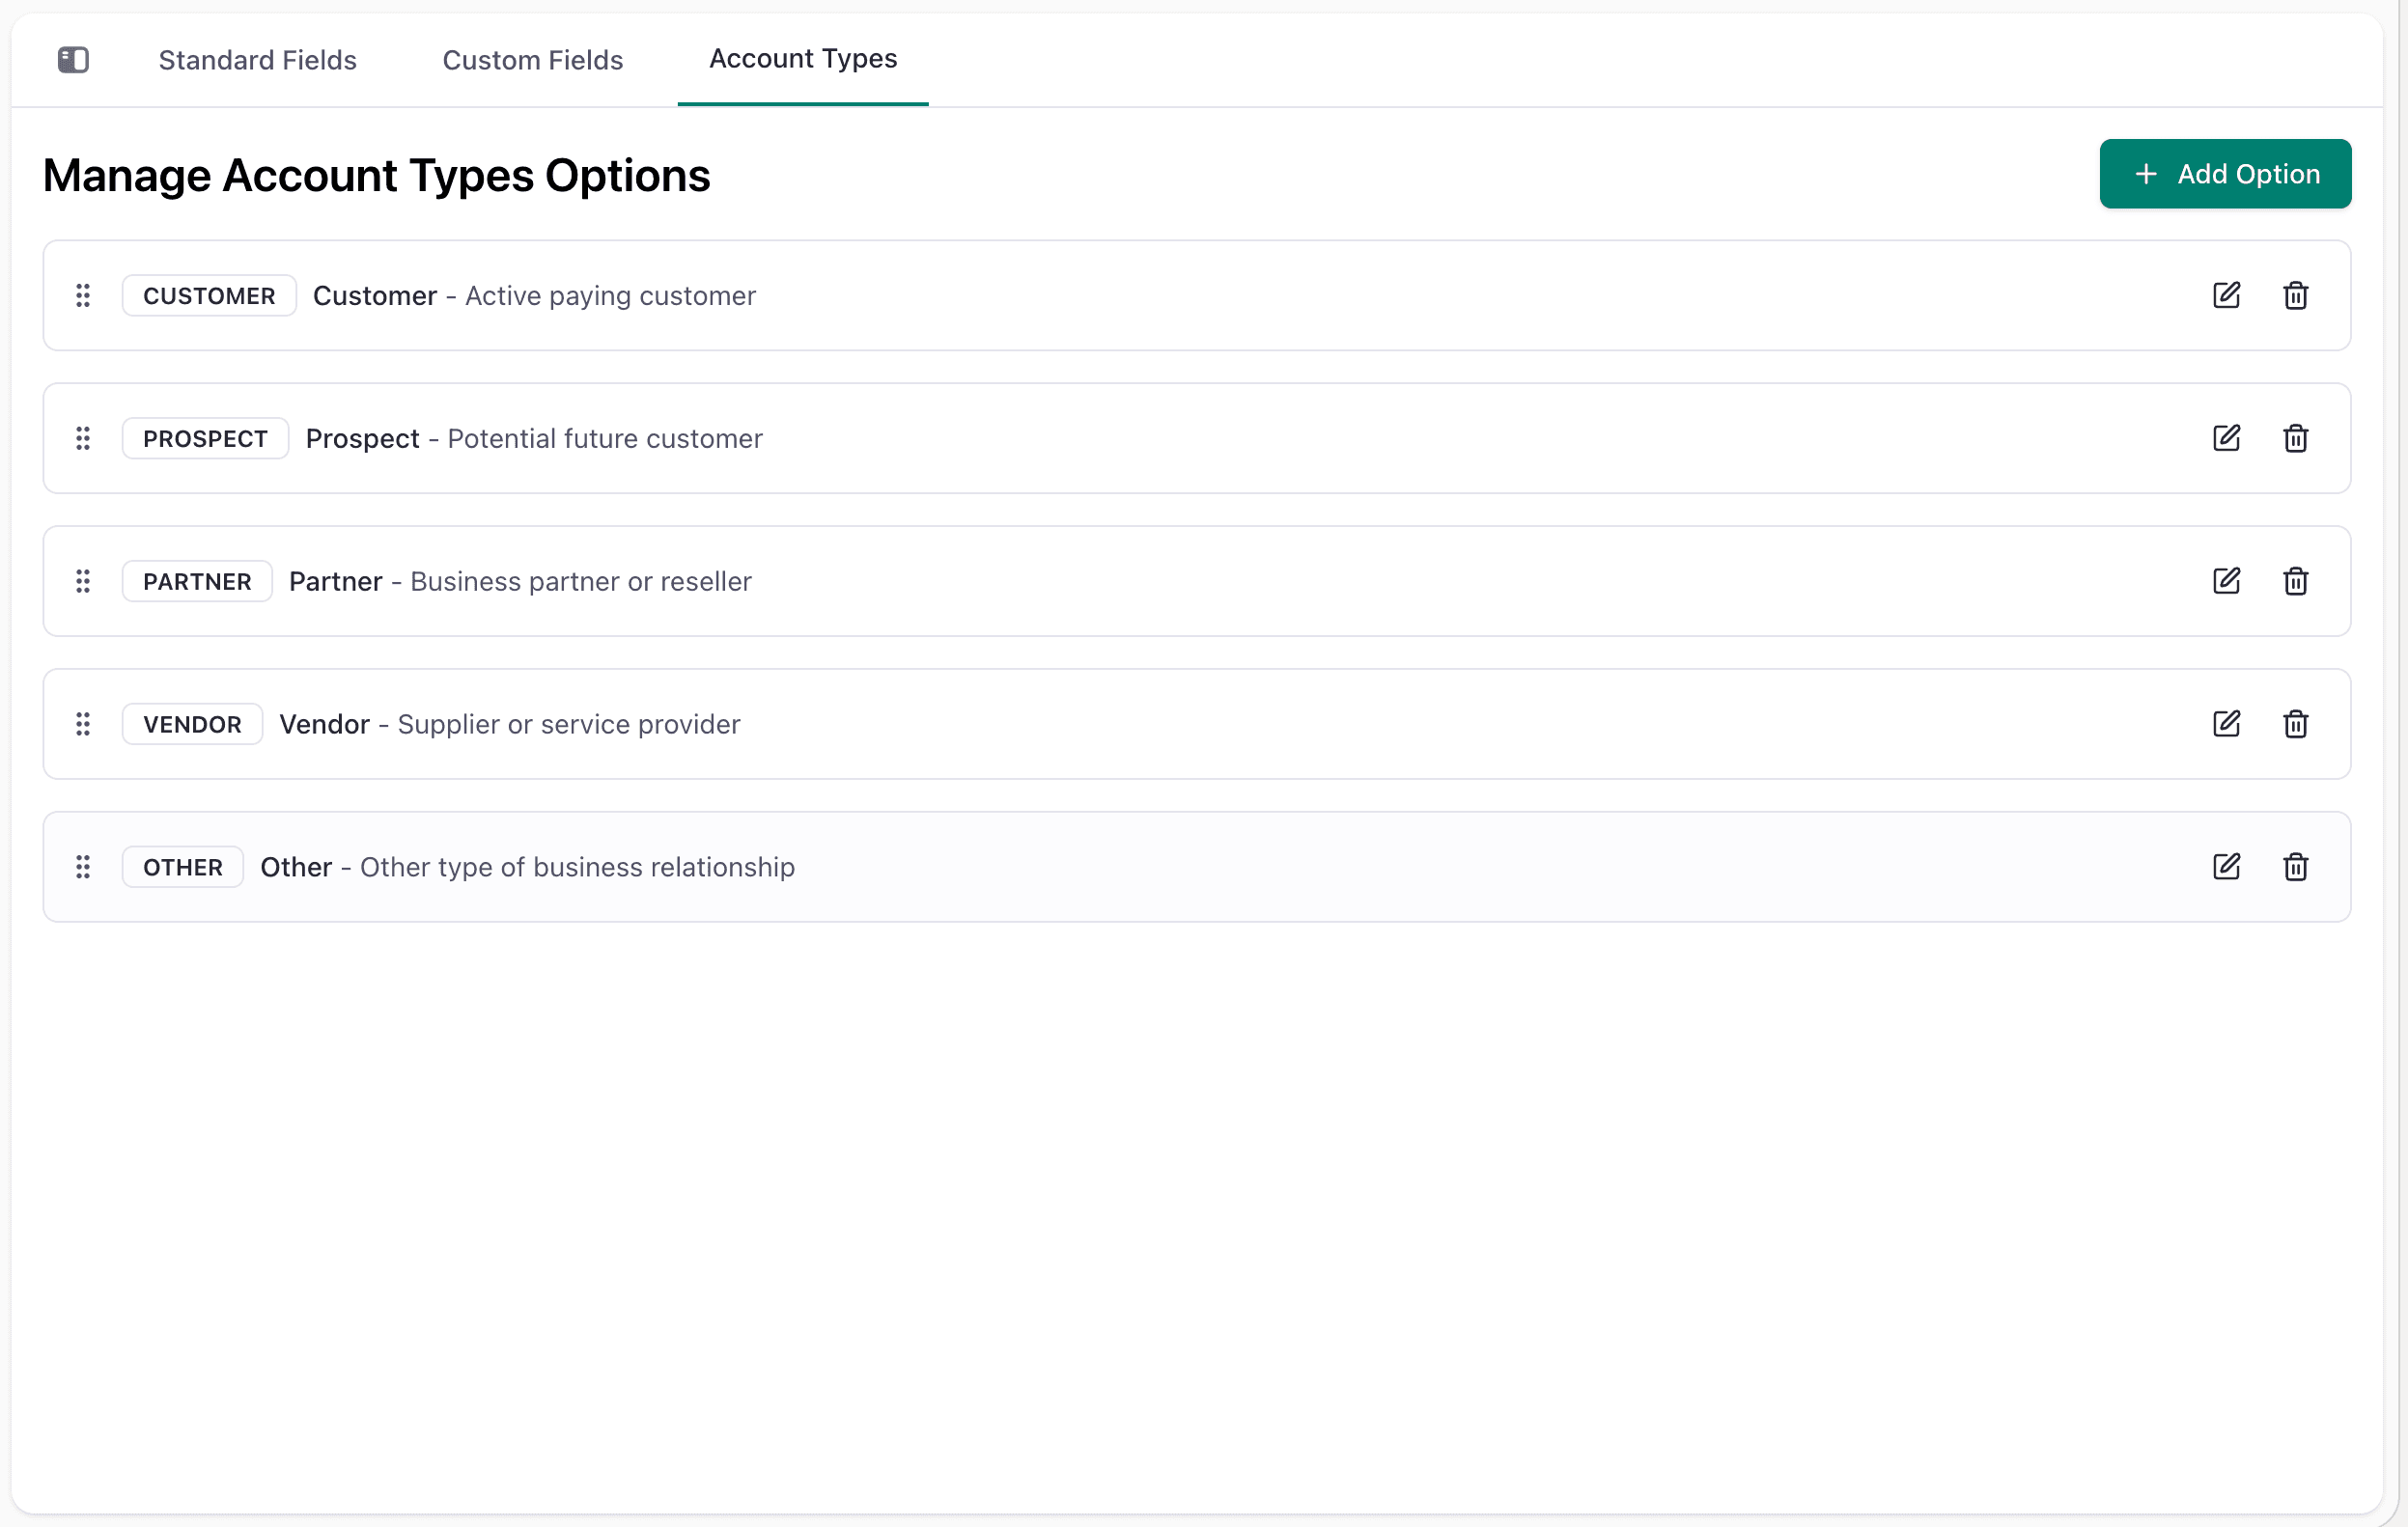
Impact: These field customizations will be immediately reflected in the Flinkk One CRM Companies module. Any changes made to company fields will appear in the company detail views, company list views, and all company-related workflows within the CRM.
Example Company Fields:
- Account Tier (Dropdown: Enterprise, Mid-Market, SMB)
- Founded Year (Number field)
- Parent Company (Lookup field)
- Billing Contact (Lookup to Contact)
Contacts
Customize contact/person fields:
- First Name: Text field for first name
- Last Name: Text field for last name
- Email: Email field for primary contact
- Phone: Phone field for contact number
- Mobile: Phone field for mobile number
- Job Title: Text field for contact's position
- Department: Dropdown for contact's department
- Reports To: Lookup field for manager/supervisor
How to Customize Contact Fields
- Navigate to Admin Center → CRM Setup → Contacts
- Configure contact information fields
- Set up role-specific fields if needed
- Enable/disable fields based on business process
- Click Save
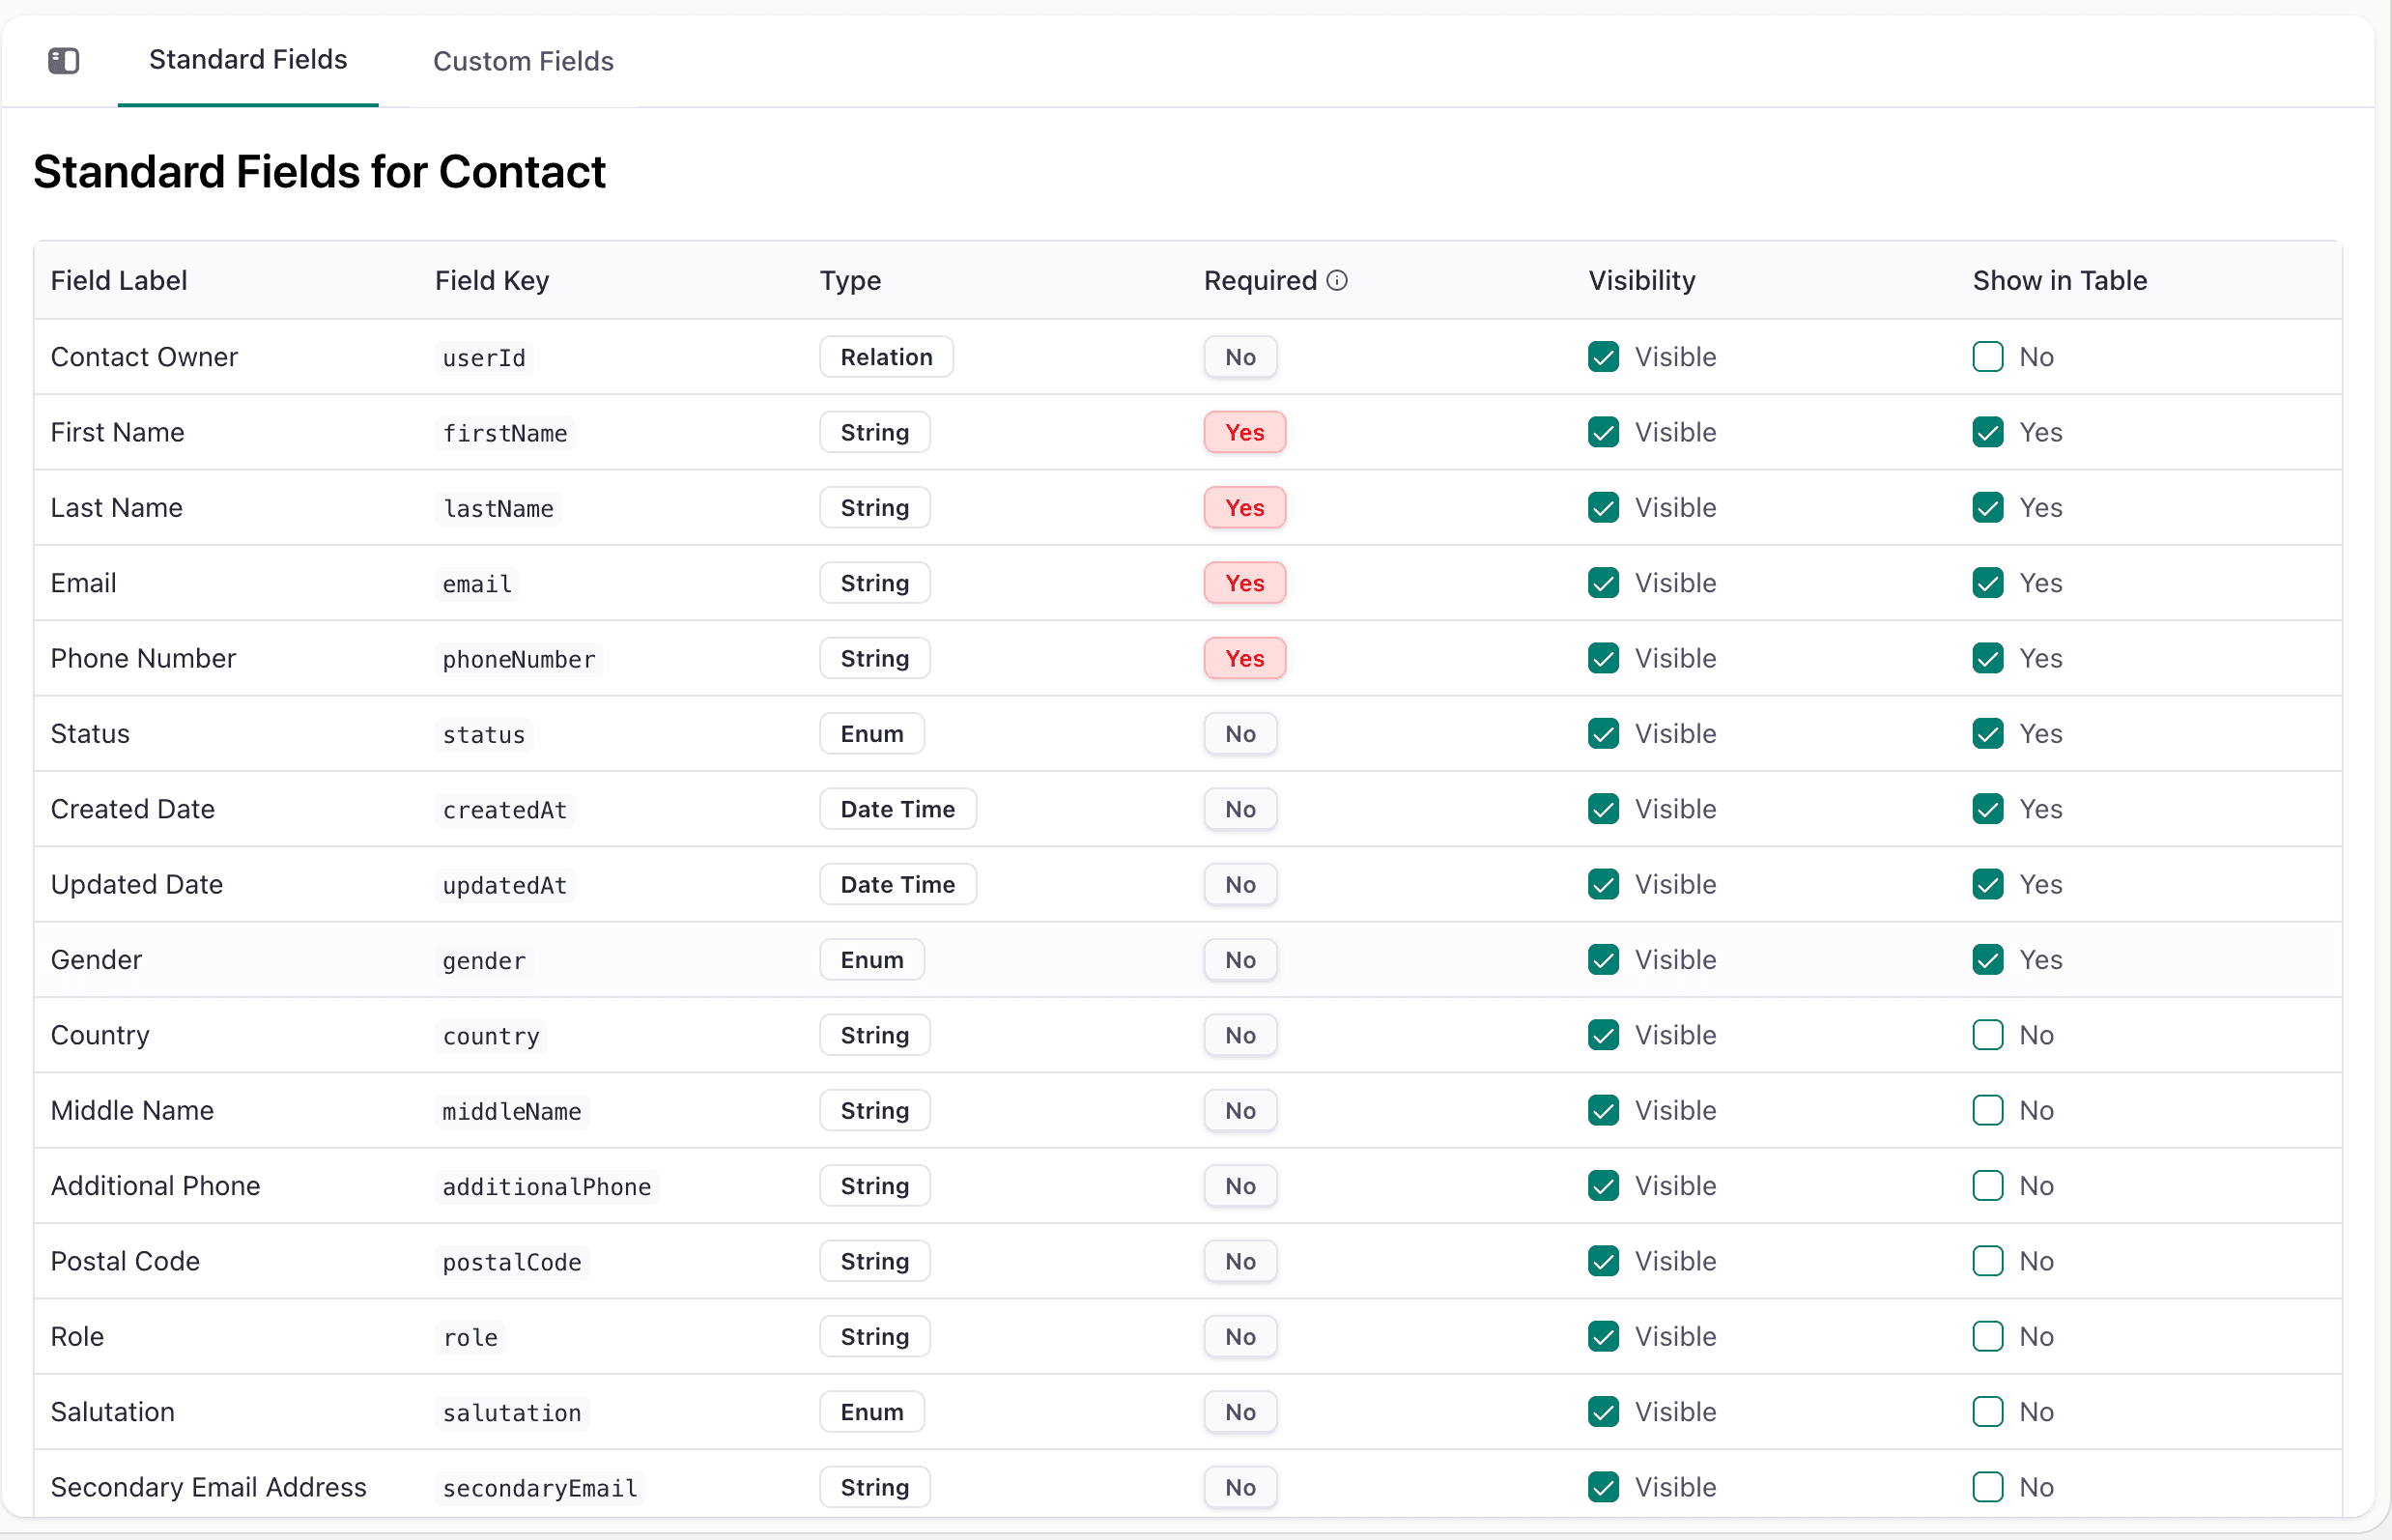
Impact: These field customizations will be immediately reflected in the Flinkk One CRM Contacts module. Any changes made to contact fields will appear in the contact detail views, contact list views, and all contact-related workflows within the CRM.
Tasks
Customize task/activity fields:
- Subject: Text field for task name
- Description: Text area for task details
- Due Date: Date field for task deadline
- Priority: Dropdown (High, Medium, Low)
- Status: Dropdown (Open, In Progress, Completed, Cancelled)
- Assigned To: Lookup field for task owner
- Related To: Lookup field for associated record
How to Customize Task Fields
- Navigate to Admin Center → CRM Setup → Tasks
- Add custom task fields as needed
- Configure task status workflow
- Set up task categories or types if required
- Click Save
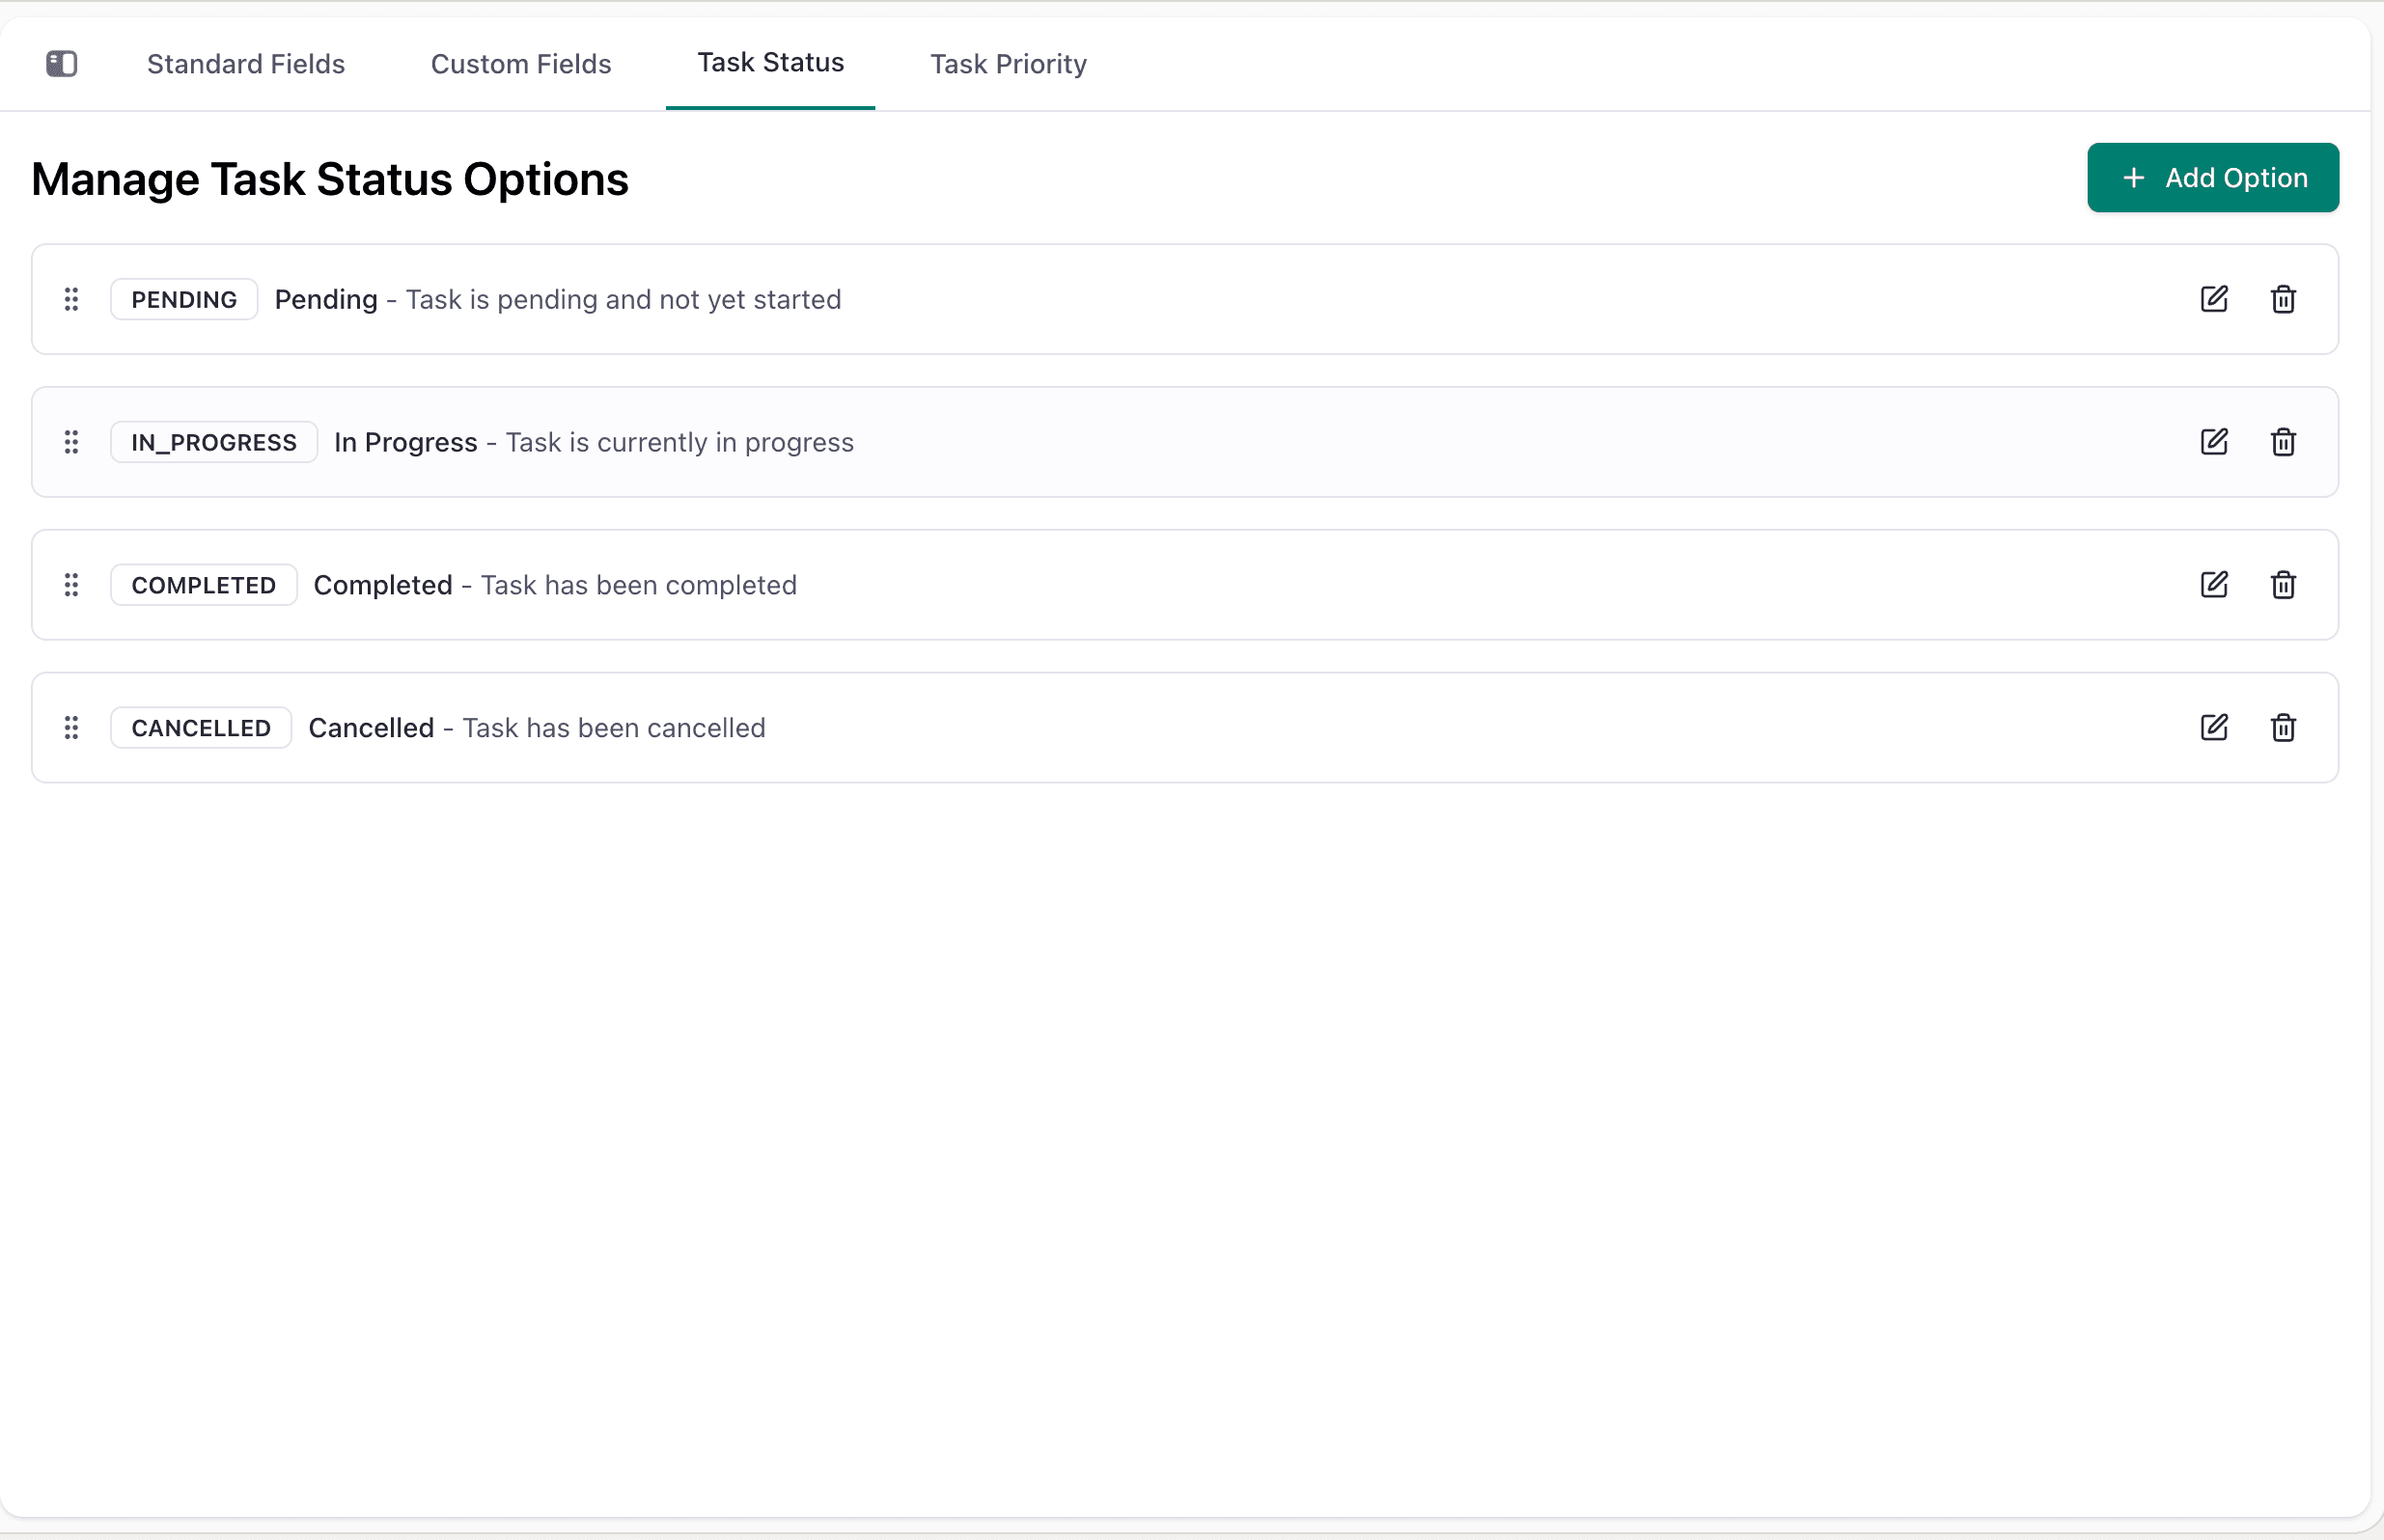
Impact: These field customizations will be immediately reflected in the Flinkk One CRM Tasks module. Any changes made to task fields will appear in the task detail views, task list views, and all task-related workflows within the CRM.
Events
Customize event/meeting fields:
- Event Name: Text field for event identifier
- Start Date/Time: Date and time fields
- End Date/Time: Date and time fields
- Location: Text field for event location
- Description: Text area for event details
- Attendees: Multi-select lookup for event participants
- Related To: Lookup field for associated record
How to Customize Event Fields
- Navigate to Admin Center → CRM Setup → Events
- Configure event information fields
- Set up event types or categories if needed
- Click Save
Impact: These field customizations will be immediately reflected in the Flinkk One CRM Events module. Any changes made to event fields will appear in the event detail views, event list views, and all event-related workflows within the CRM.
Products
Customize product/service fields:
- Product Name: Text field for product identifier
- Product Code: Text field for SKU or product code
- Category: Dropdown for product category
- Unit Price: Number field for product price
- Description: Text area for product details
- Tax Rate: Number field for tax percentage
- Status: Dropdown (Active, Inactive)
How to Customize Product Fields
- Navigate to Admin Center → CRM Setup → Products
- Add custom product fields
- Configure product categories
- Set up product attributes or specifications fields
- Click Save
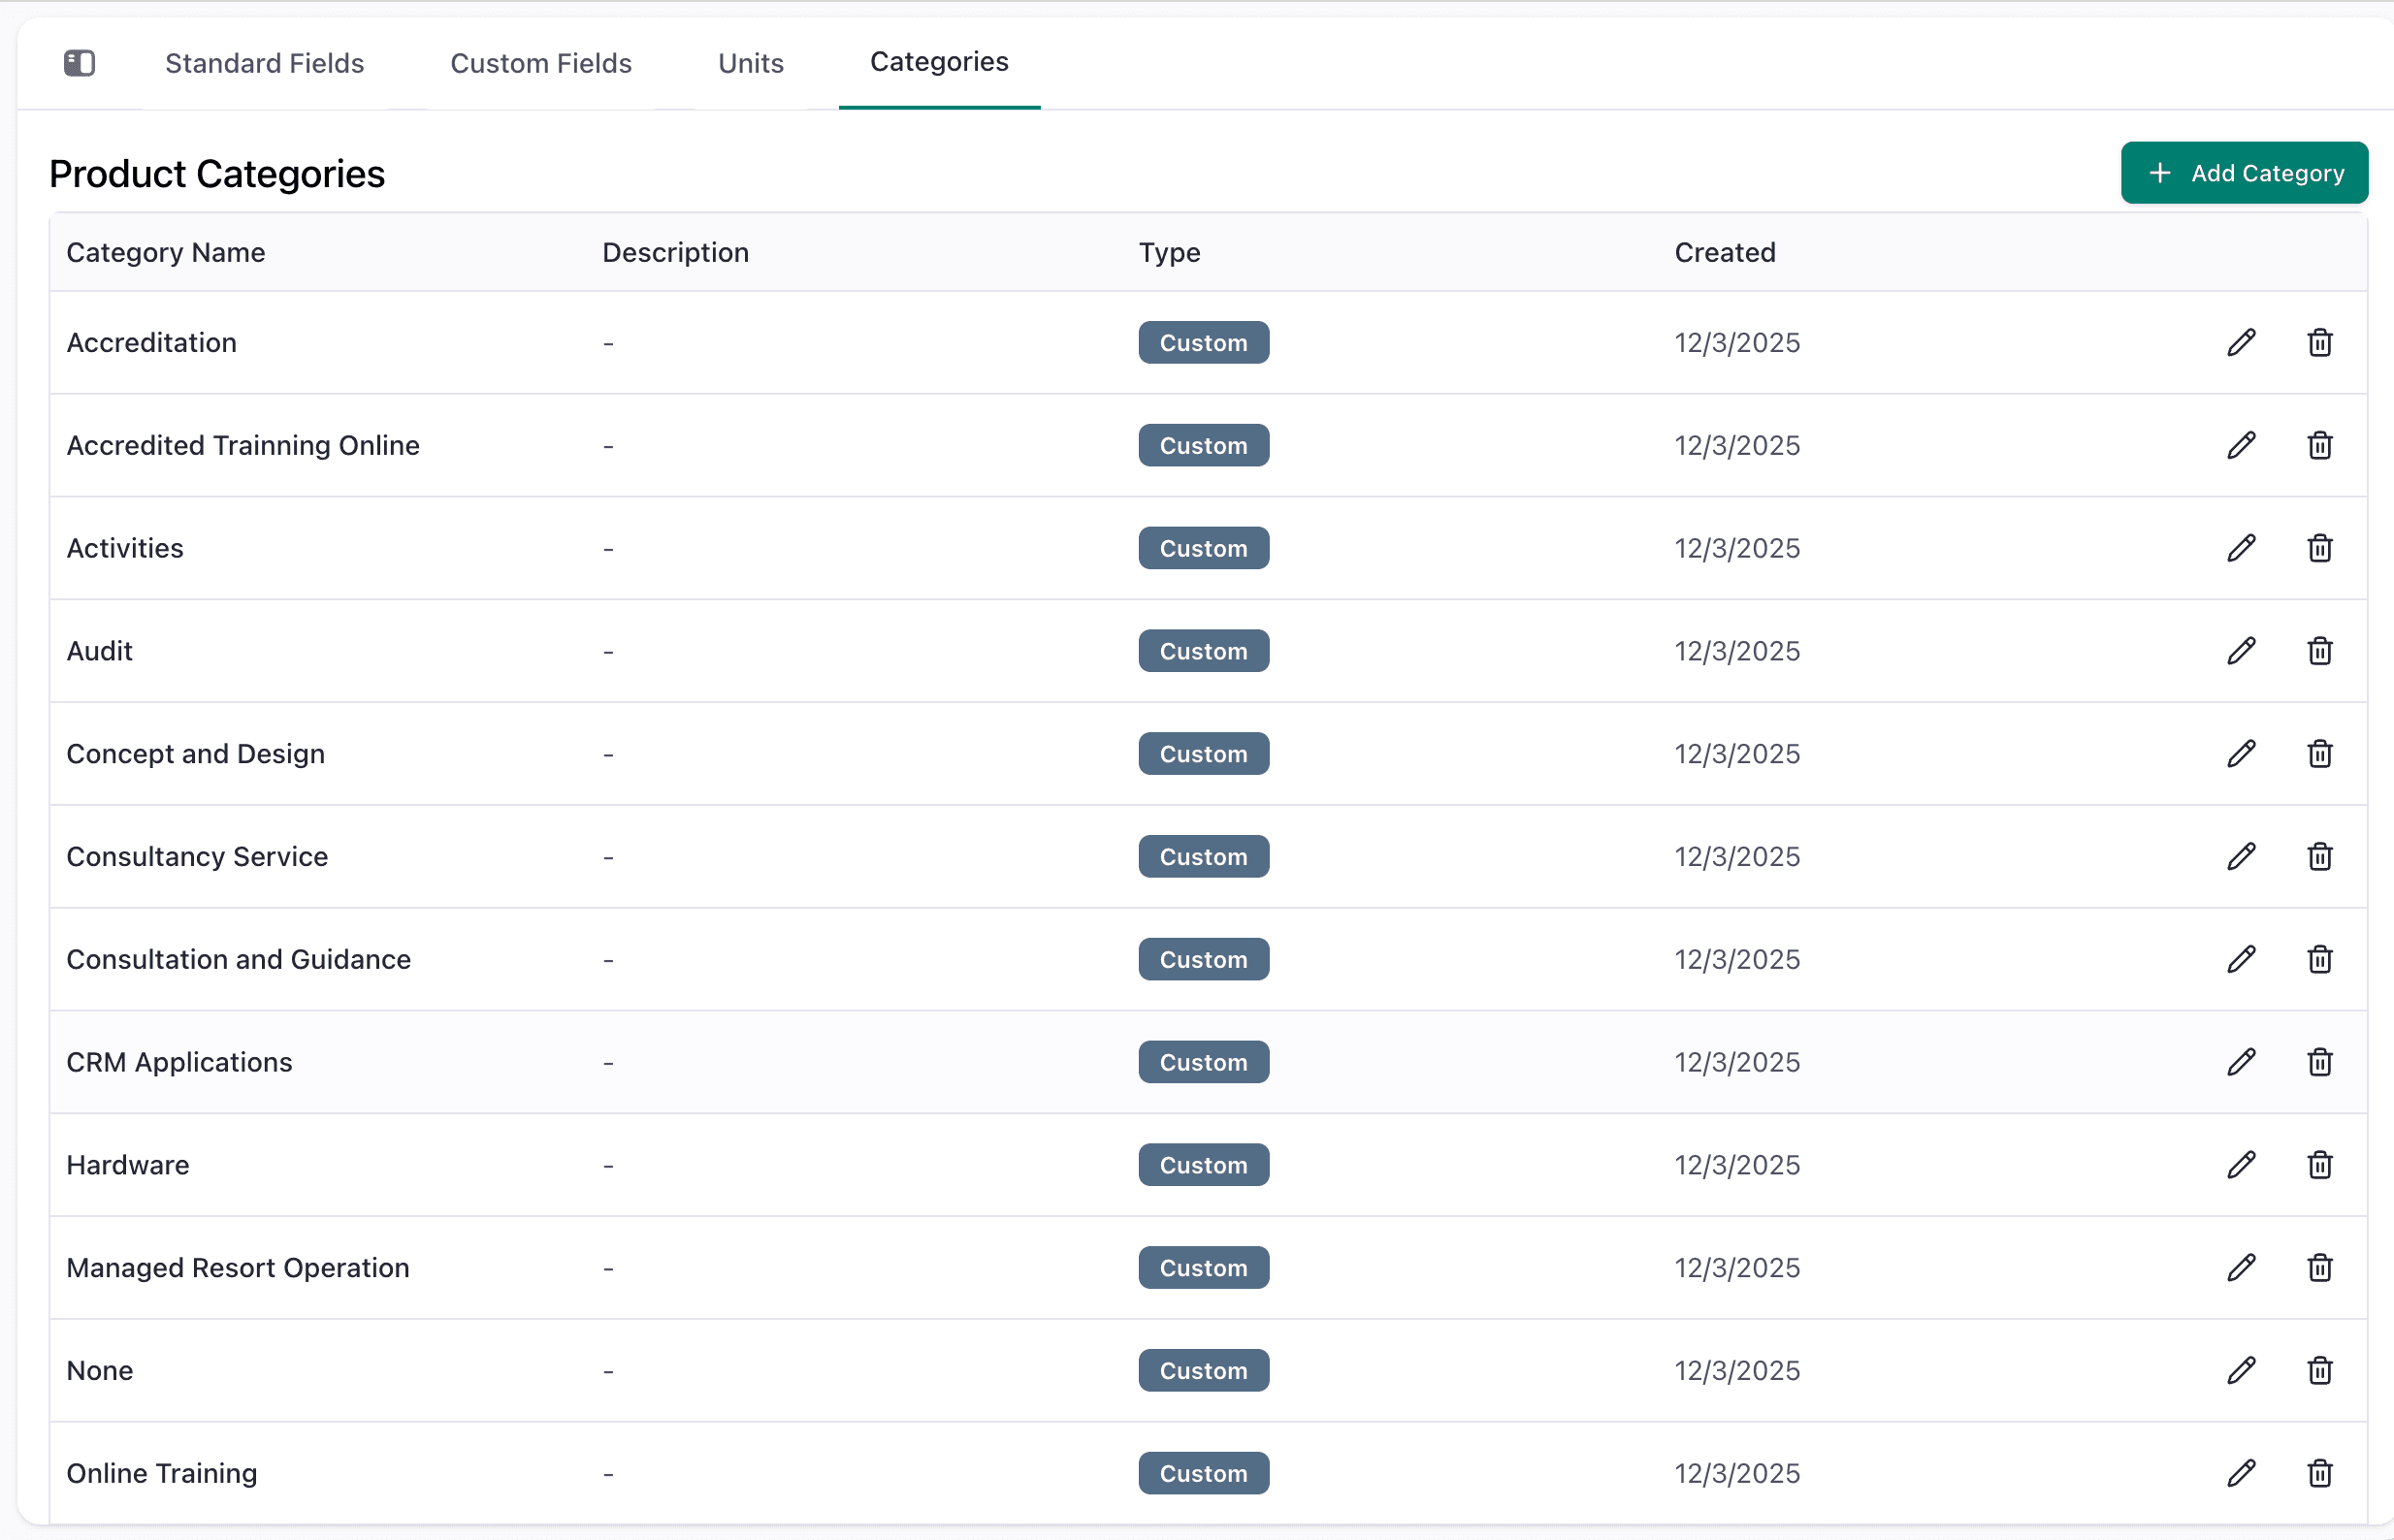
Impact: These field customizations will be immediately reflected in the Flinkk One CRM Products module. Any changes made to product fields will appear in the product detail views, product list views, and all product-related workflows within the CRM.
Price Books
Customize price book configuration:
- Price Book Name: Text field for price book identifier
- Currency: Dropdown for pricing currency
- Effective Date: Date field for price book start date
- Description: Text area for price book details
- Status: Dropdown (Active, Archived)
How to Customize Price Book Fields
- Navigate to Admin Center → CRM Setup → Price Books
- Configure price book fields
- Set up pricing tiers if needed
- Click Save
Impact: These field customizations will be immediately reflected in the Flinkk One CRM Price Books module. Any changes made to price book fields will appear in the price book detail views and all price book-related workflows within the CRM.
Packages
Customize package/bundle fields:
- Package Name: Text field for package identifier
- Description: Text area for package details
- Included Products: Multi-select lookup for bundled products
- Total Value: Auto-calculated field
- Discount: Discount percentage or amount
- Status: Dropdown (Active, Inactive)
How to Customize Package Fields
- Navigate to Admin Center → CRM Setup → Packages
- Configure package fields
- Set up package templates for common bundles
- Click Save
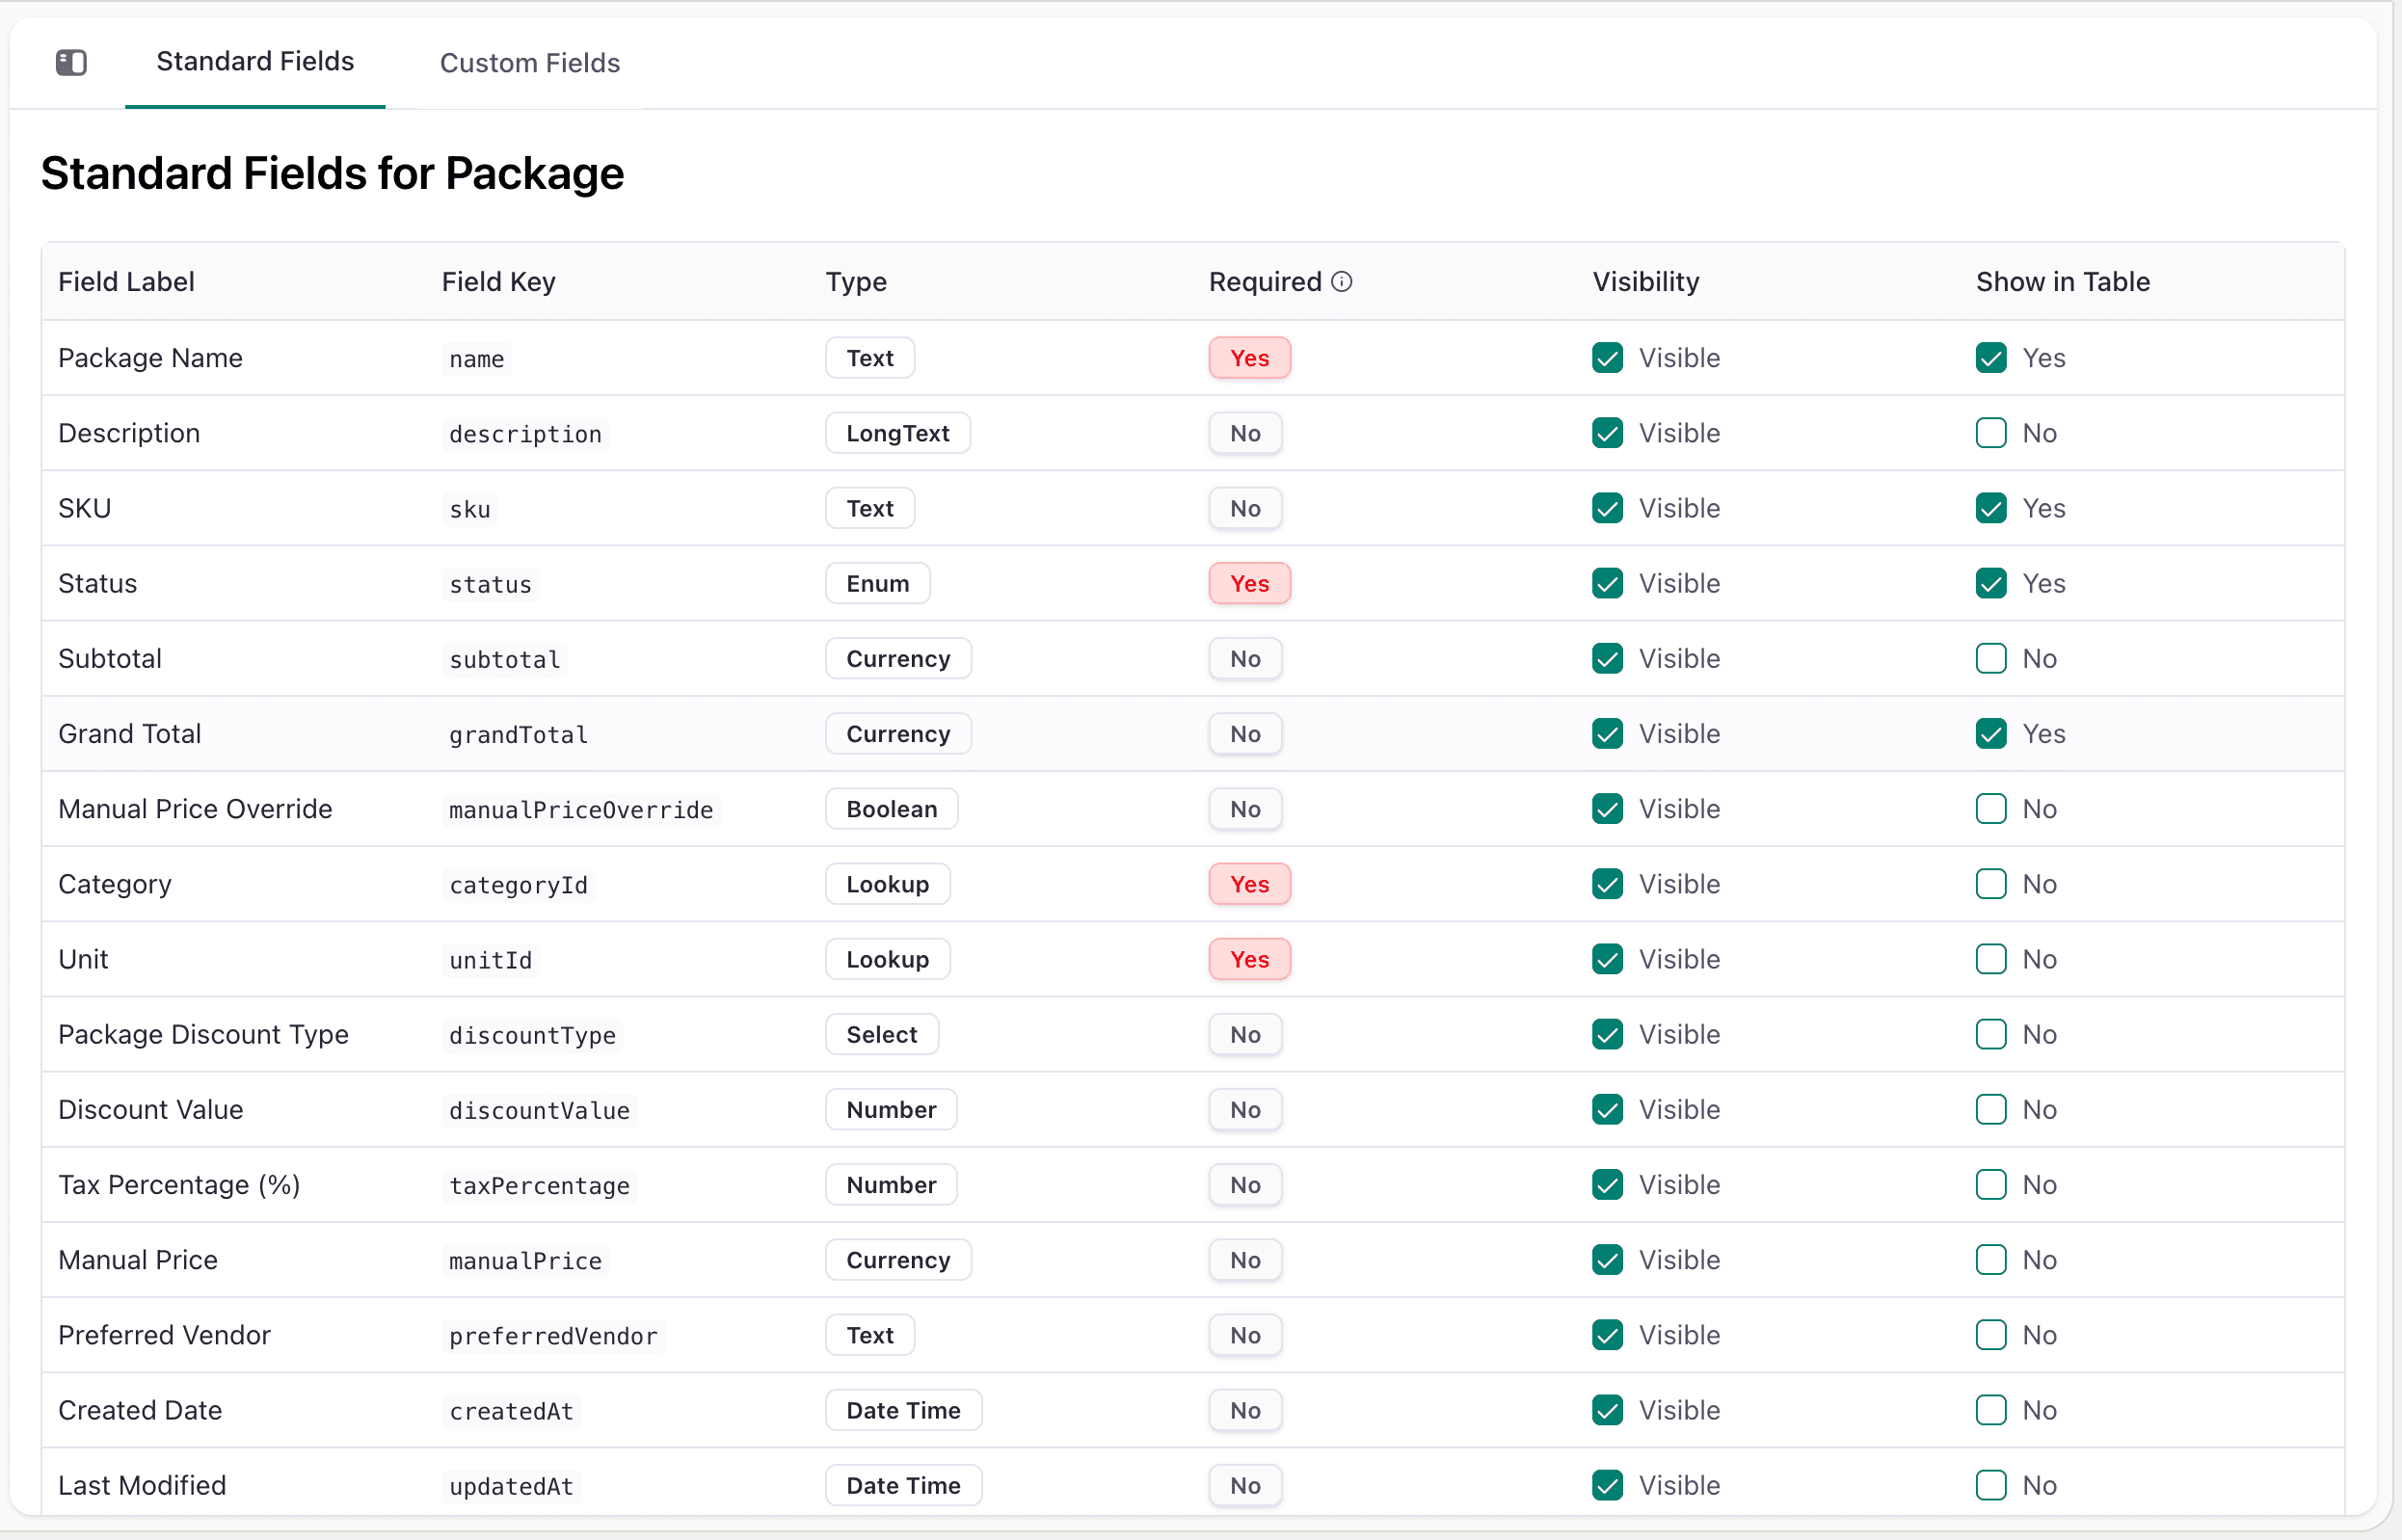
Impact: These field customizations will be immediately reflected in the Flinkk One CRM Packages module. Any changes made to package fields will appear in the package detail views, package list views, and all package-related workflows within the CRM.
Support Module Customization
Support Setup
Customize fields for support ticket management:
Ticket Fields
- Ticket Number: Auto-generated unique identifier
- Subject: Text field for ticket title
- Description: Text area for ticket details
- Priority: Dropdown (Critical, High, Medium, Low)
- Status: Dropdown (New, Open, In Progress, On Hold, Resolved, Closed)
- Category: Dropdown for ticket category
- Assigned To: Lookup field for support agent
- Created By: Auto-populated field for ticket creator
- Related To: Lookup field for associated record (Company, Contact, etc.)
How to Customize Support Fields
- Navigate to Admin Center → CRM Setup → Support Setup
- Click on Ticket Fields tab
- Add or edit ticket fields
- Configure ticket status workflow
- Set up ticket categories and priorities
- Click Save
Impact: These field customizations will be immediately reflected in the Flinkk One Support module. Any changes made to ticket fields will appear in the ticket detail views, ticket list views, and all support-related workflows within the Support system.
Example Custom Support Fields:
- SLA Status (Dropdown: On Track, At Risk, Breached)
- Resolution Target Date (Date field)
- Customer Impact (Dropdown: High, Medium, Low)
- Internal Notes (Text area, visible only to support team)
Field Types
Available field types for customization:
- Text: Single line text input (max 255 characters)
- Textarea: Multi-line text input for longer content
- Dropdown/Select: Single selection from predefined list of options
- Multi-Select: Multiple selections from predefined list
- Checkbox: Boolean yes/no field
- Date: Calendar date selector
- DateTime: Date and time selector
- Number: Numeric values with optional decimal places
- Currency: Numeric field with currency formatting
- Percentage: Numeric field for percentage values (0-100)
- Email: Email address field with validation
- Phone: Phone number field with formatting
- URL: Web address field with validation
- Lookup: Reference to another record in the system
- Multi-Lookup: Multiple references to other records
- File Upload: Attachment field for file storage
Field Properties
Common properties available for all field types:
- Required: Mark field as mandatory. Records cannot be created or saved without filling required fields.
- Default Value: Pre-populate field with default value when creating new records. Reduces data entry and ensures consistency.
- Visibility: Control field visibility based on:
- User role (show/hide for specific roles)
- Record status (show/hide based on record state)
- Custom conditions
- Search: Enable field for search functionality and filtering. Improves data discovery.
- Edit Permission: Control which roles can edit field after record creation:
- All users
- System Manager only
- Field creator only
- Custom role-based permissions
- Description/Help Text: Provide field-level help text visible to users during data entry.
Best Practices
- Plan Field Structure: Analyze business requirements before creating fields
- Use Standard Fields: Leverage pre-built fields before creating custom ones
- Consistent Naming: Use clear, descriptive field names following naming conventions
- Limit Dropdowns: Keep dropdown options under 50 items for usability
- Required Field Discipline: Mark only truly essential fields as required
- Field Relationships: Use Lookup fields to maintain data relationships
- Regular Audits: Periodically review and clean up unused custom fields
- User Training: Document custom fields and train users on proper usage
- Version Control: Document field changes and track configuration history
- Performance: Minimize custom fields to maintain system performance
Troubleshooting
Issue: Field not appearing in record view
- Solution: Check field visibility settings and user role permissions
Issue: Cannot delete field
- Solution: Field may be used in workflows or have existing data. Archive field instead.
Issue: Dropdown options not displaying
- Solution: Verify dropdown options are configured correctly and user has permission to view
Issue: Lookup field showing wrong records
- Solution: Check lookup configuration and record filtering criteria