Tasks
Tasks in Flinkk One CRM help you manage your to-do list, track follow-ups, and ensure nothing falls through the cracks. Create tasks for yourself or assign them to team members, set due dates and priorities, and monitor progress - all within your sales workflow.
What are Tasks?
Tasks are action items that need to be completed as part of your sales and customer relationship management process. They can be standalone to-dos or linked to specific leads, opportunities, contacts, or companies, ensuring all activities are connected to relevant customer records.
Task Components
Each task contains:
- Title: Brief description of what needs to be done
- Status: Current state (Pending, In Progress, Completed, Cancelled)
- Priority: Urgency level (Low, Medium, High, Urgent)
- Due Date: Target completion date
- Assigned To: Team member responsible for the task
- Related Entity: Link to lead, opportunity, contact, or company
- Description: Detailed notes and additional information
Key Features
Task Management
- Create and assign tasks to team members
- Set priorities and due dates
- Link tasks to customer records
- Add detailed descriptions
Task Tracking & Collaboration
- Filter, sort, and search tasks
- Monitor progress and completion
- Collaborate with notes and activity history
- View tasks in list or kanban views
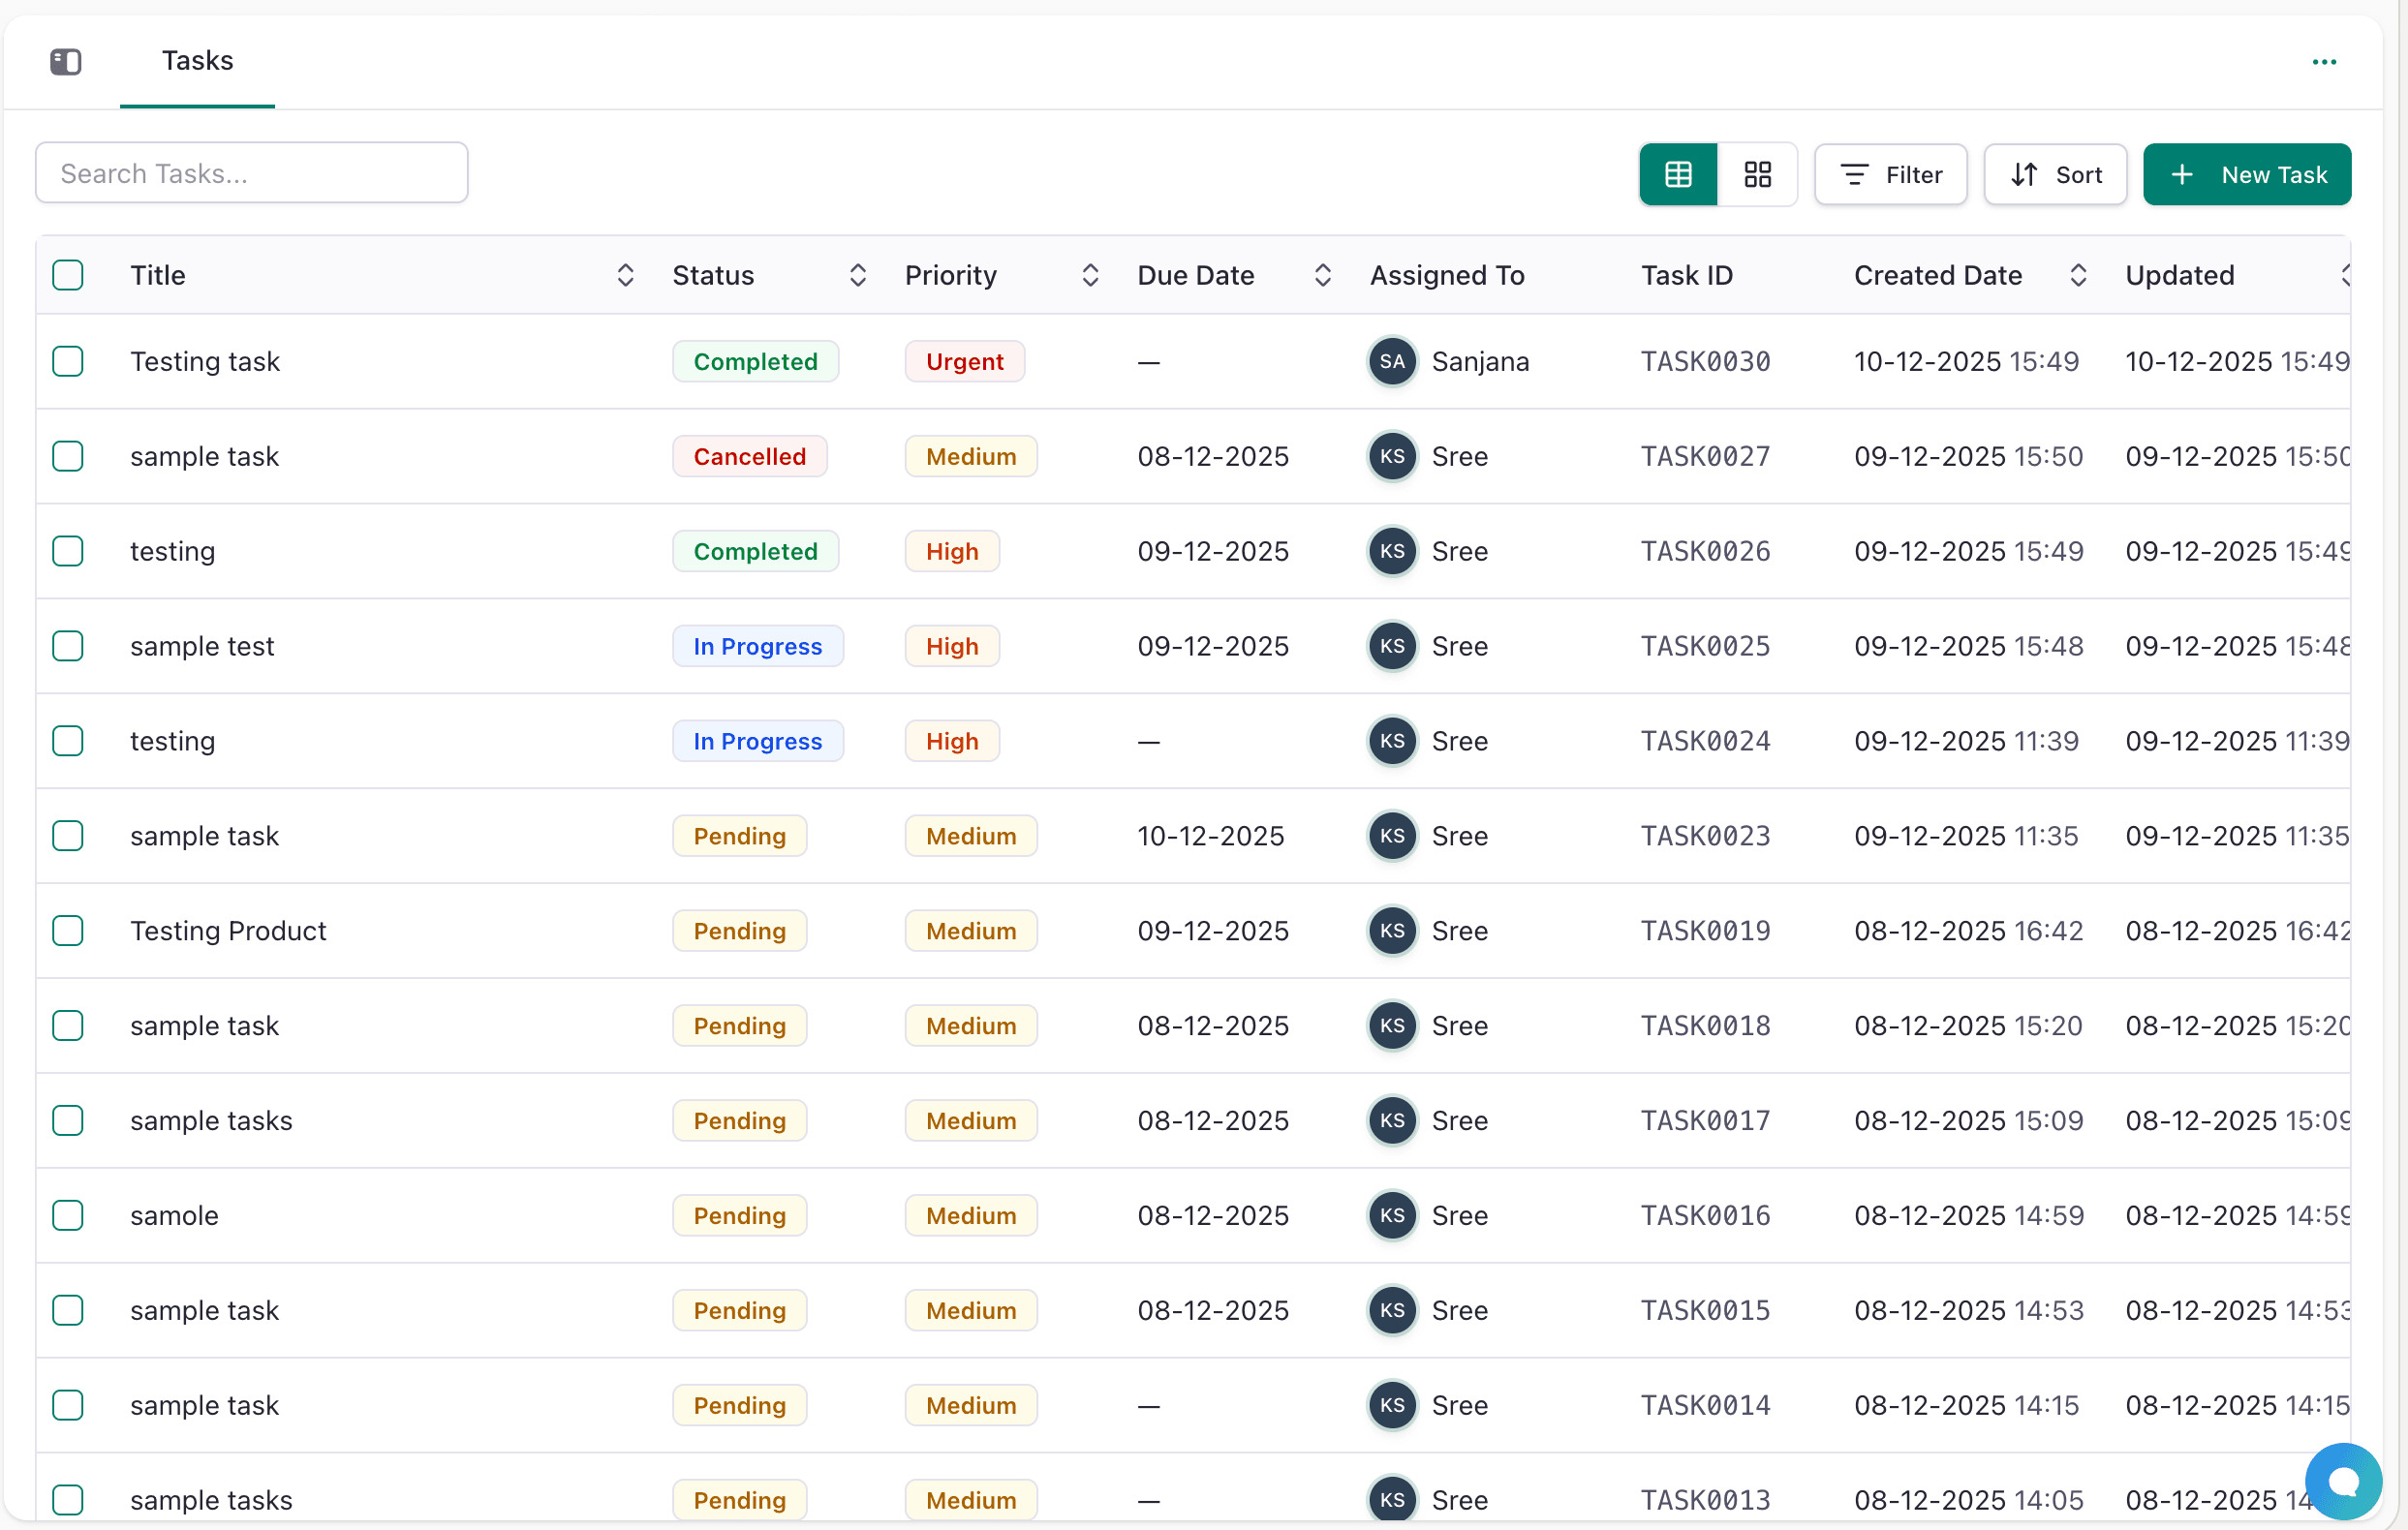
Task List View
Navigate to Activities > Tasks from the sidebar menu to access all tasks.
The tasks list displays the following columns:
- Title: Task name/description
- Status: Current state (Pending, In Progress, Completed, Cancelled)
- Priority: Importance level with color coding
- Due Date: Target completion date
- Assigned To: Team member responsible
- Checkboxes: Select multiple tasks for bulk actions
List Controls:
- Search: Find tasks by title
- Filter: Filter by status, priority, assignee, or due date
- Sort: Sort by any column
- View Toggle: Switch between table, grid, and kanban views
- Actions: Quick actions button for additional options
Task Kanban View
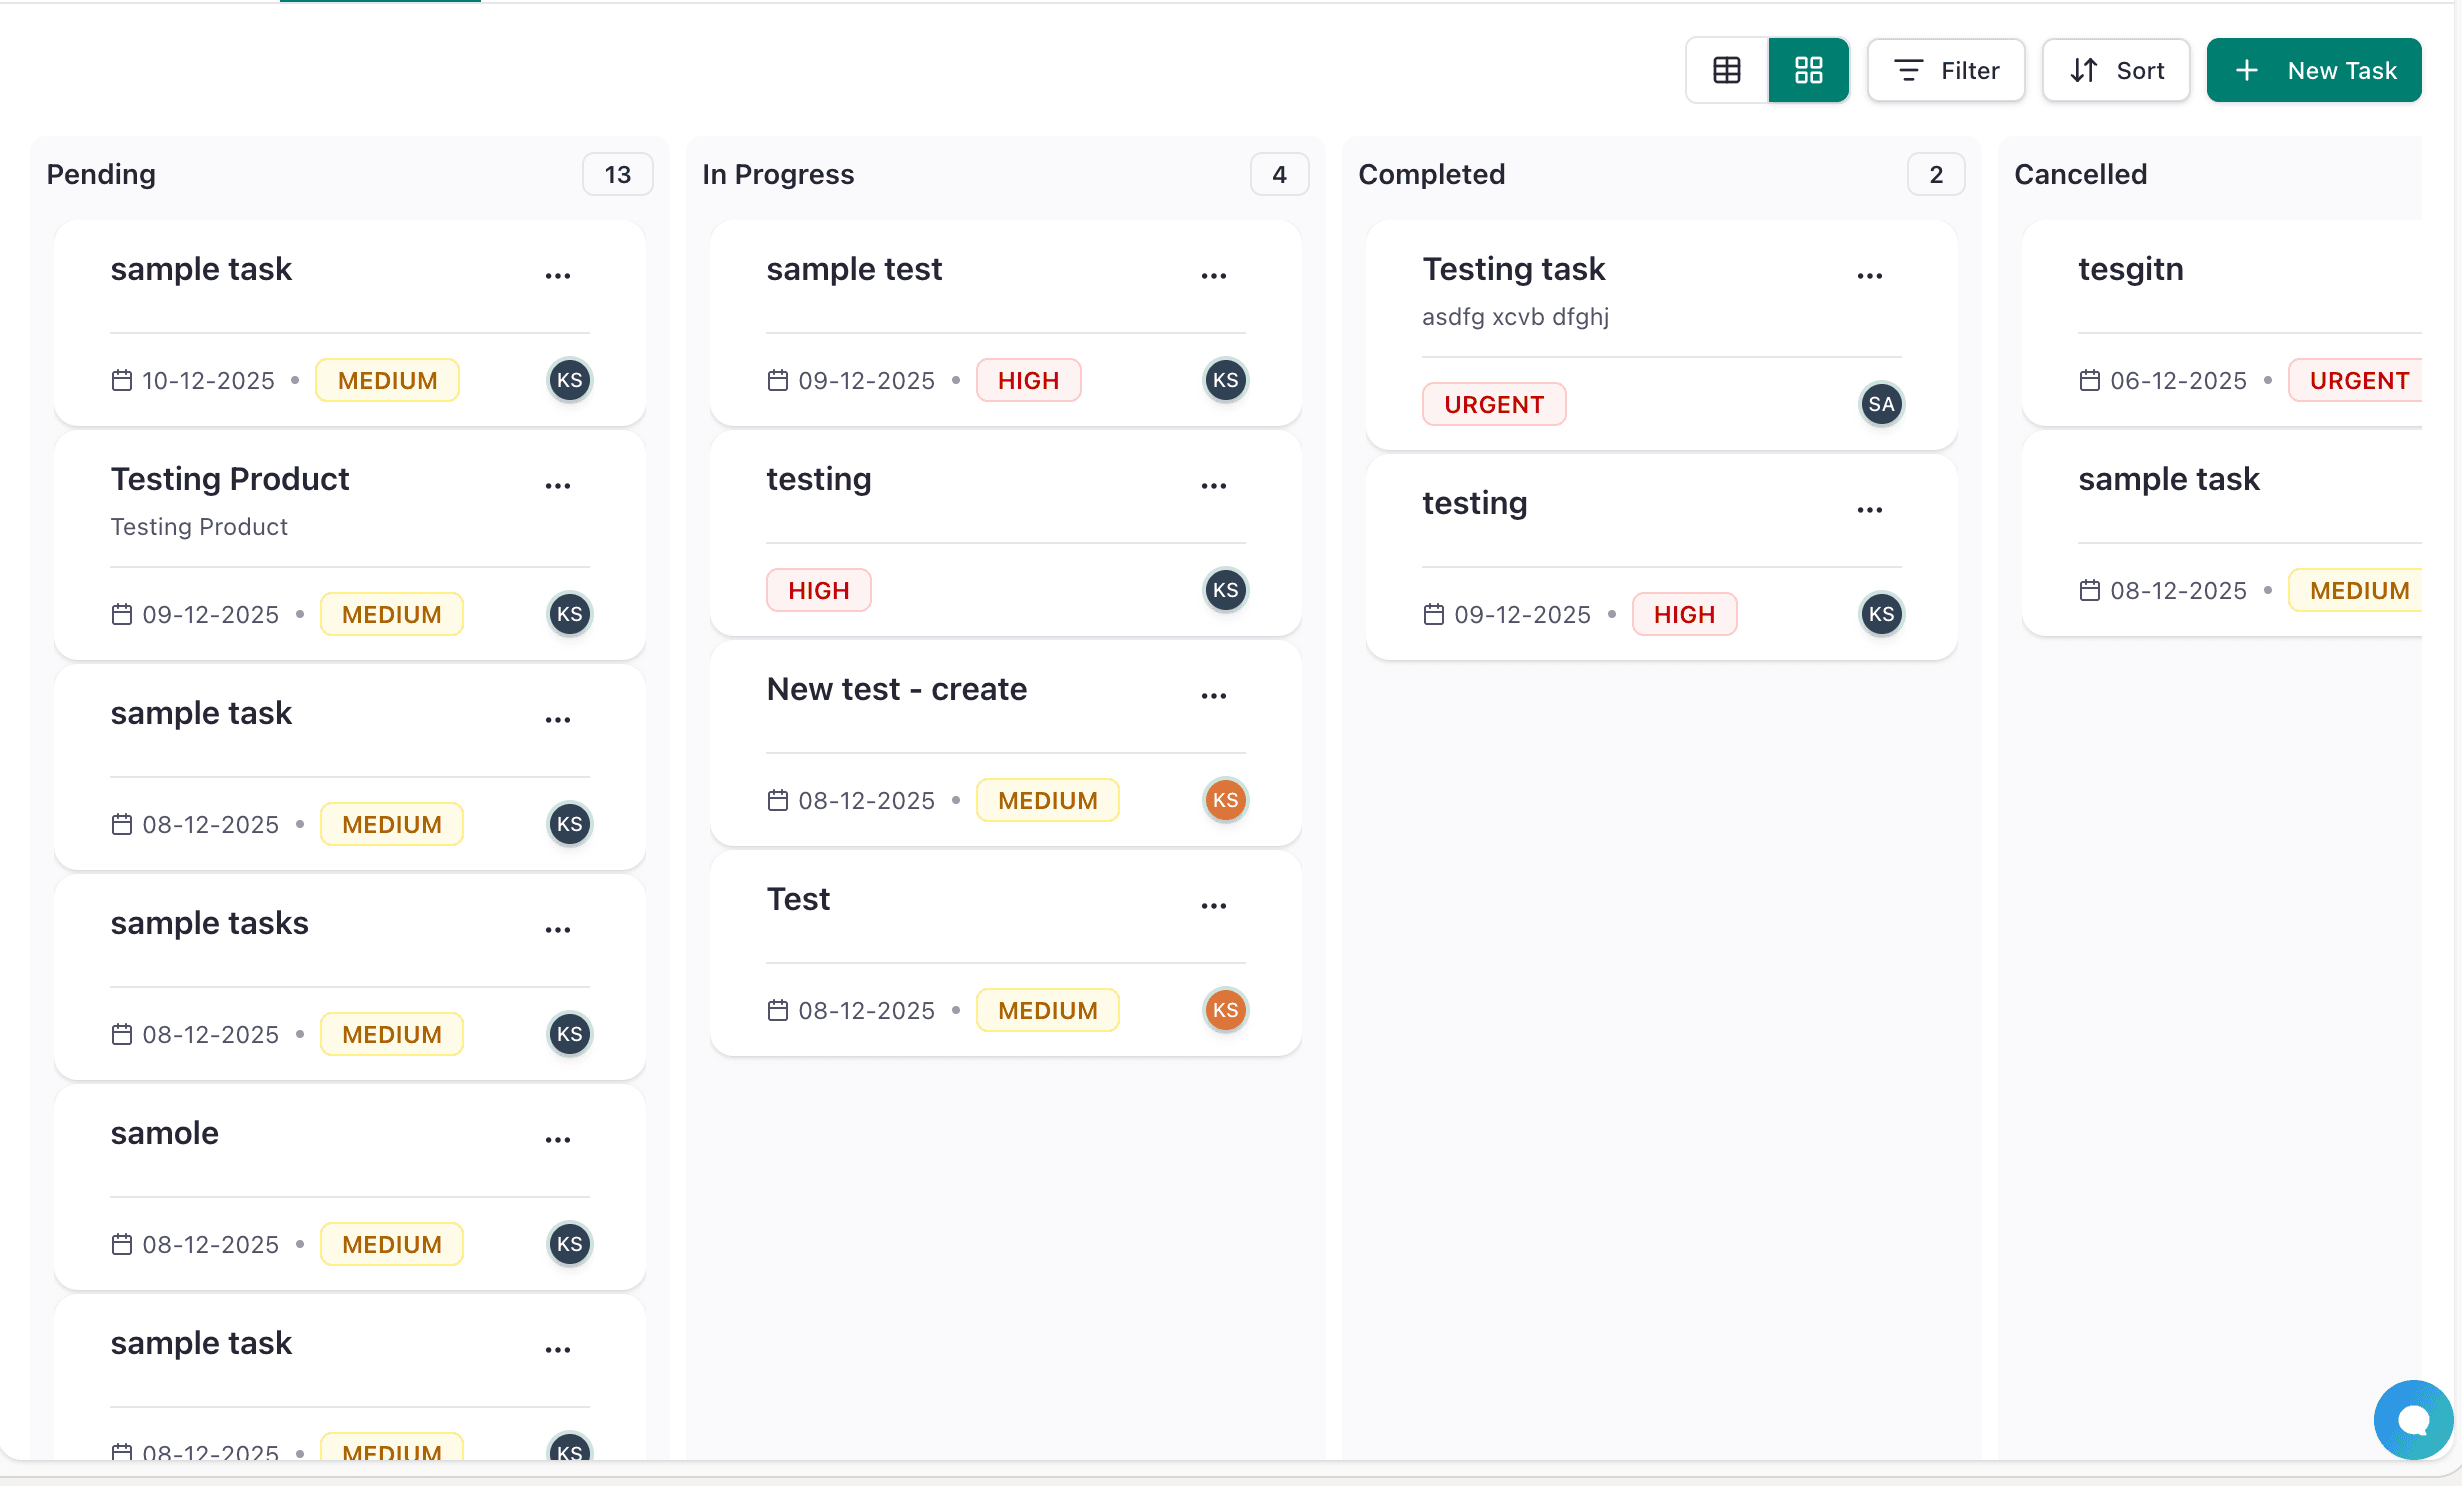
Visualize tasks as cards across status columns to track workflow progress:
- Pending - Tasks created but not started
- In Progress - Tasks currently being worked on
- Completed - Finished tasks
- Cancelled - Tasks no longer needed
Kanban Features:
- Drag and drop task cards between status columns
- View task details on cards (title, assignee, priority, due date)
- Color-coded priority indicators
- Quick status updates with drag and drop
Creating Tasks
From Tasks Module
- Navigate to Activities > Tasks
- Click + New Task button
- Fill in task details
- Click Create Task
From Related Records
You can create tasks directly from lead, opportunity, contact, or company detail pages:
- Open a customer record
- Click + New Task button (or similar)
- Task automatically links to that record
- Fill in remaining details
- Click Create Task
Task Creation Form
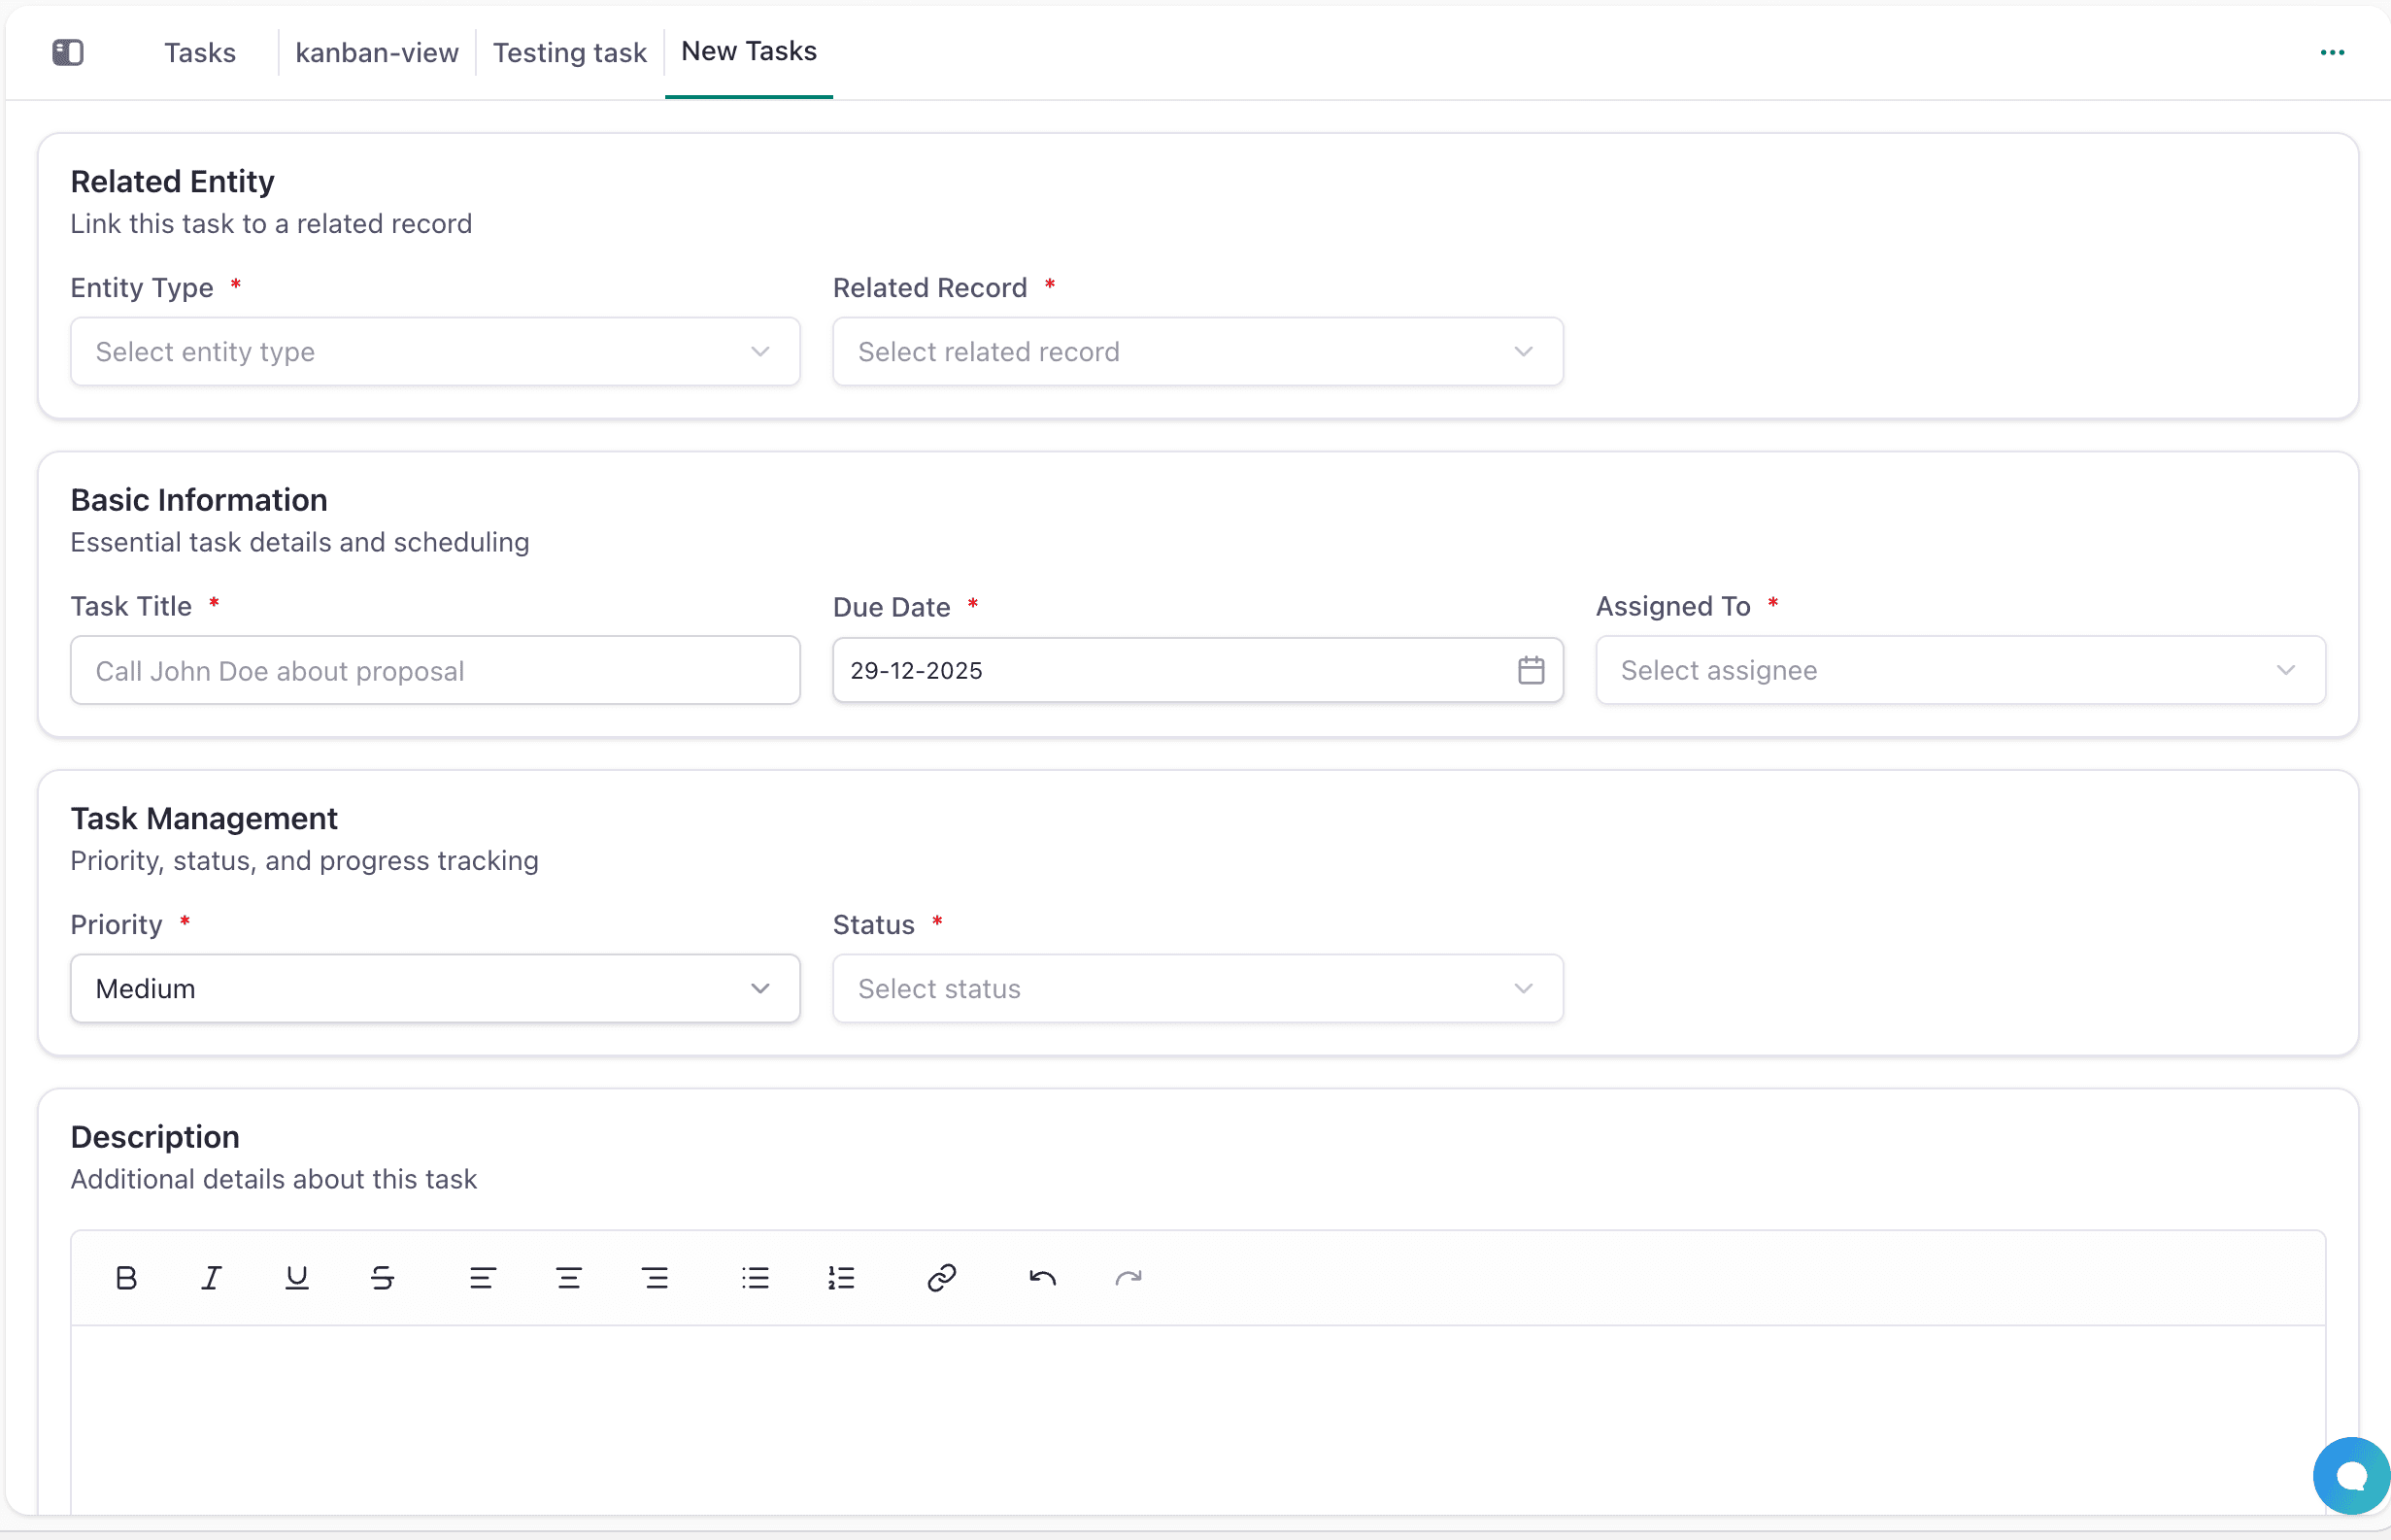
The task creation form includes:
- Task Title: Brief description of the task
- Due Date: Target completion date
- Assigned To: Team member responsible
- Priority: Urgency level (Low, Medium, High, Urgent)
- Status: Current state (defaults to Pending)
- Description: Detailed notes with rich text editor
- Related Entity (Optional): Link to lead, opportunity, contact, or company
Task Detail View
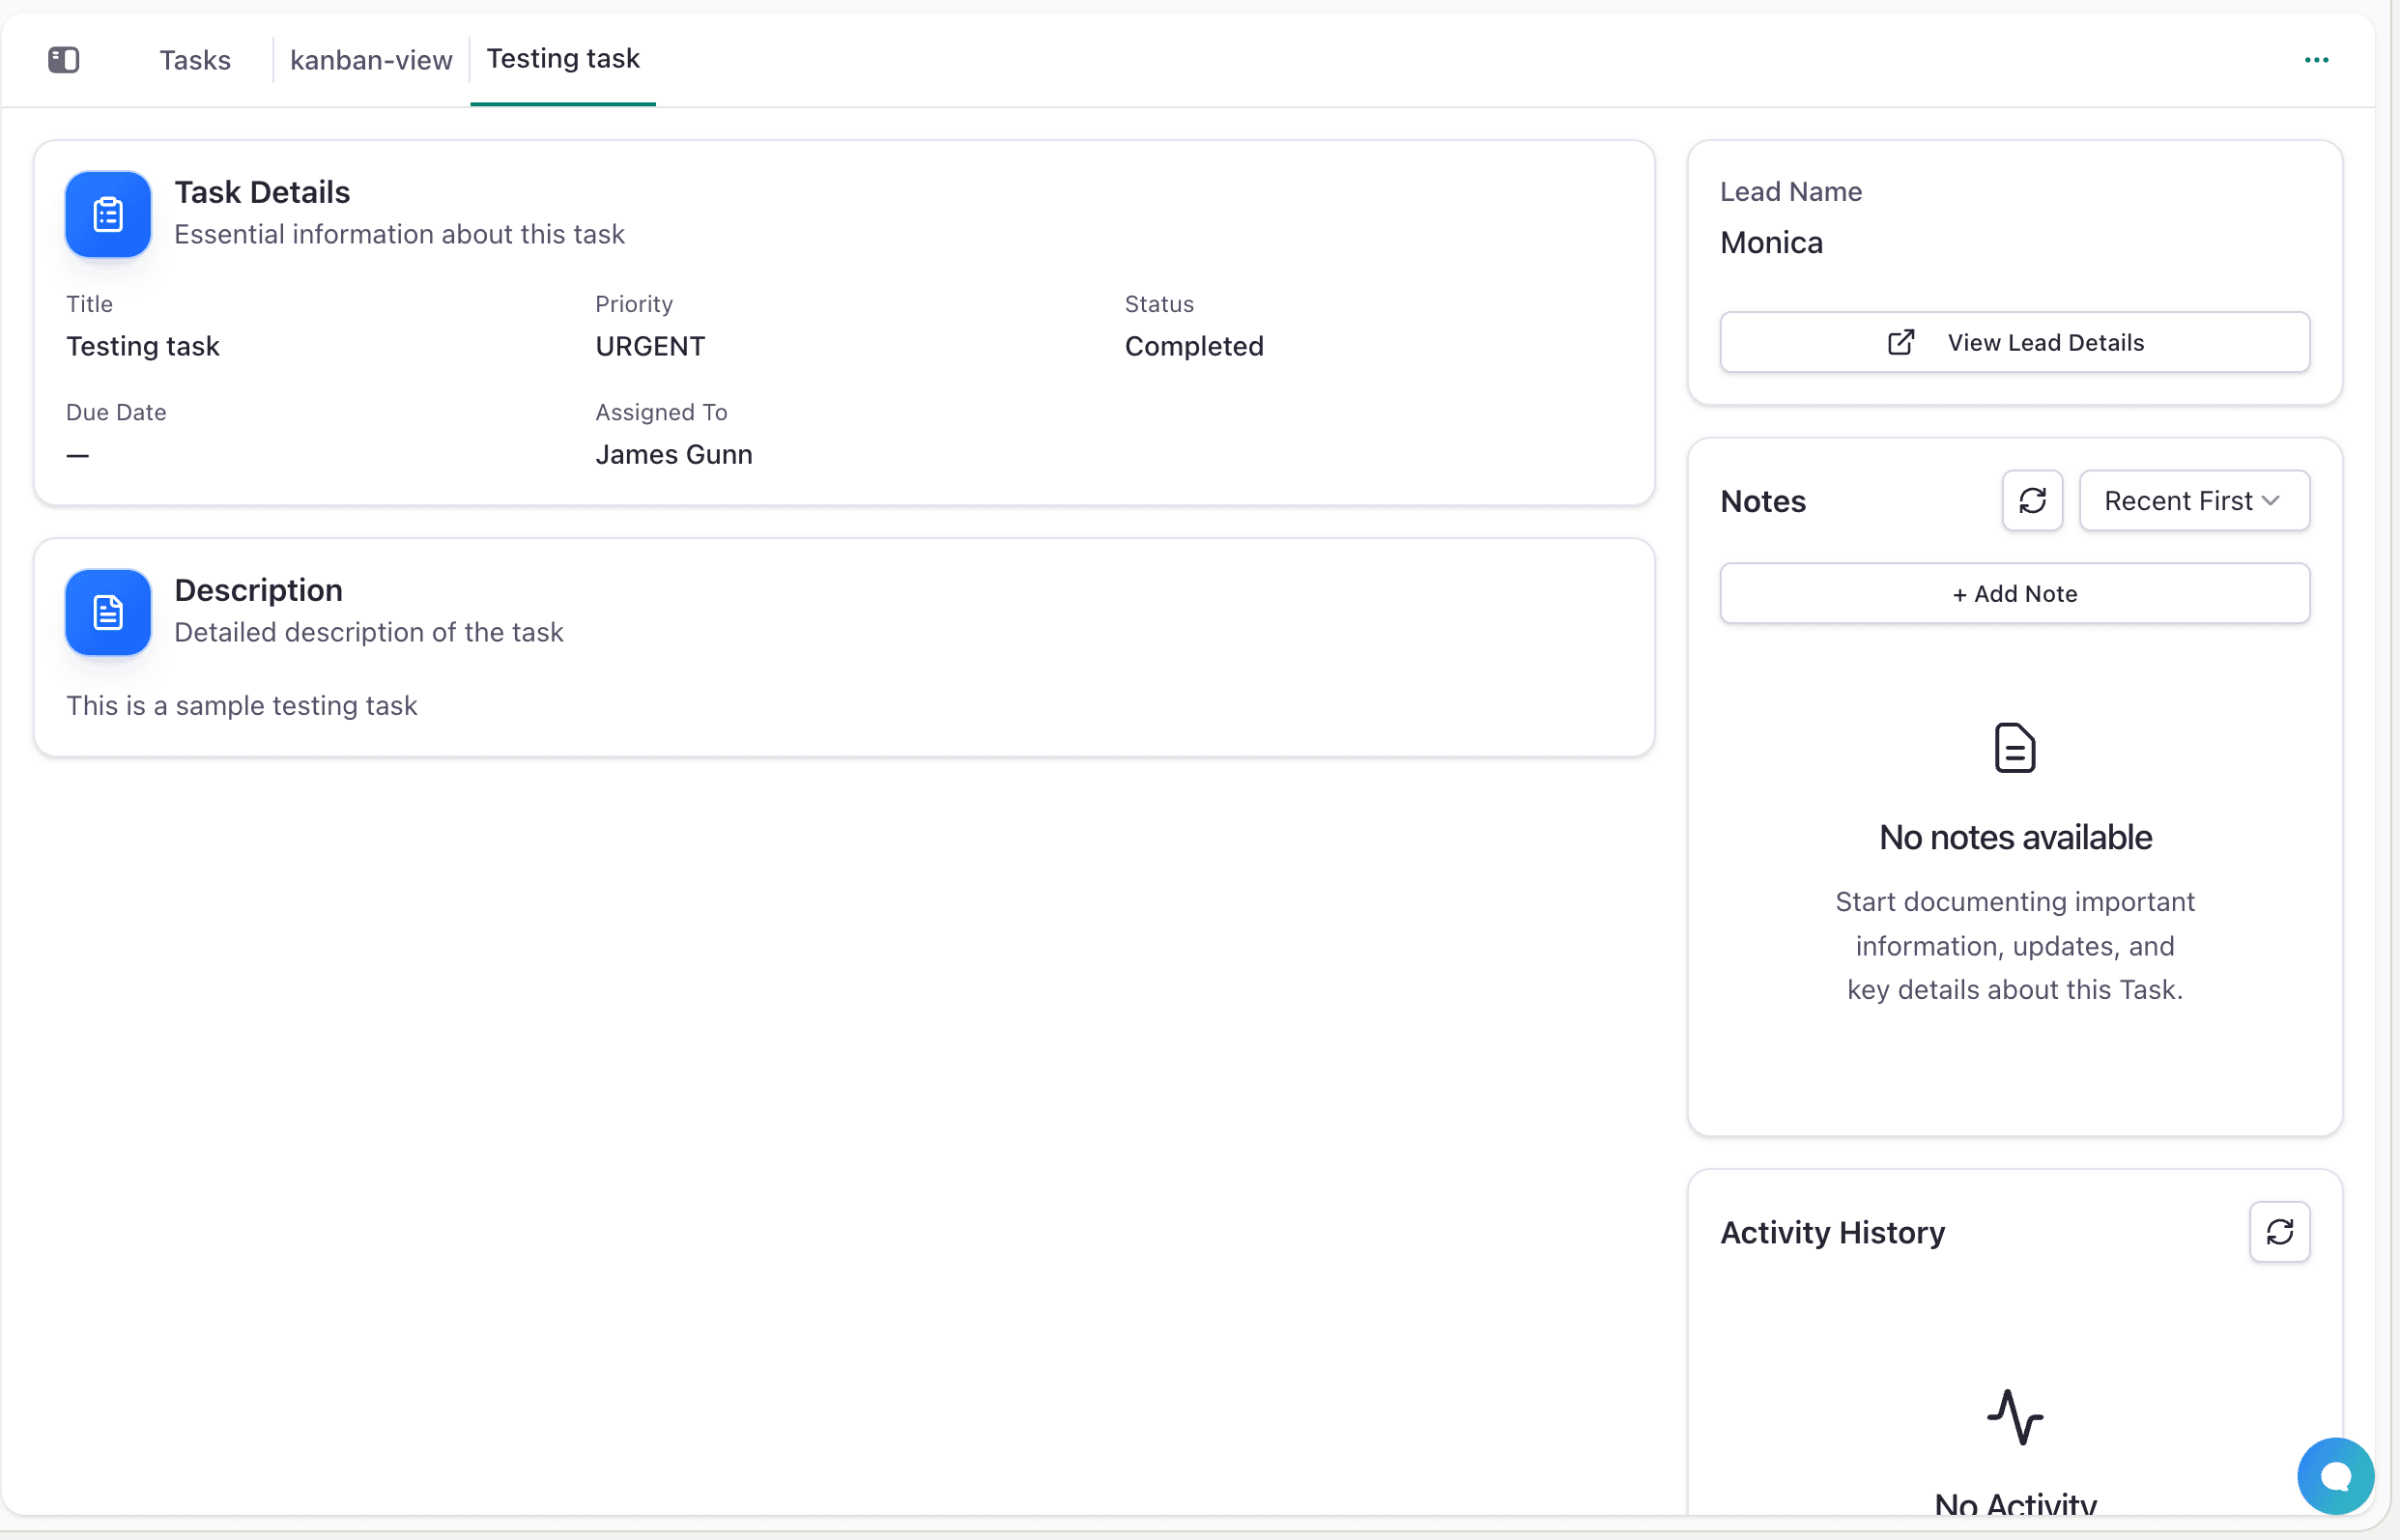
Click on any task to open its detailed view, which includes:
- Task Header: Title, status badge, priority indicator, and assignee
- Key Details: Due date, creation date, and linked customer record
- Description: Full task description with rich text formatting
- Notes: Collaborative comments from team members
- Activity Timeline: Chronological log of all task changes and updates
Managing Tasks
Editing and Updating Tasks
Click on any task to open its detail view for editing:
- Edit Fields: Click the edit icon to update title, due date, priority, or description
- Update Status: Use the status dropdown or drag cards in kanban view
- Reassign: Change the assigned team member
- Changes save automatically
Adding Notes
- Click + Add Note in the Notes section
- Type your note
- Click save or submit
- Note appears in the list with timestamp
Best Practices
- Use Clear Titles: Make task titles specific and action-oriented
- Set Realistic Dates: Assign due dates that give enough time
- Link to Records: Always link tasks to relevant customer records
- Update Status: Keep task status current for accurate tracking
- Add Context: Use descriptions to provide important details
- Assign Appropriately: Ensure tasks are assigned to the right person
- Follow Up: Review overdue tasks regularly
- Use Priority Levels: Help team focus on what matters most