Leads
Leads are potential customers who have shown interest in your products or services but haven't yet been qualified as sales opportunities. The Leads module in Flinkk One CRM helps you capture, track, and nurture these prospects through your sales pipeline.
What are Leads?
A lead represents an individual or organization that has expressed interest in your business. Leads can come from various sources like:
- Website forms and landing pages
- Trade shows and events
- Cold outreach and marketing campaigns
- Referrals from existing customers
- Social media engagement
- Purchased lead lists
Once captured, leads move through stages until they're either qualified (converted to an opportunity) or disqualified.
Accessing Leads
Navigate to Sales → Leads from the sidebar menu. You have two main views:
- All Leads - View all leads in the system
- My Leads - View only leads assigned to you
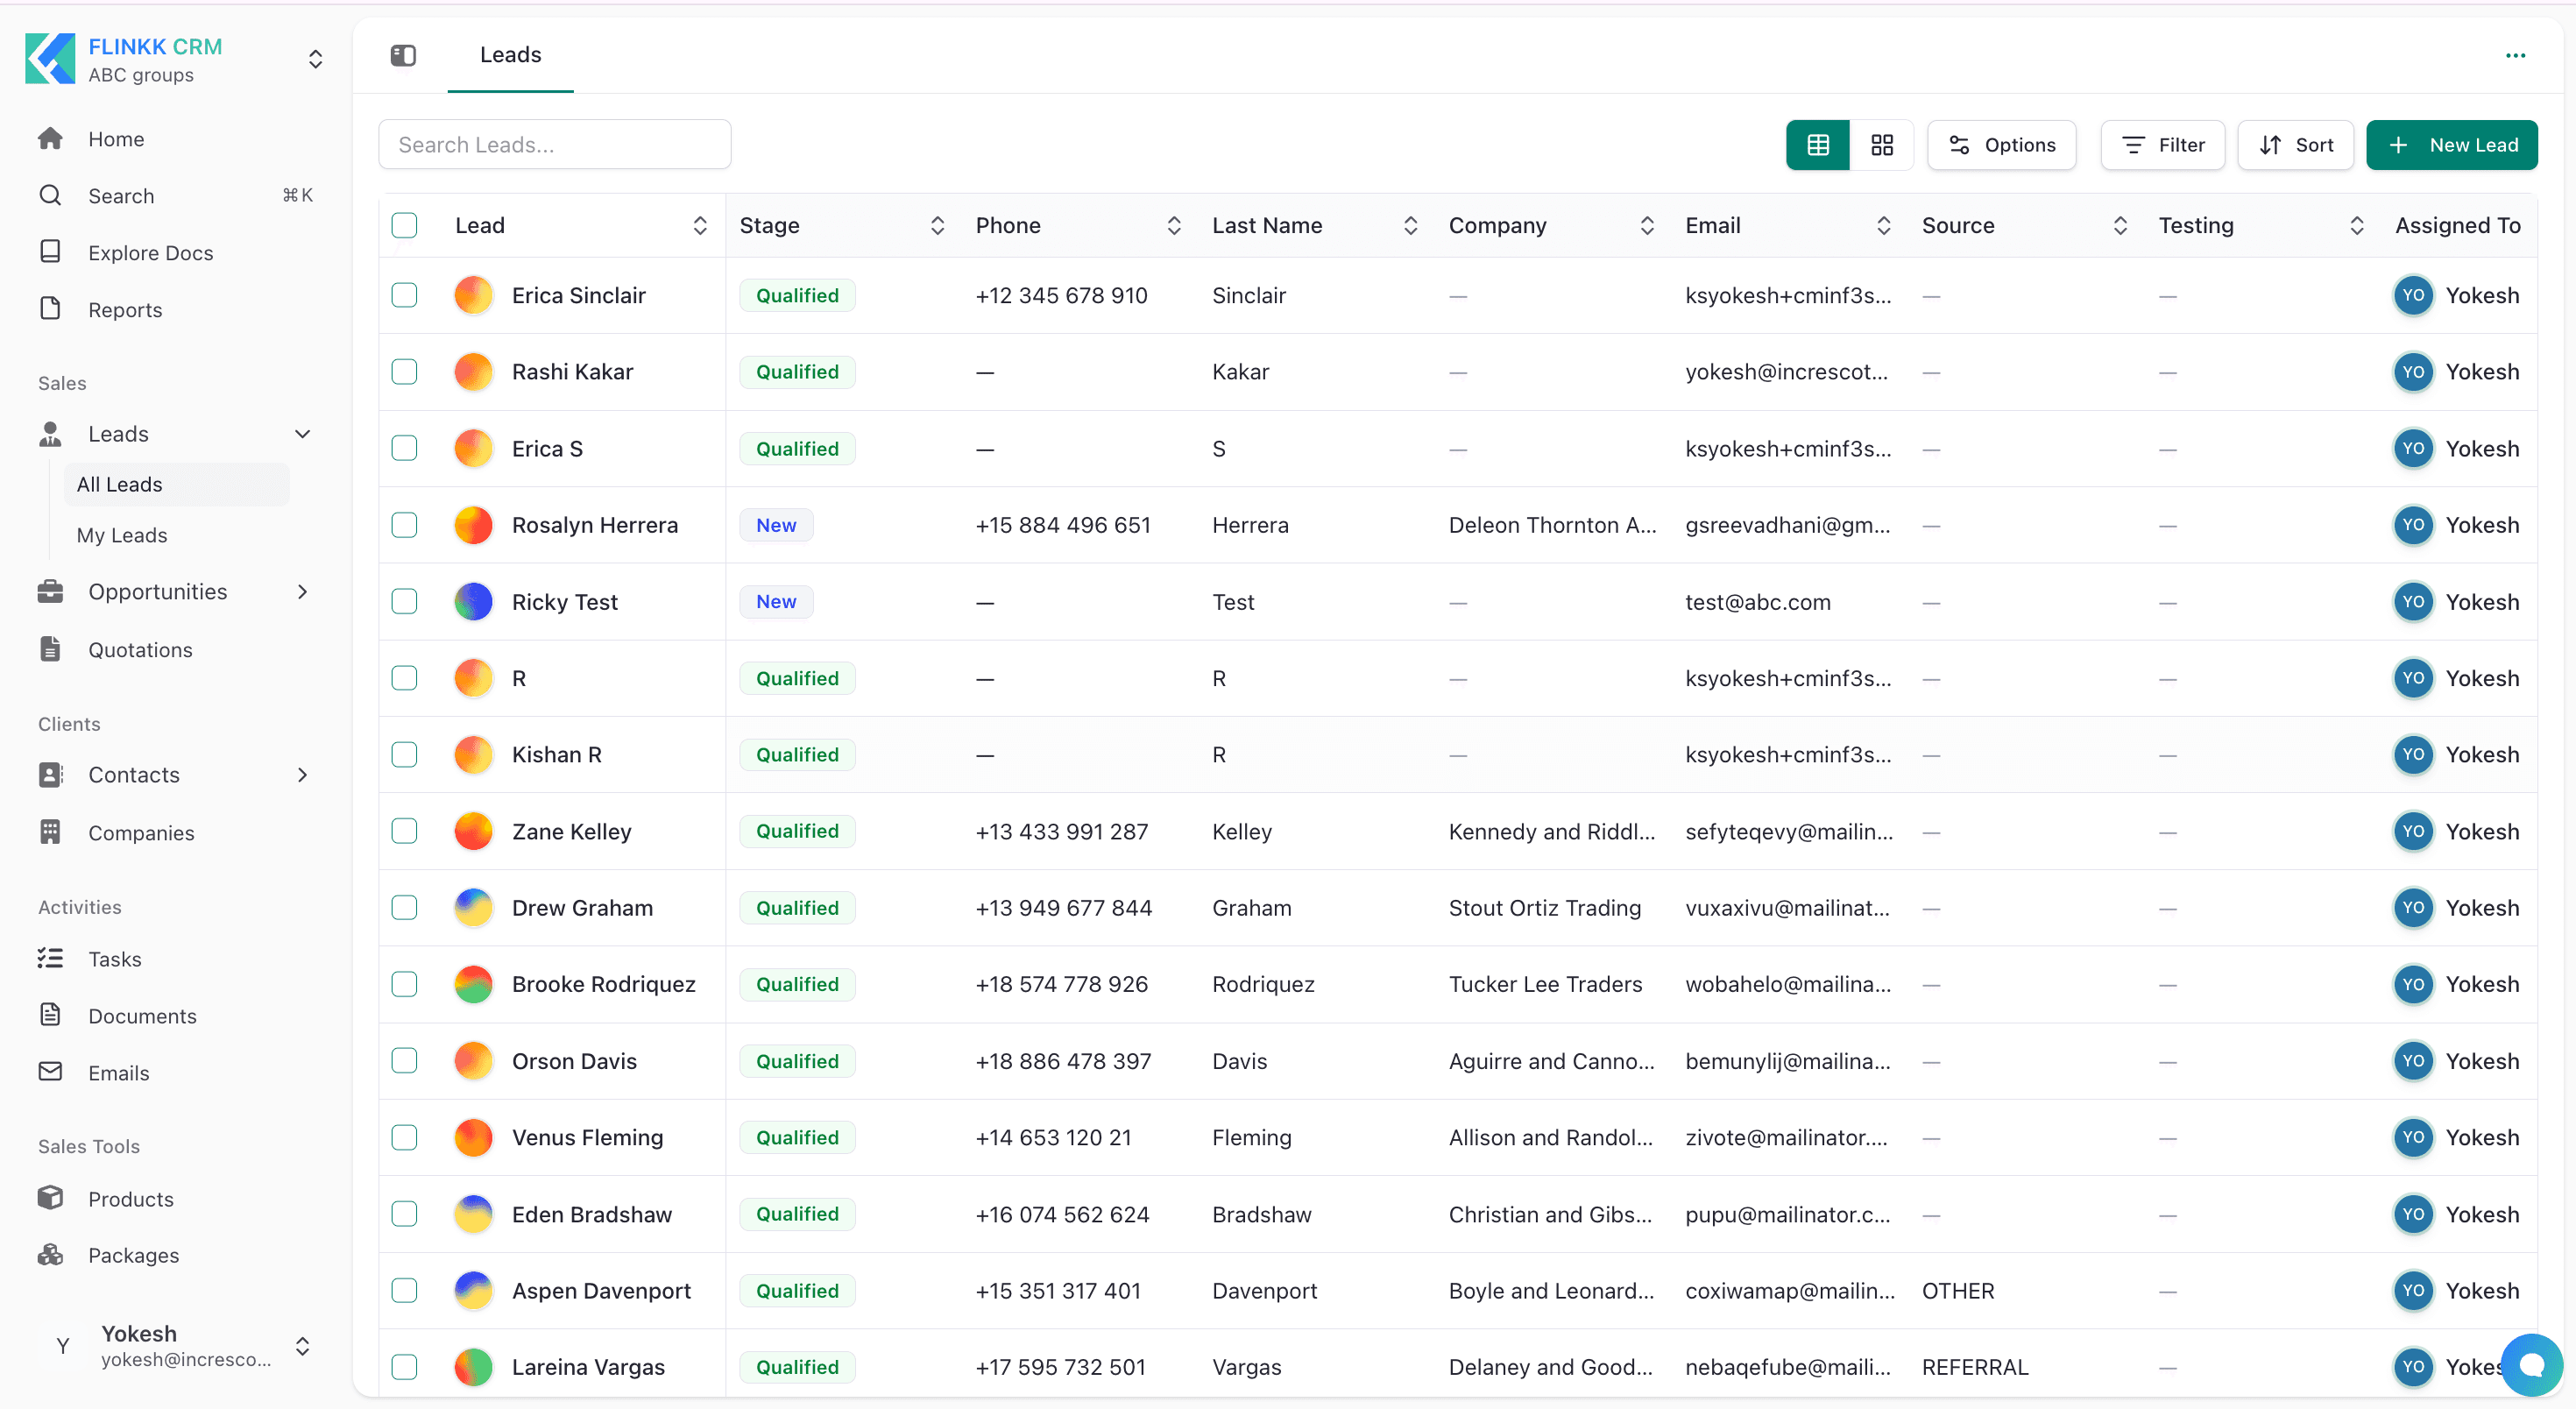
Lead Table View
The default table view displays leads in a sortable, filterable list.
Table Columns:
- Lead Name - Contact name with colored avatar
- Stage - Current lead stage (New, Contacted, Qualified, etc.)
- Phone - Contact phone number
- Last Name - Last name of the contact
- Company - Associated organization
Table Actions:
- Search - Find leads by name, email, or company
- Options - Bulk actions and table settings
- Filter - Filter by stage, source, owner, date range
- Sort - Sort by any column
- Grid/Table Toggle - Switch between table and grid views
Lead Kanban View
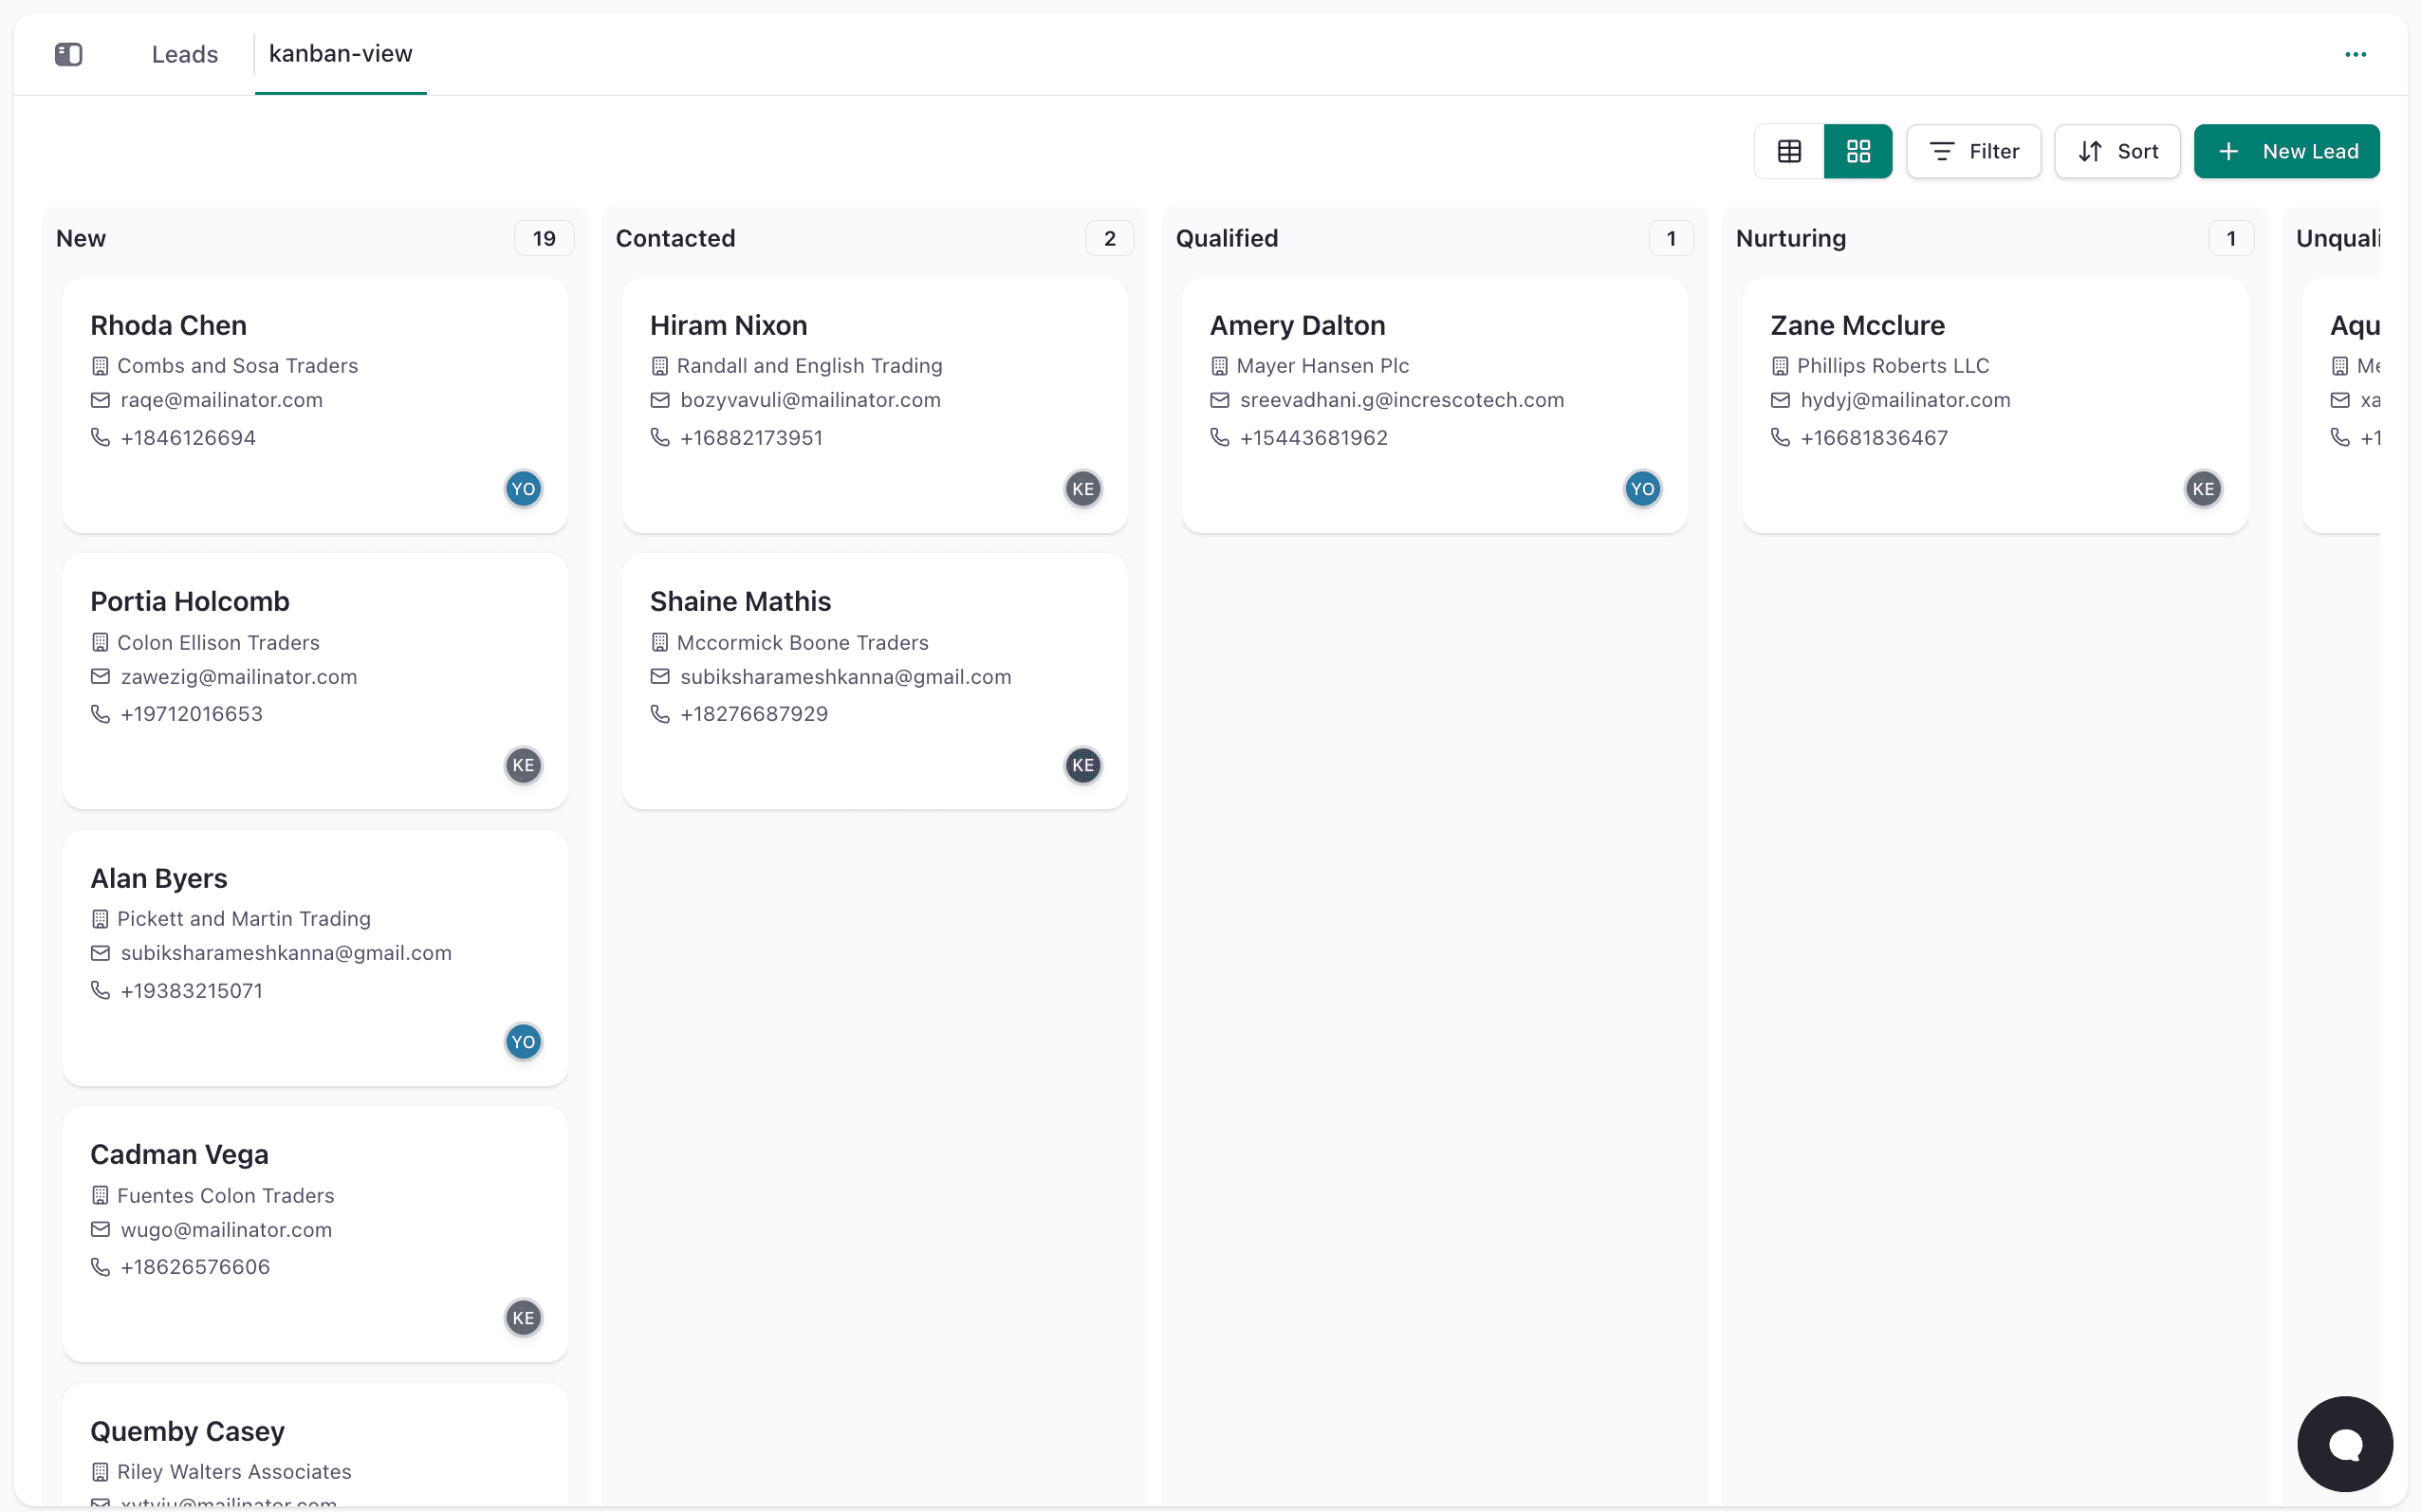
Switch to Kanban view using the grid icon in the toolbar to visualize leads across pipeline stages.
Default Lead Stages:
- New - Freshly captured leads, no action taken yet
- Contacted - Initial outreach completed
- Qualified - Meets your qualification criteria (ready for opportunity)
- Nurturing - Being nurtured through marketing campaigns
- Unqualified - Doesn't fit your ideal customer profile
Kanban Features:
- Drag and drop lead cards between stages
- See lead count per stage
- Quick actions on each card
- Visual pipeline overview
Lead Detail View
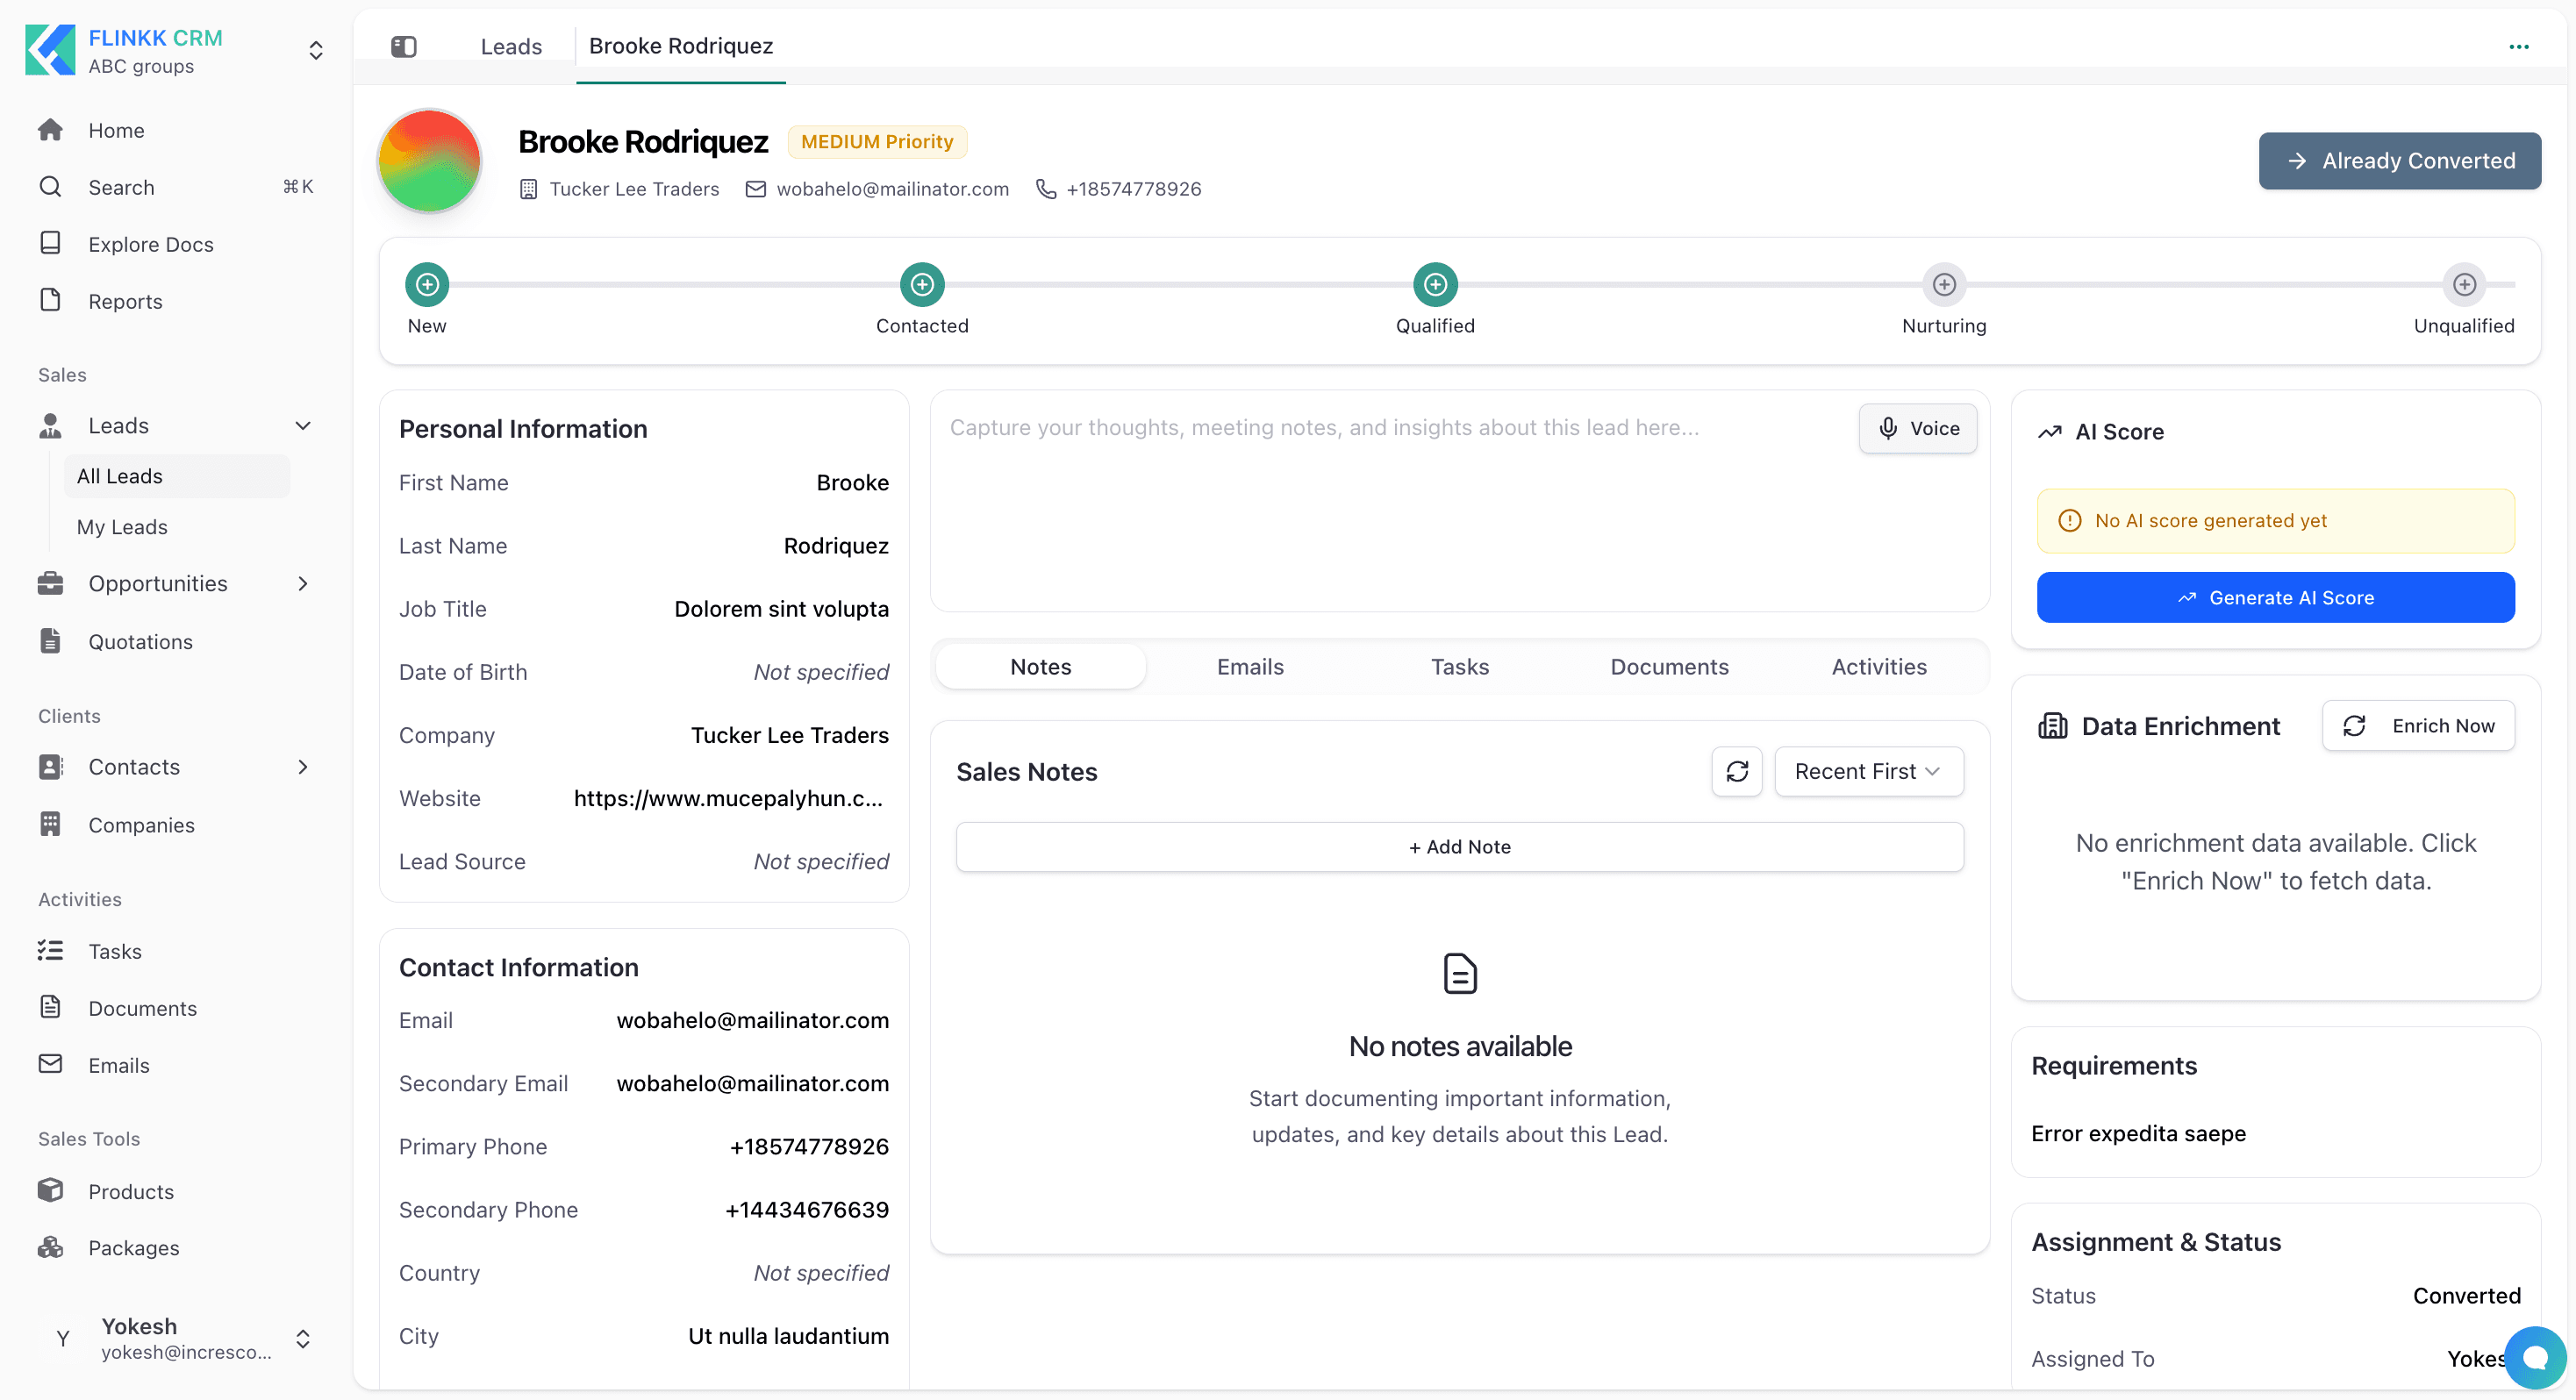
Click on any lead to open the detailed view with comprehensive information.
Lead Header:
- Lead name and colored avatar
- Priority badge (Low, Medium, High)
- Company name
- Email address
- Phone number
- Convert to Opportunity button
Lead Stage Pipeline: Visual representation showing current stage in the lead lifecycle with progress indicators.
Information Sections
Personal Information:
- First Name, Last Name
- Job Title
- Date of Birth
- Company
- Website
- Lead Source
Contact Information:
- Primary Email
- Secondary Email
- Phone numbers
- Email opt-in preferences
Center Panel Tabs:
- Notes - Sales notes and important observations
- Emails - Email communication history
- Tasks - Related tasks and follow-ups
- WhatsApp - WhatsApp conversation history
- Activities - Complete activity timeline
Right Panel Widgets:
- AI Score - AI-powered lead scoring (click "Generate AI Score")
- Data Enrichment - Enrich lead data from external sources
Creating a New Lead
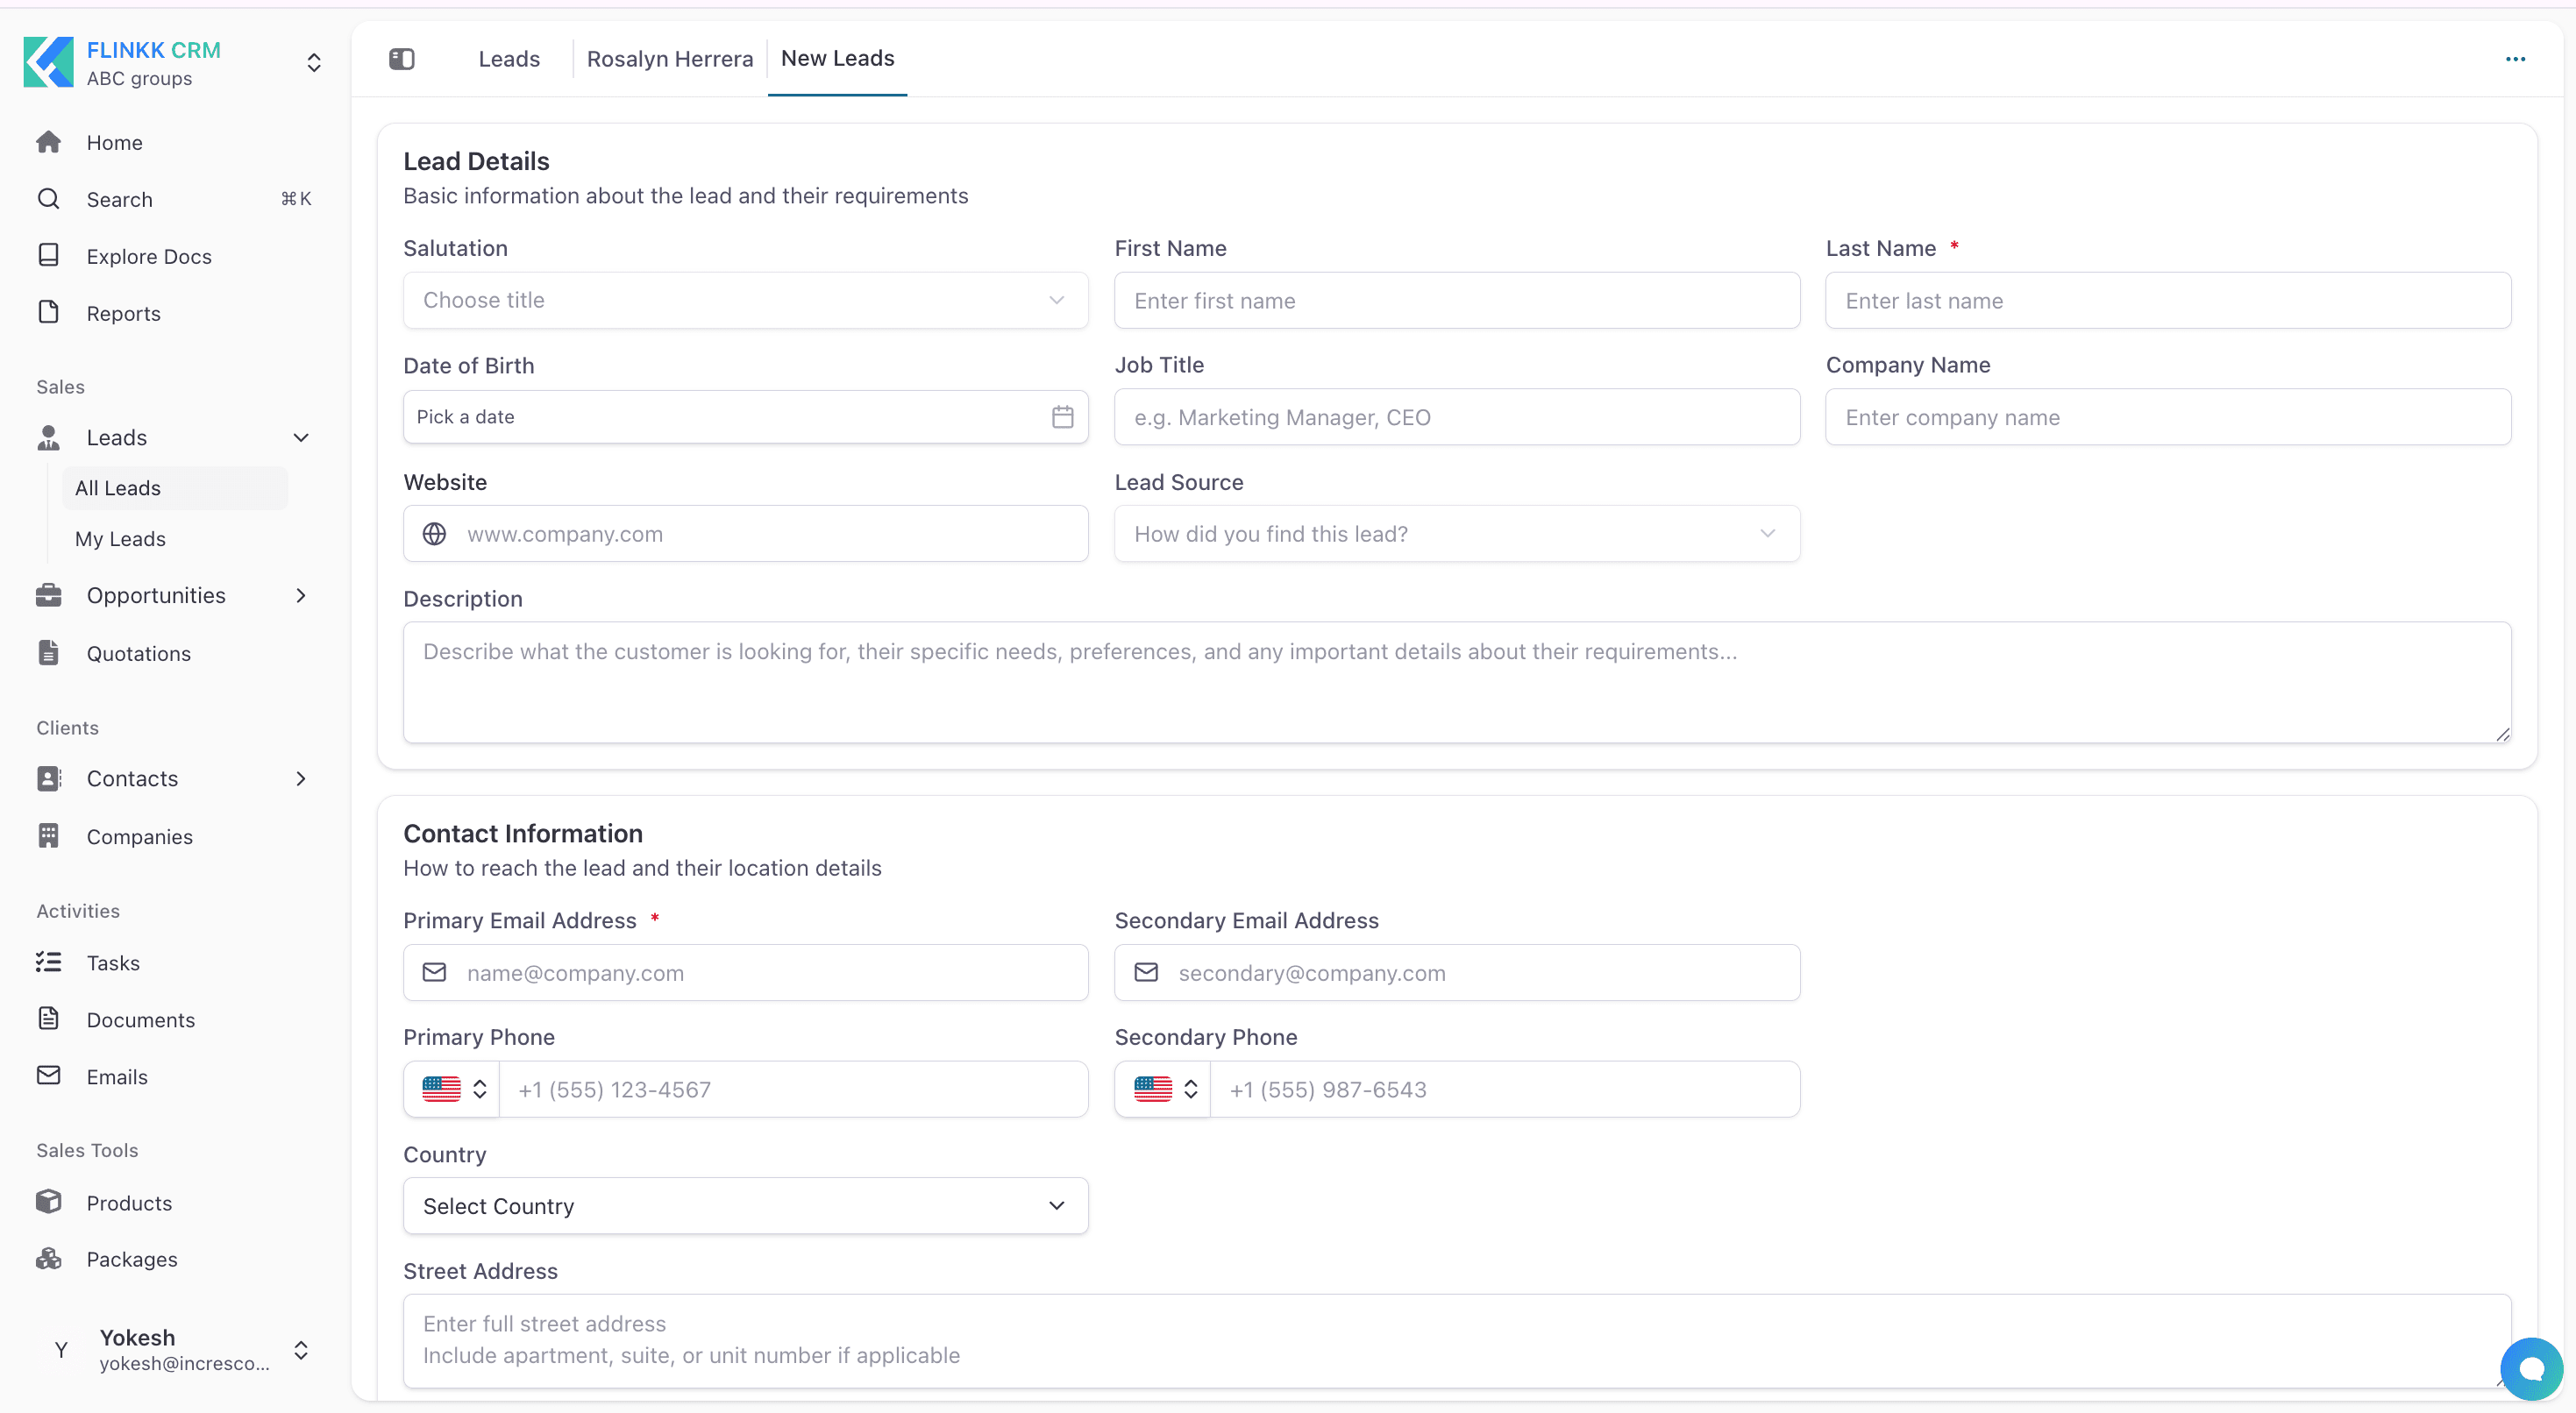
Click the + New Lead button to open the lead creation form.
Required Fields
- Last Name - Lead's last name (required)
- Primary Email - Main email for communication (required)
Lead Details
- Salutation - Title (Mr., Mrs., Ms., Dr., etc.)
- First Name - Lead's first name
- Date of Birth - Birth date
- Job Title - Position/role
- Company Name - Organization
- Website - Company or personal website
- Lead Source - How you acquired this lead
- Description - Notes about requirements
- Priority - Low, Medium, High
Contact Information
- Primary Email Address (required)
- Secondary Email Address
- Primary Phone Number
- Secondary Phone Number
Address Information
- Street Address
- City
- State/Province
- Postal Code
- Country
After filling in the details, click Save to create the lead.
Converting Leads to Opportunities
When a lead is qualified and ready for active pursuit, convert it to an opportunity.
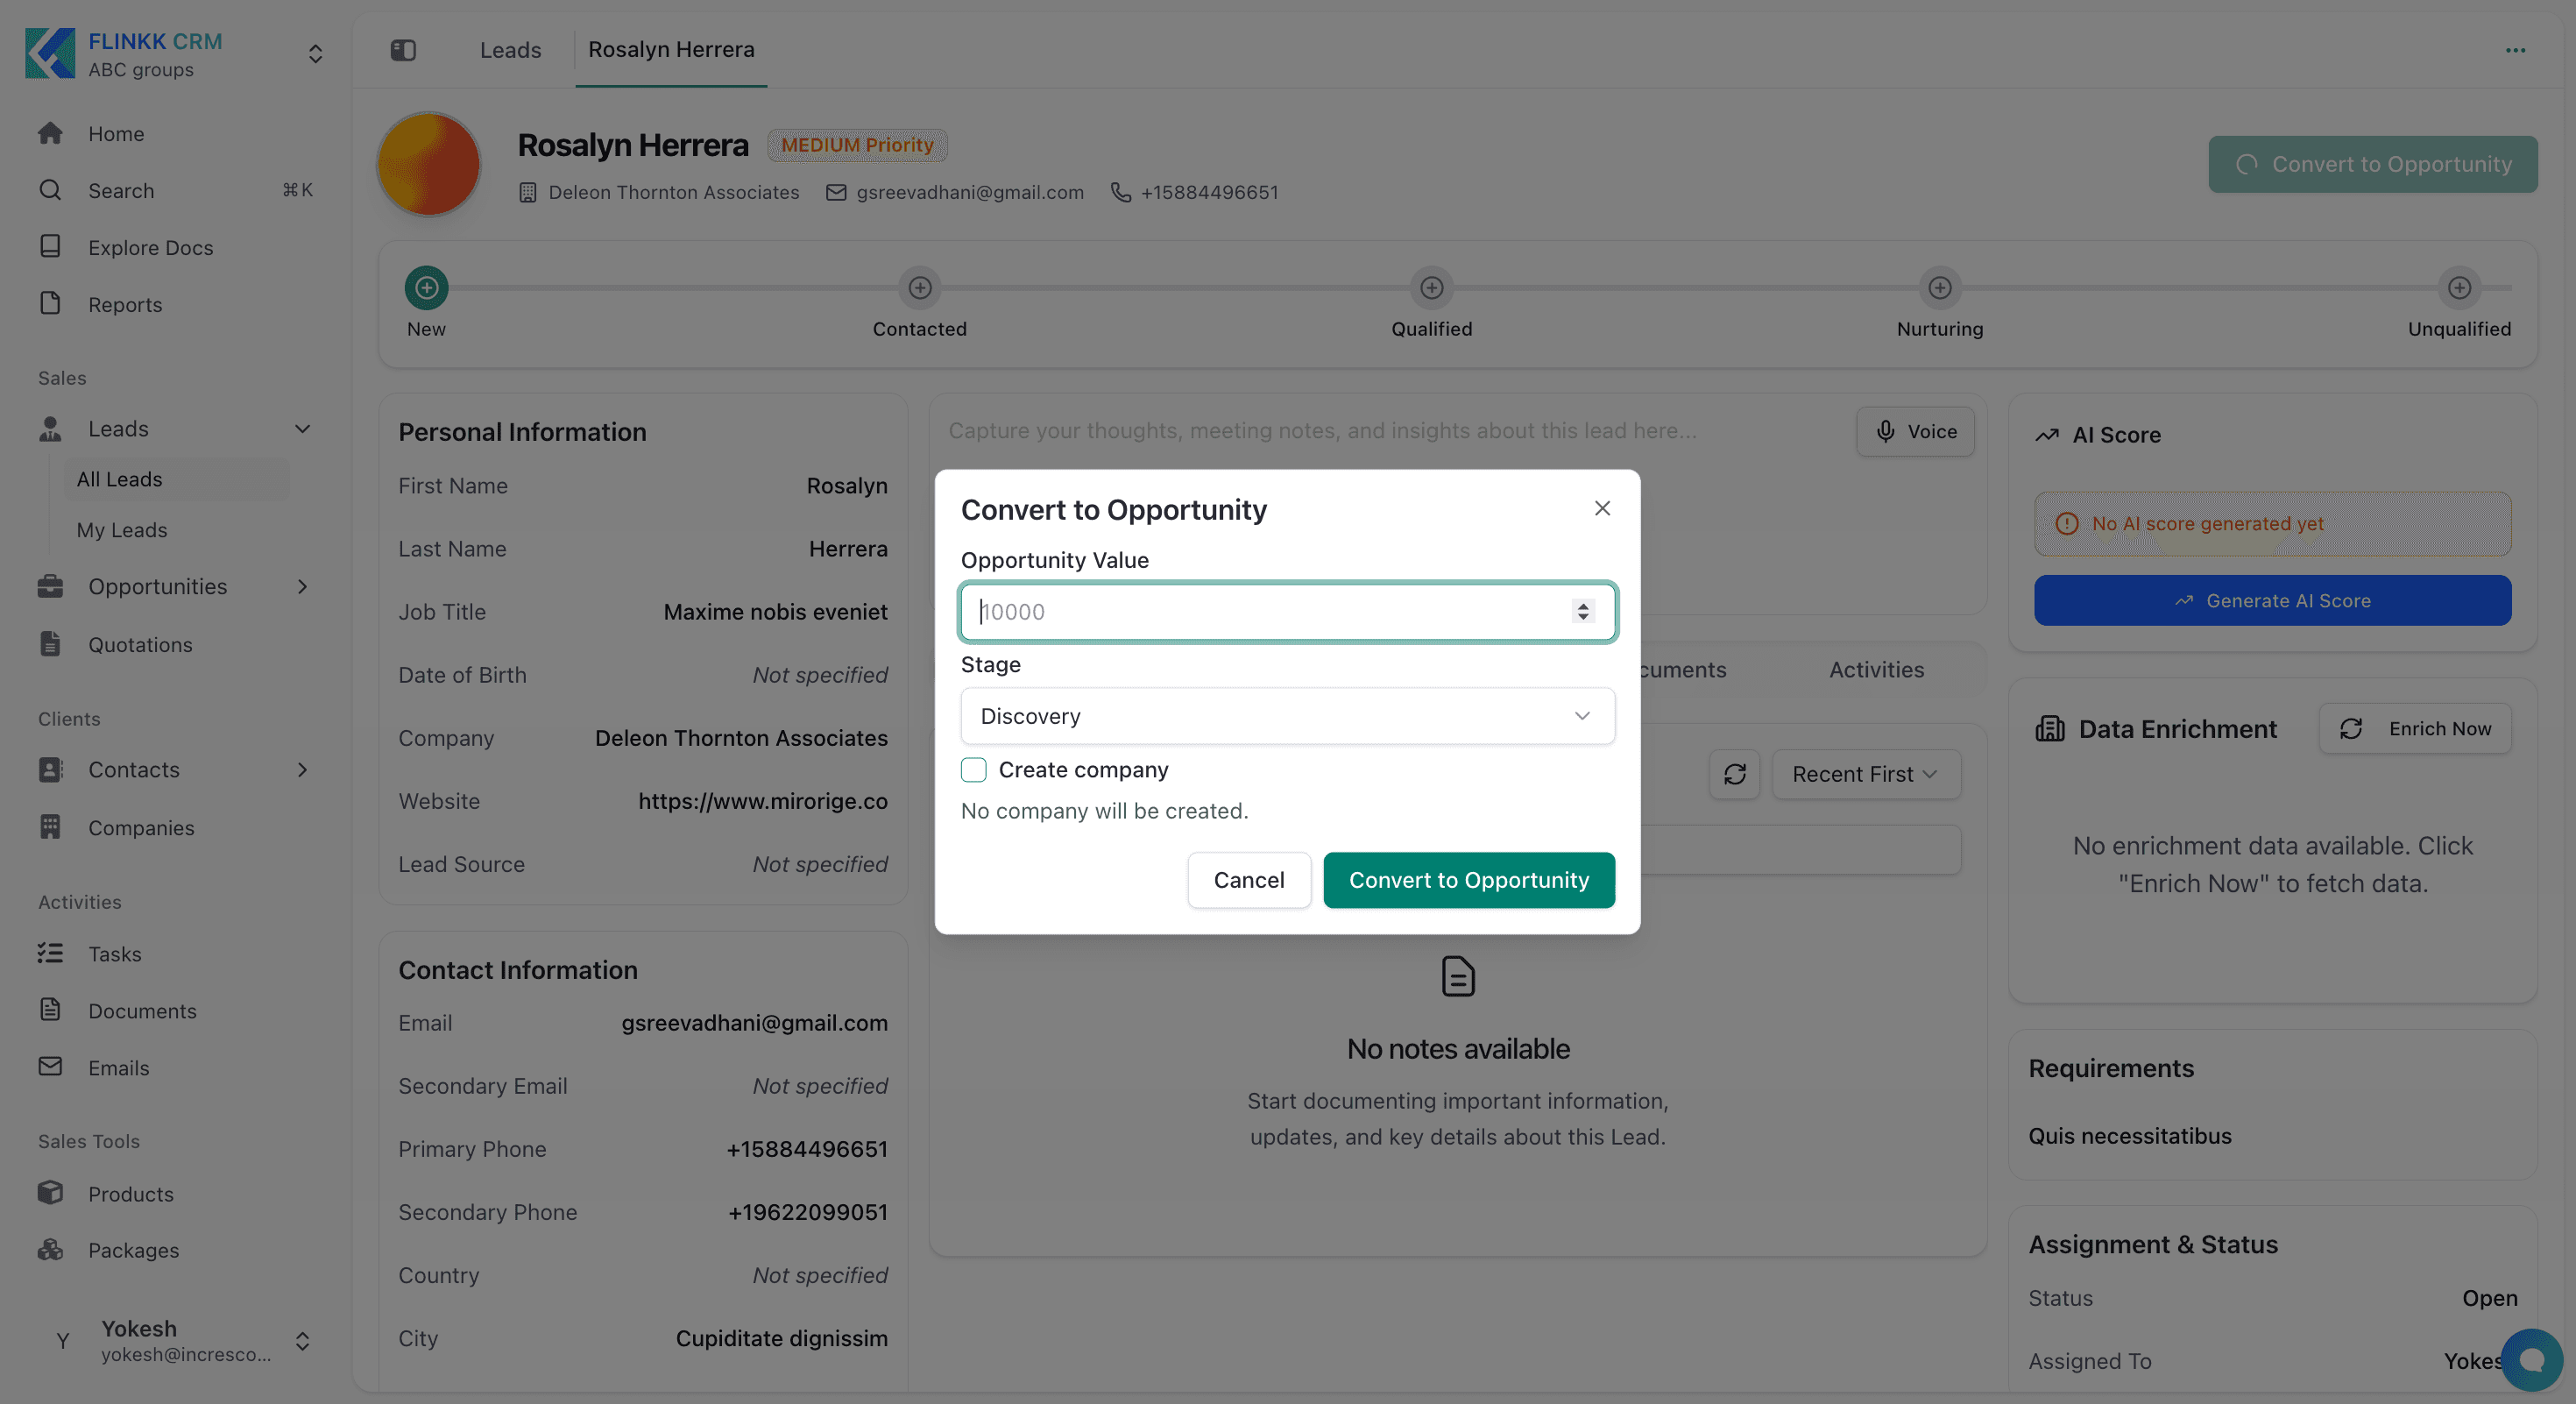
Conversion Process:
- Click Convert to Opportunity button
- Enter Opportunity Value (estimated deal size)
- Select initial Stage (usually "Discovery")
- Optionally create a new company record
- Click Convert to Opportunity
What Happens:
- Lead is marked as converted
- New Opportunity record is created
- Contact record is created from lead data
- Lead source and history are preserved
- You're redirected to the new opportunity
Customizing Lead Settings
Admin Access Required: You need admin permissions to customize lead settings.
Flinkk One allows you to fully customize lead stages, fields, and table columns to match your business process.
Accessing Lead Customization
- Click on FLINKK CRM logo (top left)
- Select Admin Center from the dropdown
- Navigate to Module Customize → CRM Setup
- Click on Leads
 Admin Center sidebar showing expanded "CRM Setup" menu with "Leads" option highlighted*
Customization Options
You'll see five tabs for customizing leads:
1. Standard Fields
View and configure visibility and requirements for default lead fields.
! Configuration Options:
- Set fields as Required or Optional
- Show/Hide fields using Visibility toggle
- View field type and key
Standard Fields Include:
- Notes (LongText)
- Annual Revenue (Text)
- City, State/Province (Text)
- Company Size (Enum)
- Country (Enum)
- Lead Owner (User Reference)
- Tags/Labels (Multi Select)
- And more...
2. Custom Fields
Add your own custom fields to capture business-specific information.
Click "+ Add Field" to create:
- Text fields
- Number fields
- Date fields
- Dropdown lists
- Checkboxes
- And more field types
3. Lead Status
Configure the status options for leads (Active, Inactive, etc.).
4. Lead Source
Manage the list of lead sources for tracking where leads come from.
Default Sources:
- Website
- Referral
- Trade Show
- Cold Call
- Social Media
- Email Campaign
Click "+ Add Source" to add custom lead sources specific to your business.
5. Lead Stages
Customize the stages that leads move through in your sales process.
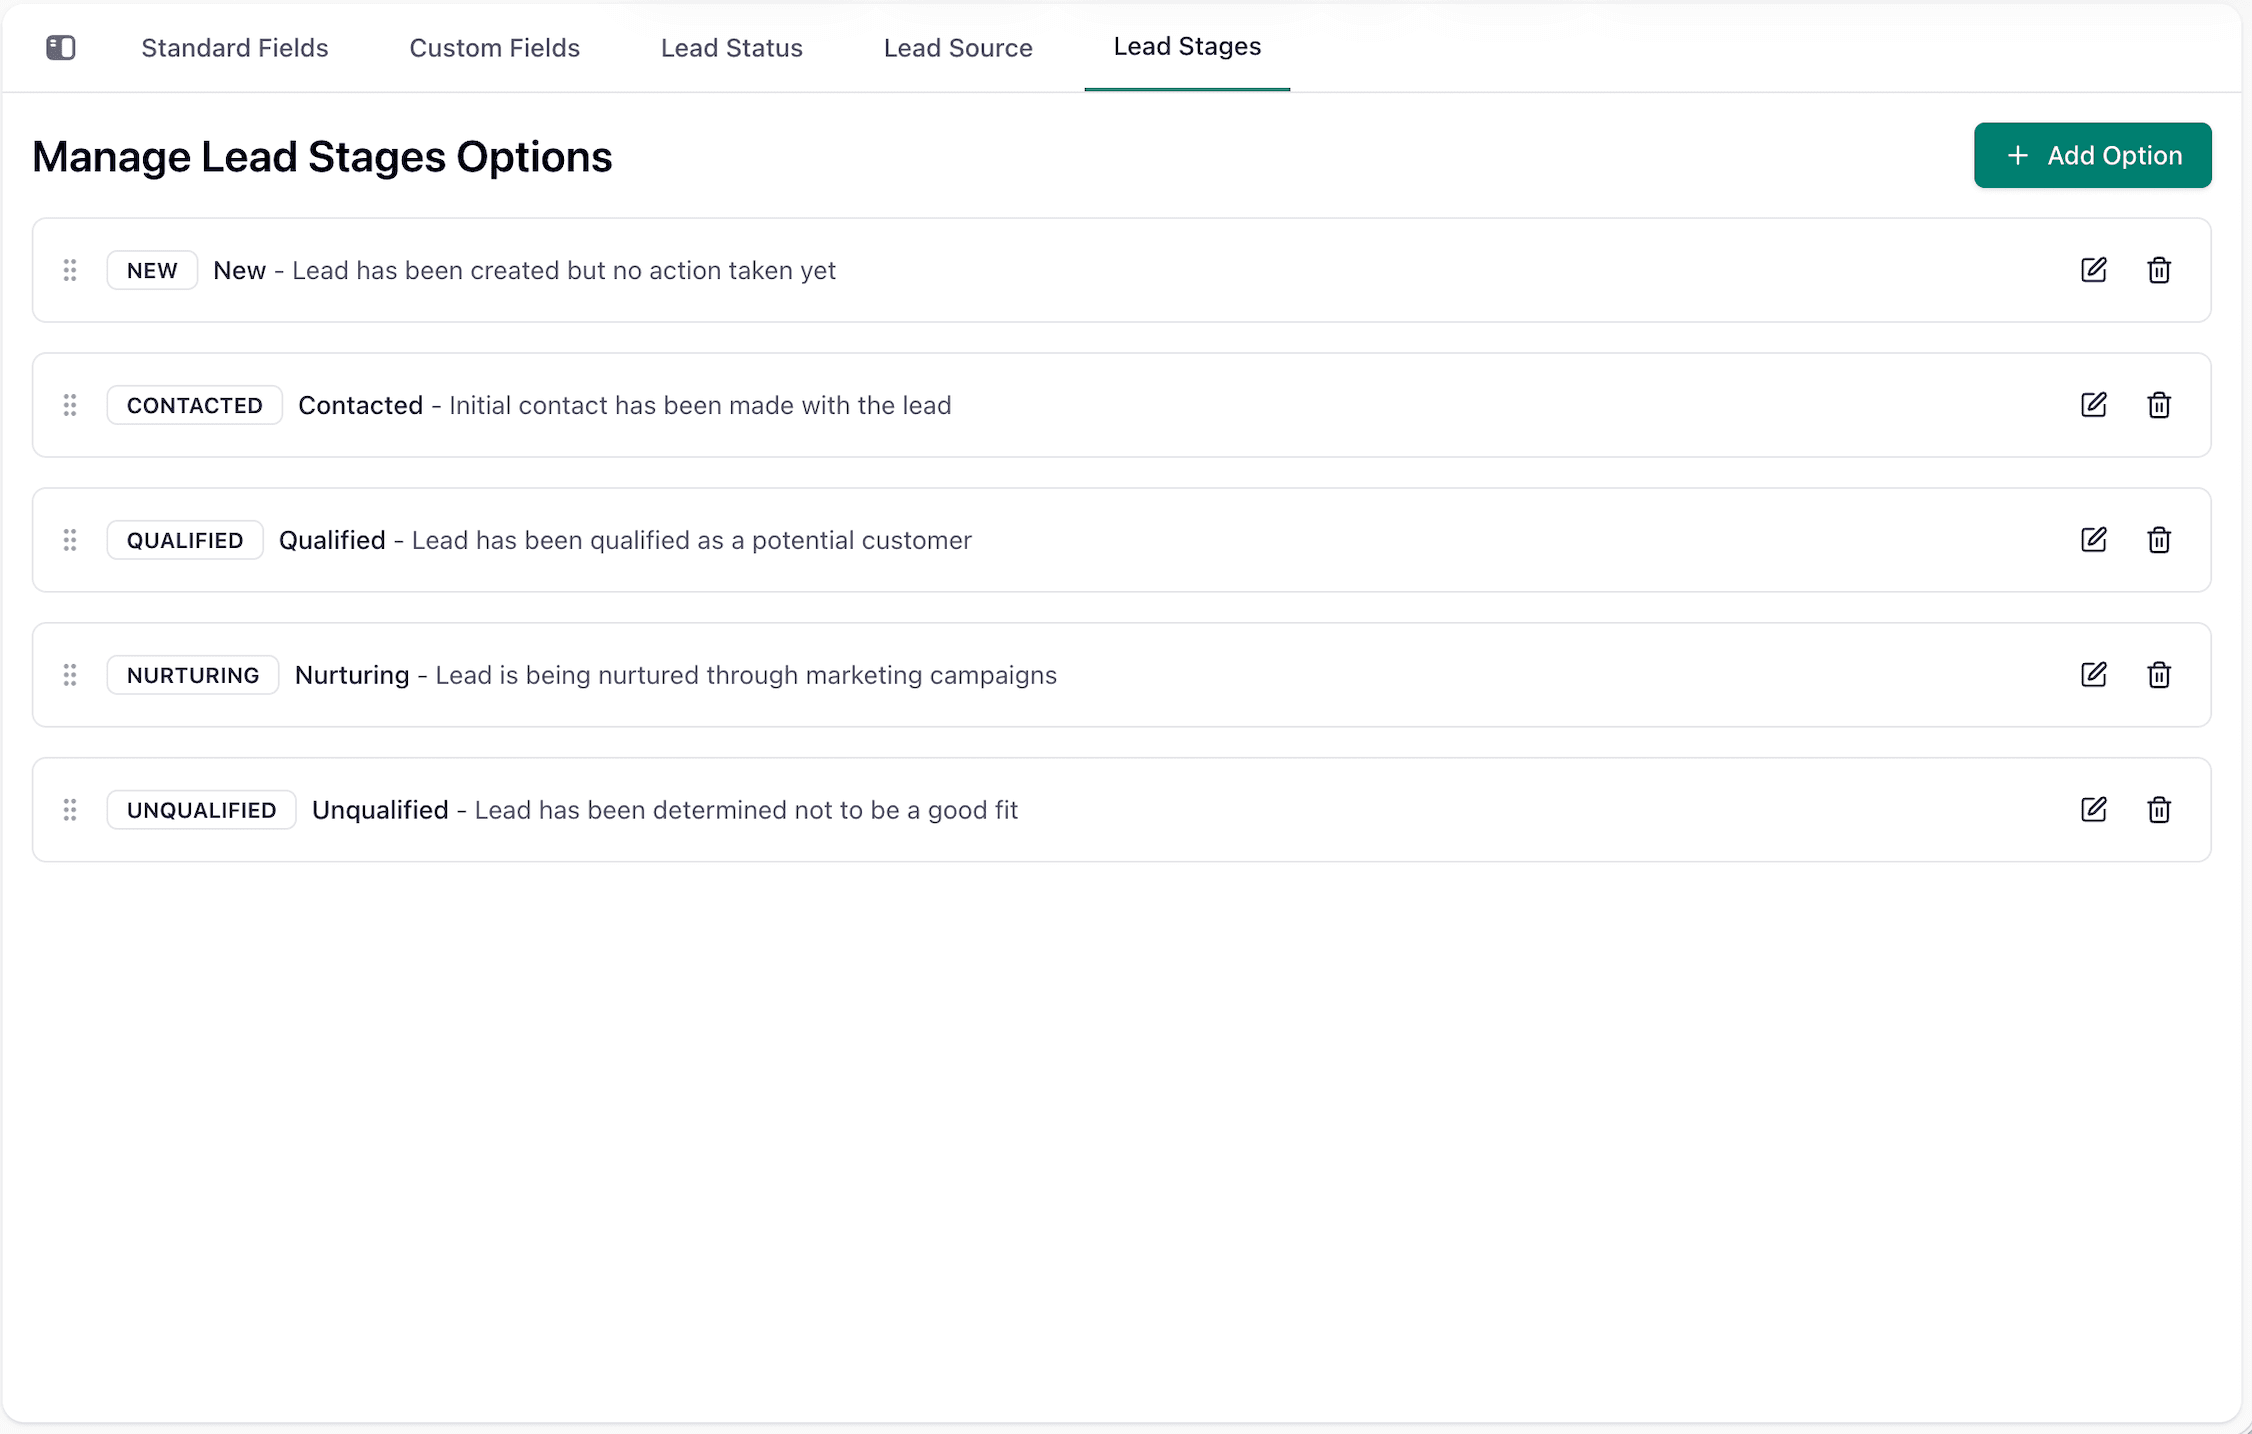 "Manage Lead Stages Options" page showing the five default stages with drag handles, edit icons, and delete icons. Highlight the "+ Add Option" button*
Default Stages:
- NEW - Lead has been created but no action taken yet
- CONTACTED - Initial contact has been made with the lead
- QUALIFIED - Lead has been qualified as a potential customer
- NURTURING - Lead is being nurtured through marketing campaigns
- UNQUALIFIED - Lead has been determined not to be a good fit
Customization Actions:
- Drag to Reorder - Use the drag handle (⋮⋮) to reorder stages
- Edit Stage - Click the pencil icon to modify stage name and description
- Delete Stage - Click the trash icon to remove unused stages
- Add New Stage - Click "+ Add Option" button to create custom stages
Example Custom Stages:
- "Proposal Sent"
- "Decision Pending"
- "Re-engage Later"
- "Partner Referral"
💡 Tip: Customize stages to match your actual sales process. This ensures your team follows consistent qualification steps and improves reporting accuracy.
Saving Customization Changes
After making changes to lead stages, fields, or sources:
- Review your changes
- Click Save or Update
- Changes apply immediately to all users
- Existing leads retain their current stage/data
Next Steps
Now that you understand leads, explore related features: